19th Zen Nihon Pro Tournament Game 4
Black: Tanigawa Koji, 9-dan
White: Moriuchi Toshiyuki, 8-dan
19th Zen Nihon Pro Tournament
Game 4
April 23rd 2001
1.P2g-2f     00:00:00  00:00:00
2.P3c-3d     00:00:00  00:00:00
3.P7g-7f     00:00:00  00:00:00
4.P4c-4d     00:00:00  00:00:00
5.P2f-2e     00:00:00  00:00:00
6.B2b-3c     00:00:00  00:00:00
7.S3i-4h     00:00:00  00:00:00
8.P9c-9d     00:00:00  00:00:00
9.G4i-5h     00:02:00  00:00:00
10.P9d-9e    00:02:00  00:00:00
11.K5i-6h    00:02:00  00:00:00
12.R8b-4b    00:02:00  00:00:00

For the first time Moriuchi plays Furibisha in this match. Both players have
now played Furibisha and the R8e Yokofudori two times. This seems the be the
common pattern in modern professional play. For Moriuchi this game must have
been hard, as it should never have been played. He should already have had the
Zen Nihon Pro title in the bag...

13.K6h-7h    00:02:00  00:00:00
14.S7a-7b    00:02:00  00:00:00
15.P5g-5f    00:02:00  00:00:00
16.G4a-5b    00:02:00  00:00:00
17.S4h-5g    00:07:00  00:00:00
18.S3a-3b    00:07:00  00:00:00
19.P3g-3f    00:07:00  00:00:00
20.K5a-6b    00:07:00  00:00:00
21.B8h-7g    00:07:00  00:00:00
22.P6c-6d    00:07:00  00:03:00
23.K7h-8h    00:08:00  00:03:00
24.P7c-7d    00:08:00  00:03:00
25.P6g-6f    00:16:00  00:03:00
26.N8a-7c    00:16:00  00:03:00
27.L9i-9h    00:26:00  00:03:00
28.K6b-7a    00:26:00  00:03:00
29.K8h-9i    00:26:00  00:03:00
30.G5b-6c    00:26:00  00:03:00
31.S7i-8h    00:26:00  00:03:00
32.K7a-8b    00:26:00  00:03:00
33.G6i-7i    00:26:00  00:03:00

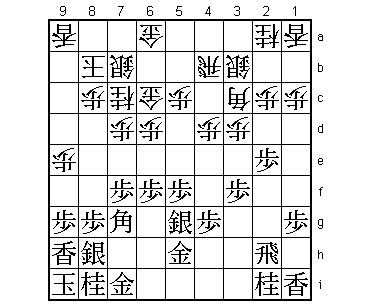
This position almost looks old-fashioned. In the past few years the Fujii
system was designed to make it hard for black to build an anaguma. This
opening system became so popular that one would almost forget that it is
possible to face the anaguma head on. This is what Suzuki Daisuke is doing
quite successfully lately. So much so that this is sometimes called
"Suzuki-style". Moriuchi gives it a try in this game and indeed, the anaguma
doesn't look that frightening here.

34.S3b-4c    00:26:00  00:04:00
35.P1g-1f    00:34:00  00:04:00
36.P8c-8d    00:34:00  00:04:00
37.G5h-6h    00:35:00  00:04:00
38.P4d-4e    00:35:00  00:11:00
39.G6h-7h    00:37:00  00:11:00
40.P5c-5d    00:37:00  00:11:00
41.B7g-5i    00:49:00  00:11:00
42.P1c-1d    00:49:00  00:11:00
43.B5i-2f    00:49:00  00:11:00
44.S7b-8c    00:49:00  00:29:00
45.R2h-3h    01:13:00  00:29:00
46.G6a-7b    01:13:00  00:40:00
47.P3f-3e    01:15:00  00:40:00
48.B3c-4d    01:15:00  00:40:00
49.P4g-4f    01:15:00  00:40:00
50.B4dx3e    01:15:00  00:48:00
51.B2fx3e    01:15:00  00:48:00
52.P3dx3e    01:15:00  00:48:00
53.P4fx4e    01:16:00  00:48:00
54.S4c-3d    01:16:00  00:58:00
55.B*4d      01:33:00  00:58:00

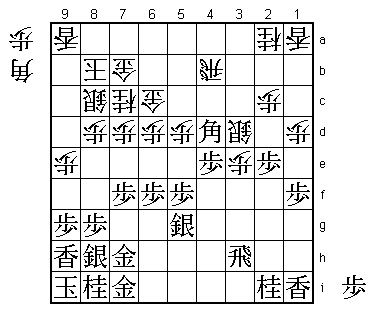
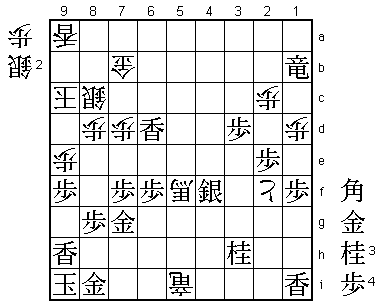
Black has attacked first, but without much effect. This bishop looks good, as
it is blocking the rook and attacking the lance at the same time, but using
the bishop here is not what black intended when he opened up the game.

56.L1a-1b?   01:33:00  01:30:00

Moriuchi had been playing quite quickly up until now. This is the first time
he is really taking his time. It seems that he spent the 32 minutes on the
difference between 56.L1b and 56.L1c. However, here 56.R1b was the right move.
After 57.P2d Px2d P*2c Sx2c Bx3e P*3c black has no good moves, so having
dropped the bishop is an important difference. Still, Moriuchi had a lot of
confidence in his position here.

57.B4d-1a+   01:37:00  01:30:00
58.P*4f      01:37:00  01:30:00
59.S5gx4f    01:42:00  01:30:00
60.B*4g      01:42:00  01:30:00
61.R3h-2h    01:42:00  01:30:00
62.B4gx5f+   01:42:00  01:36:00
63.R2h-2f    01:42:00  01:36:00
64.+B5f-4g   01:42:00  01:50:00
65.+B1ax2a   02:14:00  01:50:00
66.P3e-3f!   02:14:00  01:50:00

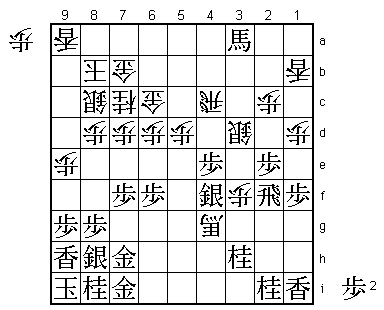
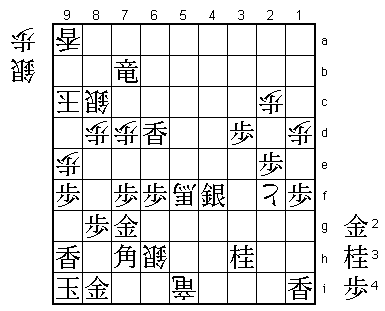
Black is a knight up, but this is a strong move. Black can't allow 68.+Bx4f.

67.+B2a-3a   02:14:00  01:50:00
68.R4b-4c?   02:14:00  02:00:00

Too confident. Moriuchi completely overlooked Tanigawa's next move. Had he
seen it, he would have played the correct 68.R6b. Then 69.P*3e S4c is good
for white. Moriuchi didn't think that black could stop the rook from
promoting, so it would be a waste to move the rook to 6b.

69.N*3h!     02:18:00  02:00:00

A wake-up call for white. 70.+Bx3h is answered by Rx3f with attack on silver
and bishop. From now on the game becomes a semeai and in such positions the
strength of the anaguma is an important advantage.

70.P3f-3g+   02:18:00  02:19:00
71.N2ix3g    02:18:00  02:19:00
72.P*3f      02:18:00  02:19:00
73.P*3e      02:20:00  02:19:00
74.P3fx3g+   02:20:00  02:19:00
75.P3ex3d    02:20:00  02:19:00
76.+P3g-3f   02:20:00  02:19:00
77.S*4d      02:22:00  02:19:00
78.R4cx4d    02:22:00  02:19:00
79.P4ex4d    02:22:00  02:19:00
80.+P3fx2f   02:22:00  02:19:00
81.P4d-4c+   02:22:00  02:19:00
82.N7c-8e    02:22:00  02:19:00
83.+P4c-5c   02:22:00  02:19:00
84.G6c-7c    02:22:00  02:19:00
85.+P5cx5d   02:29:00  02:19:00
86.R*5a      02:29:00  02:22:00

87.+B3ax6d?! 02:34:00  02:22:00

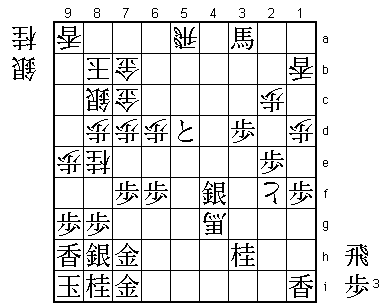
Tanigawa style. Maruyama would undoubtedly have played 87.+B5c followed by
P*5b and S5e, which is slow but gives white absolutely no hope of attack.
Tanigawa stays true to his character and looks for the fastest way to win.

88.G7cx6d    02:34:00  02:24:00
89.+P5dx6d   02:34:00  02:24:00
90.R5a-5i+   02:34:00  02:24:00
91.R*4b      02:34:00  02:24:00
92.K8b-9c    02:34:00  02:38:00
93.P9g-9f    02:41:00  02:38:00
94.B*3a      02:41:00  02:42:00

After 94.N*5b S5e (attack on the bishop) black wins quickly.

95.R4bx1b+   02:43:00  02:42:00

Here the professionals in the press room thought that black had a quick win
after 95.Rx7b+ 96.Sx7b 97.G*7c. If 98.Bx6d, then 99.G*9d leads to mate after
Kx9d Px9e and K9b is answered by Gx7b. However, when this sequence was played
in the post-mortem analysis, Moriuchi immediately played 98.N*9g!. Then
99.Gx7b Nx8i+ leads to mate and 99.Lx9g Nx9g+ Sx9g Bx6d Gx7b Px9f wins for
white! 95.Rx1b+ is the strongest move here.

96.B3ax6d    02:43:00  02:42:00
97.L*6e      02:43:00  02:42:00
98.N*7g      02:43:00  02:47:00

99.L6ex6d    02:43:00  02:47:00
100.N7gx8i+  02:43:00  02:56:00
101.G7ix8i   02:43:00  02:56:00
102.N*7g     02:43:00  02:57:00
103.S8hx7g   02:43:00  02:57:00
104.N8ex7g+  02:43:00  02:57:00
105.G7hx7g   02:43:00  02:57:00
106.+B4g-5f  02:43:00  02:57:00

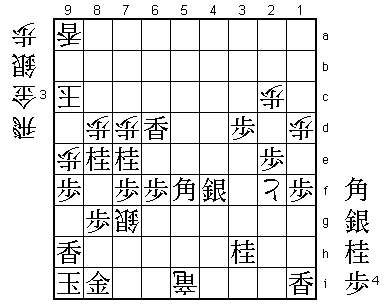
Here many thought that Tanigawa had given the game away. After both 107.N*7h
and 107.G*7h, white wins with 108.S*6h (difficult, but the white king can
escape up the board).

107.B*7h!    02:45:00  02:57:00

In combination with the next move this becomes an endgame that only Tanigawa
can play.

108.S*6h     02:45:00  02:57:00
109.+R1bx7b! 02:47:00  02:57:00

Still Tanigawa is the only one who has seen the win. The professionals in the
press room were very surprised by this. Even Moriuchi wasn't sure and had to
ask after the games if 109.Sx7g= was really mate. It is after the difficult
110.N*8e Px8e +Rx8c Kx8c N*7e Px7e Bx5f +Rx5f S*7b etc.

110.S8cx7b   02:47:00  02:59:00
111.B7hx5f   02:47:00  02:59:00
112.S6hx7g=  02:47:00  02:59:00
113.G*9d     02:50:00  02:59:00

One can only watch in awe. This long and difficult mate just works.

114.K9c-8b   02:50:00  02:59:00
115.G*8c     02:50:00  02:59:00
116.S7bx8c   02:50:00  02:59:00
117.G9dx8c   02:50:00  02:59:00
118.K8bx8c   02:50:00  02:59:00
119.N*7e     02:50:00  02:59:00
120.K8c-9c   02:50:00  02:59:00
121.N*8e!    02:50:00  02:59:00
Resigns      02:50:00  02:59:00

Beautiful. It's mate after 122.Px8e S*9d Kx9d B*7b or 122.K9d Px9e Kx8e S*9f
Kx7f B*4c etc. In the end even the silver on 4f (which Tanigawa saved with
the knight drop on 3h) helps to mate the king. This makes the match all
square at 2-2 and Tanigawa now seems the strong favorite to win the match.
