19th Zen Nihon Pro Tournament Game 3
Black: Moriuchi Toshiyuki, 8-dan
White: Tanigawa Koji, 9-dan
19th Zen Nihon Pro Tournament
Game 3
April 17th 2001
1.P7g-7f 00:00:00 00:00:00
2.P3c-3d 00:00:00 00:00:00
3.P2g-2f 00:00:00 00:00:00
4.P8c-8d 00:00:00 00:00:00
5.P2f-2e 00:00:00 00:00:00
6.P8d-8e 00:00:00 00:00:00
7.G6i-7h 00:00:00 00:00:00
8.G4a-3b 00:00:00 00:00:00
9.P2e-2d 00:00:00 00:00:00
10.P2cx2d 00:00:00 00:00:00
11.R2hx2d 00:00:00 00:00:00
12.P8e-8f 00:00:00 00:00:00
13.P8gx8f 00:00:00 00:00:00
14.R8bx8f 00:00:00 00:00:00
15.R2dx3d 00:00:00 00:00:00
16.B2b-3c 00:00:00 00:00:00
17.R3d-3f 00:00:00 00:00:00
18.S3a-2b 00:00:00 00:00:00
19.P*8g 00:00:00 00:00:00
20.R8f-8e 00:00:00 00:00:00
21.R3f-2f 00:00:00 00:00:00
22.K5a-4a 00:00:00 00:00:00
23.K5i-6h 00:00:00 00:00:00
24.S7a-6b 00:00:00 00:00:00
25.P3g-3f 00:00:00 00:00:00
26.G6a-5a 00:00:00 00:00:00
27.S3i-3h 00:00:00 00:00:00
28.P7c-7d 00:00:00 00:01:00
29.N2i-3g 00:00:00 00:01:00
30.N8a-7c 00:00:00 00:02:00
31.P4g-4f 00:00:00 00:02:00
32.R8e-5e 00:00:00 00:13:00
33.P4f-4e 00:11:00 00:13:00
34.R5e-5d 00:11:00 00:14:00
35.B8hx3c+ 00:11:00 00:14:00
36.N2ax3c 00:11:00 00:14:00
37.P6g-6f 00:11:00 00:14:00
38.P*2d 00:11:00 00:38:00
39.B*8b 00:24:00 00:38:00
40.N3c-2e 00:24:00 00:40:00
41.B8bx9a+ 00:25:00 00:40:00
42.P7d-7e 00:25:00 00:40:00
43.P4e-4d 00:40:00 00:40:00
44.P4cx4d 00:40:00 00:42:00
45.P*4b 00:53:00 00:42:00
46.K4a-5b 00:53:00 00:44:00
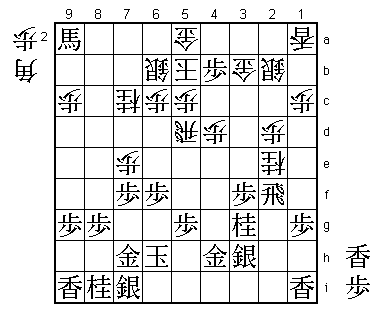
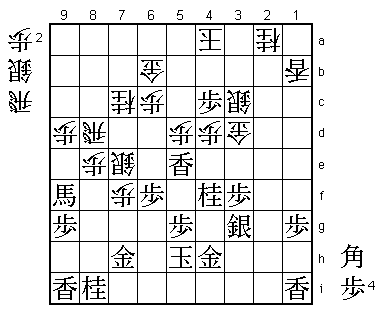
For the second time in a row the R8e Yokofudori. So far, this game is
following the semi-final game of this Zen Nihon Pro tournament between
Maruyama and Tanigawa. As Tanigawa now plays with white and he won the
game against Murayama with black, it was expected that Tanigawa would
be the one to play differently. However, ...
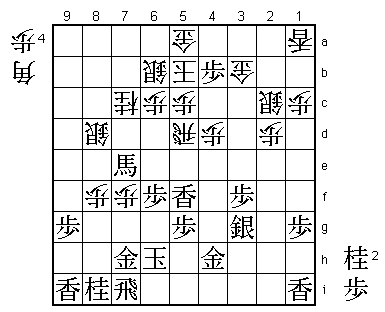
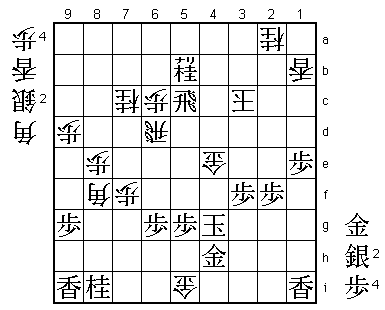
47.G4i-4h! 01:08:00 00:44:00
... it is Moriuchi who deviates first (in the Tanigawa-Maruyama game +B9b
was played). This is an interesting new plan. The R8e Yokofudori is known
for its quick attacks, but Moriuchi is opting for slowing down the game
by sacrificing a pawn to get his promoted bishop back in his own camp. If
he succeeds (like in the game), his material profit of a lance will be
very important.
48.P7ex7f 01:08:00 01:04:00
49.P*7d 01:16:00 01:04:00
50.R5dx7d 01:16:00 01:36:00
51.+B9a-9b 01:16:00 01:36:00
52.R7d-5d 01:16:00 01:36:00
53.R2f-2i 01:24:00 01:36:00
54.N2ex3g+ 01:24:00 01:44:00
55.S3hx3g 01:24:00 01:44:00
56.S2b-2c 01:24:00 01:44:00
57.P8g-8f 01:35:00 01:44:00
58.P*8e 01:35:00 01:59:00
59.+B9bx9c 01:56:00 01:59:00
60.P8ex8f 01:56:00 01:59:00
61.+B9c-7e 01:56:00 01:59:00
62.N*8g 01:56:00 02:00:00
63.L*5f 01:58:00 02:00:00
64.N8gx7i+ 01:58:00 02:17:00
65.R2ix7i 01:58:00 02:17:00
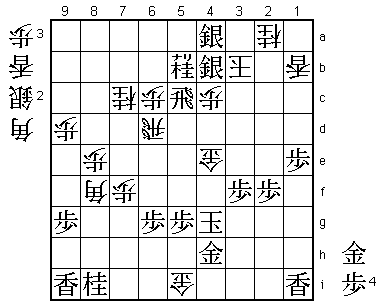
66.S*8d! 01:58:00 02:17:00
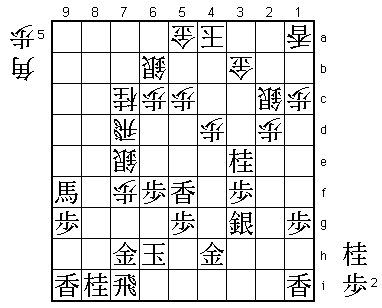
Black has managed to pull back his promoted bishop and white is no in
serious trouble. This is a good move to keep the fight going. White can't
afford to lose the rook and with this silver drop the rook gets into a
better position and the silver on 8d can also be used for attack. In the
press room 66.B*8d was analyzed, but after simply pulling back the promoted
bishop, white doesn't gain much.
67.P4b-4a+ 02:13:00 02:17:00
68.K5bx4a 02:13:00 02:21:00
69.+B7ex8f 02:14:00 02:21:00
70.R5d-7d 02:14:00 02:23:00
71.N*3e 02:23:00 02:23:00
72.S8d-7e 02:23:00 02:26:00
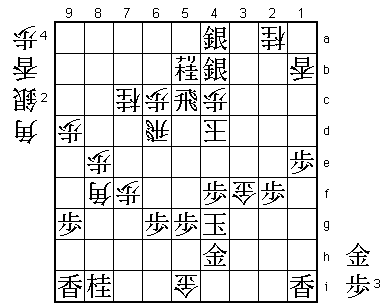
73.+B8f-9f? 02:28:00 02:26:00
A mistake that makes things more difficult for Moriuchi. Correct was
73.Nx2c+ Sx8f +Nx3b Kx3b S*3d G5b P*8g and black has a huge advantage.
After 73.+B9f "Things got a little more fun" [Tanigawa], "I couldn't
move the promoted bishop anymore" [Moriuchi]. However, even after
73.+B9f, black still has the advantage.

74.P*8e      02:28:00  02:26:00
75.N3ex2c+   02:28:00  02:26:00
76.G3bx2c    02:28:00  02:26:00
77.K6h-5h    02:30:00  02:26:00
78.G2c-3c    02:30:00  02:27:00
79.S*8c      02:39:00  02:27:00
80.R7d-8d    02:39:00  02:29:00
81.S8c-7b+   02:40:00  02:29:00
82.P*9d      02:40:00  02:29:00
83.R7i-2i    02:43:00  02:29:00
84.P5c-5d    02:43:00  02:32:00
85.P*2e      02:43:00  02:32:00
86.P5d-5e    02:43:00  02:32:00
87.P2ex2d    02:44:00  02:32:00
88.P*2b      02:44:00  02:32:00
89.L5fx5e    02:50:00  02:32:00
90.P*5d      02:50:00  02:32:00
91.P2d-2c+   02:54:00  02:32:00
92.P2bx2c    02:54:00  02:32:00
93.+S7bx6b   02:54:00  02:32:00
94.G5ax6b    02:54:00  02:32:00
95.S*3d!     02:54:00  02:32:00
This is a typical Moriuchi move. Giving up a full silver for a rook
promotion and some attack seems a little much and the professionals
in the pressroom were not convinced that this was a good move. Tanigawa
also said that he was surprised by it. However, Moriuchi has judged this
well. His attack is very difficult to stop and black is probably winning
from here.

96.G3cx3d    02:54:00  02:36:00
97.R2ix2c+   02:54:00  02:36:00
98.S*3c      02:54:00  02:36:00
99.P*4c      02:54:00  02:36:00
100.B*1b     02:54:00  02:37:00
101.+R2cx1c  02:55:00  02:37:00
102.N*2a     02:55:00  02:38:00
103.+R1cx1b  02:55:00  02:38:00
104.L1ax1b   02:55:00  02:38:00
105.N*4f!    02:55:00  02:38:00
This is the move that makes the silver sacrifice playable for black.
106.K4a-3b? 02:55:00 02:43:00
This should have been the losing move. White still has fighting chances
after 106.G4e Nx5d Gx5e Nx6b+ K3b and white gets an extra lance in hand
which is important for both attack and defense.
107.P4c-4b+ 02:56:00 02:43:00
108.K3bx4b 02:56:00 02:44:00
109.N4fx5d 02:56:00 02:44:00
110.K4b-3b 02:56:00 02:44:00
111.N5dx6b+ 02:56:00 02:44:00
112.P*5f 02:56:00 02:44:00
113.P*2d 02:56:00 02:44:00
114.G3dx2d 02:56:00 02:45:00
115.P*2e 02:56:00 02:45:00
116.G2dx2e 02:56:00 02:45:00
117.+N6b-5b 02:56:00 02:45:00
118.K3b-2c 02:56:00 02:52:00
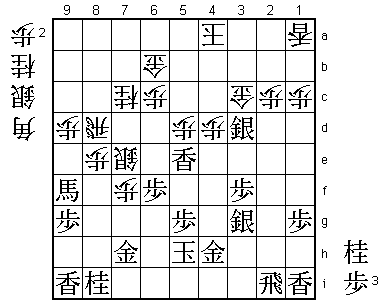
119.G7h-6h! 02:56:00 02:52:00

Another good move by Moriuchi. This move not only defends the weak head
of the king, but now black can also bring the idle promoted bishop on 9f
in play. Moving this bishop to 7h puts it directly in the diagonal of the
king. Black is now clearly winning.

120.S7ex6f   02:56:00  02:52:00
121.B*4c     02:56:00  02:52:00
122.R*2i     02:56:00  02:53:00
123.+B9f-7h  02:57:00  02:53:00
124.S6fx5e   02:57:00  02:53:00
125.G*4f     02:57:00  02:53:00
126.S5ex4f   02:57:00  02:55:00
127.+B7hx5f  02:57:00  02:55:00
128.S*3d     02:57:00  02:55:00
129.S3gx4f   02:57:00  02:55:00
130.L*6d     02:57:00  02:55:00
131.S*3b     02:58:00  02:55:00
132.K2c-1d   02:58:00  02:55:00
133.+B5fx2i  02:59:00  02:55:00
134.S3dx4c   02:59:00  02:55:00
135.S3bx4c+  02:59:00  02:55:00
136.L6dx6h+  02:59:00  02:55:00
137.K5hx6h   02:59:00  02:55:00
138.R8d-6d   02:59:00  02:55:00
139.P*6g     02:59:00  02:55:00
140.B*8f     02:59:00  02:57:00
141.K6h-5h   02:59:00  02:57:00
142.P4d-4e   02:59:00  02:57:00
143.+B2i-5f  02:59:00  02:57:00
144.G*5i     02:59:00  02:57:00
145.K5h-4g   02:59:00  02:57:00
146.P4ex4f   02:59:00  02:57:00
147.+B5fx4f  02:59:00  02:57:00
148.P*4e     02:59:00  02:57:00
149.+B4fx4e  02:59:00  02:57:00
150.G*3d     02:59:00  02:57:00
151.L*1f     02:59:00  02:57:00
152.P*1e     02:59:00  02:57:00
153.L1fx1e   02:59:00  02:57:00
154.G2ex1e   02:59:00  02:58:00
155.P1g-1f   02:59:00  02:58:00
156.G3dx4e   02:59:00  02:58:00
157.P1fx1e   02:59:00  02:58:00
158.K1d-2d   02:59:00  02:58:00
159.P*2e     02:59:00  02:58:00
160.K2dx2e   02:59:00  02:58:00
161.P*2f     02:59:00  02:58:00
162.K2e-3d   02:59:00  02:58:00
163.+S4cx3c  02:59:00  02:58:00
164.K3dx3c   02:59:00  02:58:00
165.R*5c?    02:59:00  02:58:00
In byoyomi Moriuchi misses his first chance to win. There is mate in this
position after 165.G*4c K3d (Kx4c R*5c K3d S*3e etc.) S*3e K4c R*4b K3c
S*2d Rx2d Sx2d Kx2d P*2e etc. However, even though 165.R*5c is not the
best move, it is still winning.

166.P*4c     02:59:00  02:58:00
167.S*4b?    02:59:00  02:58:00

Here black could have won with 167.G*2c. Still, he gets another chance...

168.K3c-3b   02:59:00  02:58:00
169.S*4a??   02:59:00  02:58:00
This is the real blunder as it gives away the game. 169.G*2c Kx2c Rx4c+
L*3c S*3b K2b S4b-3a= K1a +Rx4e picks up the gold and threatens mate at
the same time. In that position, white has nothing but to resign.

170.K3b-2b   02:59:00  02:58:00
171.S4b-3a=  02:59:00  02:58:00
172.K2b-3c   02:59:00  02:58:00
173.S3a-4b=  02:59:00  02:58:00
174.K3c-4d   02:59:00  02:58:00
175.P*4f     02:59:00  02:58:00
176.G4ex3f   02:59:00  02:58:00
Resigns      02:59:00  02:58:00
Mate after 177.Kx3f L*3e K2g B*3f etc. or 177.K3h S*2g K3i S*2h.
Poor Moriuchi. He played a great game that should have given him the Zen
Nihon Pro title with a whitewash over Tanigawa. Instead, the match is now
back to 2-1 and Tanigawa is still alive. Worse than the score will be the
psychological impact. Tanigawa will be delighted with the chance he has
been given, but for Moriuchi it will be hard to forget that this match
should have been over by now. Game 4 will show if Moriuchi has the mental
strength to forget what happened.