19th Zen Nihon Pro Tournament Game 1
Black: Moriuchi Toshiyuki, 8-dan
White: Tanigawa Koji, 9-dan
19th Zen Nihon Pro Tournament
Game 1
March 23rd 2001
1.P7g-7f     00:00:00  00:00:00
2.P3c-3d     00:00:00  00:00:00
3.P2g-2f     00:00:00  00:00:00
4.P4c-4d     00:00:00  00:01:00
5.P2f-2e     00:00:00  00:01:00
6.B2b-3c     00:00:00  00:01:00
7.S3i-4h     00:00:00  00:01:00
8.R8b-4b     00:00:00  00:02:00
9.K5i-6h     00:00:00  00:02:00
10.S3a-3b    00:00:00  00:02:00
11.K6h-7h    00:00:00  00:02:00
12.S7a-7b    00:00:00  00:02:00
13.P5g-5f    00:00:00  00:02:00
14.S3b-4c    00:00:00  00:04:00
15.G4i-5h    00:00:00  00:04:00
16.P9c-9d    00:00:00  00:04:00
17.P9g-9f    00:00:00  00:04:00
18.K5a-6b    00:00:00  00:04:00
19.S4h-5g    00:00:00  00:04:00
20.P6c-6d    00:00:00  00:06:00
21.P3g-3f    00:00:00  00:06:00
22.K6b-7a    00:00:00  00:06:00
23.B8h-5e    00:00:00  00:06:00

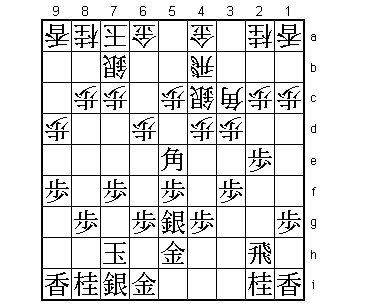
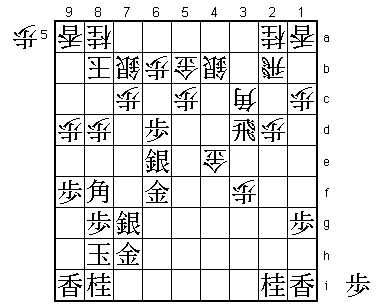
This is one of the recent counter strategies against the Fujii system.
Black just threatens to take the pawn and if white defends with S6c,
it becomes quite hard to make a strong castle.

24.P6d-6e    00:00:00  00:19:00

Positive play, but the second idea of B5e is to pull back the bishop to
3g and put pressure on the white mino castle from there. This game is a
good example of this strategy.

25.S7i-8h    00:00:00  00:19:00
26.G4a-5b    00:00:00  00:20:00
27.S8h-7g    00:02:00  00:20:00
28.K7a-8b    00:02:00  00:36:00
29.B5e-3g    00:21:00  00:36:00
30.P4d-4e    00:21:00  00:44:00
31.K7h-8h    00:26:00  00:44:00
32.S4c-4d    00:26:00  00:57:00
33.G6i-7h    00:31:00  00:57:00
34.P3d-3e    00:31:00  01:08:00
35.P6g-6f    00:37:00  01:08:00
36.P3ex3f    00:37:00  01:28:00
37.B3g-2f    00:37:00  01:28:00
38.P6ex6f    00:37:00  01:29:00
39.S5gx6f    00:38:00  01:29:00
40.R4b-3b    00:38:00  01:29:00
41.P2e-2d    00:48:00  01:29:00
42.P2cx2d    00:48:00  01:30:00
43.G5h-6g    00:48:00  01:30:00
44.G5b-4c    00:48:00  01:39:00
45.P7f-7e    00:50:00  01:39:00
46.B3c-5a    00:50:00  01:40:00
47.P*6d      01:01:00  01:40:00
48.P4e-4f!   01:01:00  01:44:00

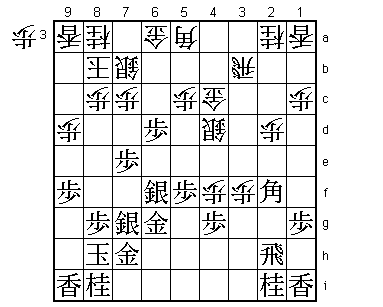
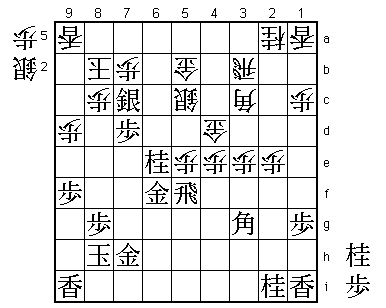
Tanigawa is in trouble, but this is a good move. If white plays the
simple 48.S3e instead, he gets into serious trouble after 49.B5i R3d
S6e P*6c Px6c+ Sx6c P*2b N3c P2a+ P*6d S6e-7f and black has a big
advantage.

49.P4gx4f    01:18:00  01:44:00
50.S4d-3e    01:18:00  01:45:00
51.B2f-5i    01:18:00  01:45:00
52.S3ex4f    01:18:00  01:45:00
53.R2h-2g    01:26:00  01:45:00
54.G4c-5d    01:26:00  01:52:00
55.P6d-6c+   01:51:00  01:52:00
56.S7bx6c    01:51:00  01:52:00
57.P5f-5e    01:51:00  01:52:00
58.G5d-4e    01:51:00  01:58:00
59.B5i-6h    02:02:00  01:58:00
60.R3b-2b    02:02:00  02:13:00
61.P7e-7d    02:19:00  02:13:00
62.P7cx7d    02:19:00  02:16:00
63.S7g-7f    02:21:00  02:16:00
64.P*6d      02:21:00  02:16:00
65.B6h-8f    02:25:00  02:16:00
66.B5a-3c    02:25:00  02:17:00
67.P*6e      02:28:00  02:17:00
68.P6dx6e    02:28:00  02:23:00
69.S7fx6e    02:28:00  02:23:00
70.S4fx5e    02:28:00  02:24:00
71.P*6d!     02:33:00  02:24:00

Perfect timing. 72.S7b S7g doesn't give white any hope, so...

72.S5ex6f    02:33:00  02:29:00
73.G6gx6f    02:34:00  02:29:00
74.S6c-7b    02:34:00  02:31:00

No choice. 74.Bx6f S*7g followed by Px6c+ wins for black.

75.S*7g?!    02:36:00  02:31:00

A little too heavy. Better would have been 75.B7g S*7c S*3d Bx6f Bx6f
G*5e B7g and black has the advantage.

76.G6a-5b    02:36:00  02:35:00
77.S6ex7d    02:36:00  02:35:00
78.P*6b      02:36:00  02:35:00
79.P*5d      02:37:00  02:35:00
80.S*4b      02:37:00  02:42:00
81.R2g-5g    02:43:00  02:42:00
82.P5cx5d    02:43:00  02:44:00
83.R5gx5d    02:43:00  02:44:00
84.P*5c      02:43:00  02:44:00
85.R5d-3d    02:45:00  02:44:00
86.P*7c      02:45:00  02:48:00
87.S7d-6e    02:45:00  02:48:00
88.P8c-8d?   02:45:00  02:48:00

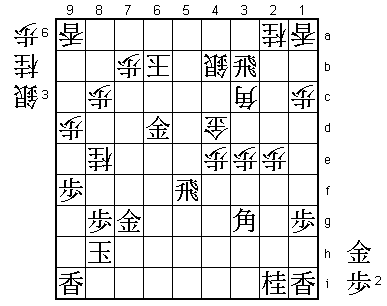
Tanigawa misses his chance to make a close fight of it. Here 88.Bx6f! Sx6f
S3c would have made the position very unclear after Rx3c+ Nx3c P*3d N2e
P3c+ R1b B*3d R*4h and black's king position is quite weak.

89.P6d-6c+   02:49:00  02:48:00
90.P6bx6c    02:49:00  02:48:00
91.R3dx8d    02:49:00  02:48:00
92.P*8c      02:49:00  02:50:00
93.R8d-3d    02:49:00  02:50:00
94.G4e-4d    02:49:00  02:51:00
95.R3dx3f    02:49:00  02:51:00
96.P*3e      02:49:00  02:51:00
97.R3f-4f    02:49:00  02:51:00
98.P*4e      02:49:00  02:52:00
99.R4f-5f    02:49:00  02:52:00
100.P2d-2e   02:49:00  02:52:00
101.P*3b     02:50:00  02:52:00
102.R2bx3b   02:50:00  02:52:00
103.P*6d     02:51:00  02:52:00
104.P6cx6d   02:51:00  02:54:00
105.B8fx6d   02:51:00  02:54:00
106.P5c-5d   02:51:00  02:55:00
107.P*7d     02:54:00  02:55:00
108.S4b-5c   02:54:00  02:55:00
109.P7dx7c+  02:54:00  02:55:00
110.S7bx7c   02:54:00  02:55:00
111.B6d-3g   02:54:00  02:55:00
112.P*7f     02:54:00  02:55:00
113.P*7d     02:54:00  02:55:00

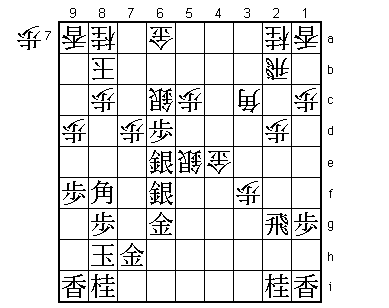
The pressure on the long diagonal is clear. Black sacrifices material on 7g,
but is certain to win it back immediately, while destroying white's king
position at the same time.

114.P7fx7g+  02:54:00  02:55:00
115.N8ix7g   02:54:00  02:55:00
116.P5d-5e   02:54:00  02:55:00
117.P7dx7c+  02:54:00  02:55:00
118.N8ax7c   02:54:00  02:55:00
119.P*7d     02:54:00  02:55:00
120.N7cx6e   02:54:00  02:55:00
121.N7gx6e   02:54:00  02:55:00
122.P*7b     02:54:00  02:55:00
123.S*7c?!   02:55:00  02:55:00

Better was 123.S*4a and black wins quickly. The final result of the game
doesn't change with this move, but now Moriuchi has to find one more good
move to win.

124.K8b-7a   02:55:00  02:55:00
125.N6ex5c+  02:55:00  02:55:00
126.G5bx5c   02:55:00  02:55:00
127.N*6e     02:56:00  02:55:00
128.G5c-6c   02:56:00  02:55:00
129.P*6d     02:57:00  02:55:00
130.G6cx7d   02:57:00  02:55:00
131.P6d-6c+  02:57:00  02:55:00
132.P7bx7c   02:57:00  02:55:00
133.N6ex7c+  02:57:00  02:55:00
134.G7dx7c   02:57:00  02:55:00
135.+P6cx7c  02:57:00  02:55:00
136.P*7g     02:57:00  02:55:00
137.G7hx7g   02:57:00  02:55:00
138.P*7b     02:57:00  02:55:00
139.S*6b     02:57:00  02:55:00
140.R3bx6b   02:57:00  02:55:00
141.+P7cx6b  02:57:00  02:55:00
142.K7ax6b   02:57:00  02:55:00
143.R*3b     02:57:00  02:55:00
144.S*4b     02:57:00  02:55:00
145.G6fx5e   02:57:00  02:55:00
146.N*8e     02:57:00  02:55:00
147.P*6c     02:59:00  02:55:00
148.K6b-7a   02:59:00  02:55:00
149.P6c-6b+  02:59:00  02:55:00
150.K7ax6b   02:59:00  02:55:00
151.G5e-6d!  02:59:00  02:55:00

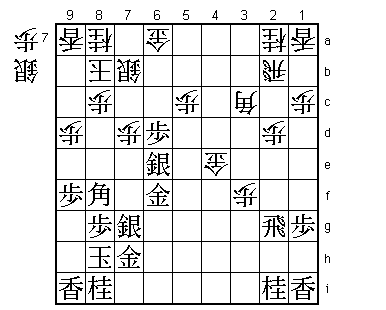
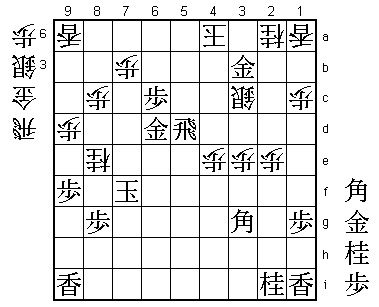
Moriuchi has sacrificed a pawn to get some extra time to calculate the
strength of this move. Tanigawa still had some hopes to turn the tables
here, but after this move these hopes disappear. Rx4b+ next is a mating
threat and Moriuchi has calculated correctly that the next variation is
not as dangerous as it looks.

152.N8ex7g+  02:59:00  02:58:00
153.K8hx7g   02:59:00  02:58:00
154.G4d-5d   02:59:00  02:58:00
155.R3bx3c+  02:59:00  02:58:00
156.N*8e     02:59:00  02:58:00
157.K7g-7f   02:59:00  02:58:00
158.S4bx3c   02:59:00  02:59:00
159.P*6c     02:59:00  02:59:00
160.K6b-5a   02:59:00  02:59:00
161.R5fx5d   02:59:00  02:59:00
162.K5a-4a   02:59:00  02:59:00
163.G*3b     02:59:00  02:59:00
Resigns      02:59:00  02:59:00

And mate after 164.Kx3b R5b+ K2c B*3b K2d G*1e K3d +R4c. A good win for
Moriuchi who needed this to build his confidence. He was 5-15 against
Tanigawa in their last twenty games, so this win makes this match a lot
more interesting.
