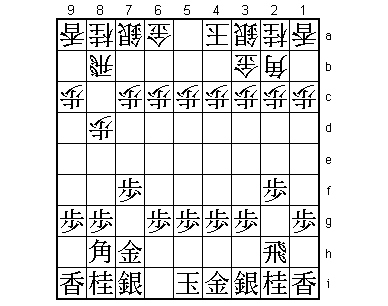
19th Ryu-O Match Game 7
[Black "Watanabe Akira, Ryu-O"]
[White "Sato Yasumitsu, Challenger"]
[Event "19th Ryu-O sen, Game 7, December 20th and 21st 2006"]
1.P7g-7f     00:01:00  00:00:00

The furigoma for this final game gave Ryu-O Watanabe the black pieces.
After the game he admitted that he was quite happy with that, as he wanted
to control the pace of the game.

2.G4a-3b     00:01:00  00:03:00

Even though Sato played the same move in the sixth game, Watanabe was
completely surprised. He never expected Sato to play this again as he
considered it a curveball to break Watanabe's rhythm in game 6.

3.G6i-7h     00:12:00  00:03:00

No Furibisha this time. When asked after the game how he had handled
the loss of the sixth game, Watanabe answered that it had no impact at
all, as he was losing a game with an opening he was unfamiliar with.
Before the final game, he had decided that he would aim for Yagura and
that is how this game is going to develop.

4.K5a-4a     00:12:00  00:03:00
5.P2g-2f     00:20:00  00:03:00
6.P8c-8d     00:20:00  00:05:00
Sato shows the second point of 2.G3b. Even if black ignores the invitation
to play Furibisha and goes for a Yagura opening, having played G7h and P2f
early means that many of the opening strategies that are considered good
for black are no longer possible. Black can no longer play a strategy where
the pawn is on 2g, and if black keeps this option open and doesn't play
5.P2f, white will not play 6.P8d, which is also better for white than a
position with the pawns on 2g and 8d. It is all rather subtle, but because
of 2.G3b, black has been forced to constrain his opening patterns.
7.S7i-6h 00:24:00 00:05:00
8.P3c-3d 00:24:00 00:05:00
9.P6g-6f 00:24:00 00:05:00
10.S3a-4b 00:24:00 00:25:00
11.P5g-5f 00:24:00 00:25:00
12.P5c-5d 00:24:00 00:25:00
13.S3i-4h 00:25:00 00:25:00
14.S7a-6b 00:25:00 00:25:00
15.G4i-5h 00:25:00 00:25:00
16.G6a-5b 00:25:00 00:25:00
17.K5i-6i 00:25:00 00:25:00
18.S4b-3c 00:25:00 00:25:00
19.S6h-7g 00:26:00 00:25:00
20.B2b-3a 00:26:00 00:25:00
21.B8h-7i 00:26:00 00:25:00
22.P4c-4d 00:26:00 00:25:00
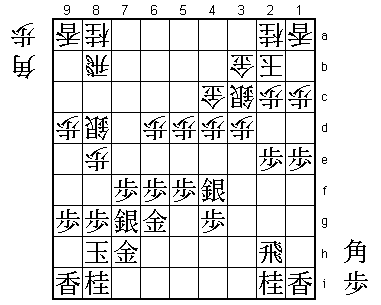
23.P3g-3f 00:28:00 00:25:00
24.P7c-7d 00:28:00 00:38:00
25.G5h-6g 00:29:00 00:38:00
26.G5b-4c 00:29:00 00:39:00
27.S4h-3g 00:40:00 00:39:00
28.P8d-8e 00:40:00 01:09:00
29.P1g-1f 00:52:00 01:09:00
30.P9c-9d 00:52:00 01:35:00
31.P1f-1e 01:42:00 01:35:00
32.P7d-7e 01:42:00 01:45:00
33.P7fx7e 01:45:00 01:45:00
34.B3ax7e 01:45:00 01:45:00
35.P3f-3e 01:46:00 01:45:00
36.P3dx3e 01:46:00 02:57:00
37.B7ix3e 01:46:00 02:57:00
38.S6b-7c 01:46:00 02:57:00
39.K6i-7i 01:49:00 02:57:00
40.K4a-3a 01:49:00 02:57:00
41.P*7f 01:50:00 02:57:00
42.B7e-6d 01:50:00 02:57:00
43.B3e-4f 01:50:00 02:57:00
44.K3a-2b 01:50:00 02:57:00
45.K7i-8h 01:51:00 02:57:00
46.P*3d 01:51:00 02:59:00
47.P2f-2e 01:52:00 02:59:00
48.S7c-8d 01:52:00 03:02:00
49.B4fx6d 02:47:00 03:02:00
50.P6cx6d 02:47:00 03:02:00
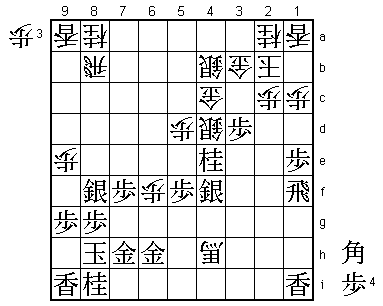
51.S3g-4f 02:54:00 03:02:00
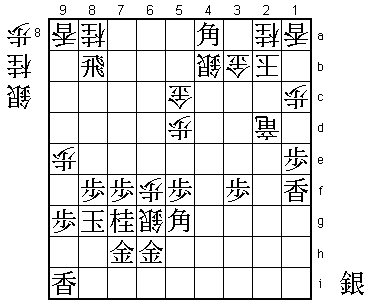
52.S8d-7c? 02:54:00 04:06:00
Tough for Sato, but this innocent looking move, aiming for the perfect
shape of S7d next, might be the move that gives Watanabe the game and the
Ryu-O title. Correct was 52.P8f Sx8f N7c and white can bring the knight on
8a into play. For example, B*7d (B*4a fails to P6e S5g P5e Px5e P*5b and
the bishop dies) P6e S5g Px6f Sx6f P*6e S5g S8e seems to be good for white.
53.S4f-5g! 03:29:00 04:06:00
Sato probably overlooked this silver pullback.
54.P9d-9e 03:29:00 04:17:00
55.P4g-4f 03:35:00 04:17:00
56.S7c-6b 03:35:00 04:26:00
57.P4f-4e 03:49:00 04:26:00
58.P4dx4e 03:49:00 04:42:00
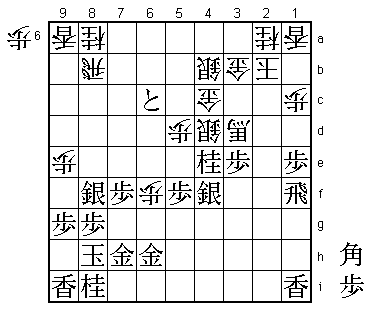
59.N2i-3g 03:57:00 04:42:00
60.B*3f 03:57:00 04:53:00
61.R2h-2f 04:31:00 04:53:00
62.B3f-4g+ 04:31:00 05:07:00
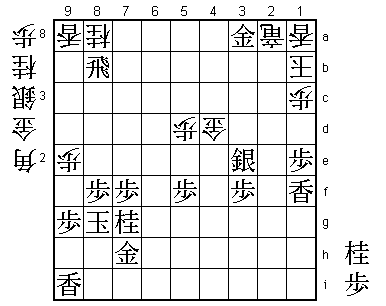
63.N3gx4e 04:31:00 05:07:00
The difference between the knight on 8a and the knight on 4e is huge.
Even though white has promoted the bishop, the difference in attacking
strength is already decisive.
64.S3c-4d 04:31:00 05:23:00
65.S5g-4f 04:39:00 05:23:00
66.+B4g-4h 04:39:00 05:35:00
67.R2f-1f 04:46:00 05:35:00
68.+B4h-4i 04:46:00 05:47:00
69.R1f-1g 04:51:00 05:47:00
70.+B4i-3i 04:51:00 05:48:00
71.P2e-2d 05:07:00 05:48:00
72.P2cx2d 05:07:00 05:52:00
73.R1g-2g 05:07:00 05:52:00
74.S6b-5a 05:07:00 05:57:00
75.P*3e 05:12:00 05:57:00
76.P8e-8f 05:12:00 06:05:00
77.S7gx8f 05:13:00 06:05:00
78.+B3i-3h 05:13:00 06:06:00
79.R2g-2f 05:16:00 06:06:00
80.+B3h-4h 05:16:00 06:13:00
81.R2f-2g 05:23:00 06:13:00
82.+B4h-5h 05:23:00 06:21:00
It looks like white could aim for sennichite here after +B4h-3h R2f +B4h
R2g etc., but Sato knows that Watanabe will change the moves at some point
because his position is better, so he plays it differently.
83.R2gx2d 05:24:00 06:21:00
84.P*2c 05:24:00 06:21:00
85.R2d-2f 05:24:00 06:21:00
86.+B5h-4h 05:24:00 06:46:00
87.R2f-1f 05:25:00 06:46:00
88.P6d-6e 05:25:00 06:46:00
89.P3ex3d 05:32:00 06:46:00
90.P6ex6f 05:32:00 06:46:00
91.G6g-6h 05:32:00 06:46:00
92.S5a-4b 05:32:00 06:47:00
The white position seems to be defended reasonably well, but there is still
an important weak point.

93.P*2d      05:39:00  06:47:00
94.P2cx2d    05:39:00  06:47:00
95.P*2e      05:39:00  06:47:00
96.+B4h-4g   05:39:00  07:00:00
97.P2ex2d    05:46:00  07:00:00
98.+B4g-2e   05:46:00  07:00:00

White pulls back the promoted bishop to relieve the pressure on the head of
the king, but is hit on the other side.

99.P*6d!     06:00:00  07:00:00

Outstanding whole board vision. White cannot play P*6b, so this move is very
hard to defend against. Of course, white could sacrifice the pawn on 6f and
then play P*6b, but that would give up the only way to start a counterattack.

100.+B2ex2d  06:00:00  07:05:00
101.P6d-6c+  06:00:00  07:05:00
102.+B2dx3d  06:00:00  07:05:00

Again it seems that white can hold the position together...

103.P*3e!    06:13:00  07:05:00
Again a good move by Watanabe.

104.+B3dx1f  06:13:00  07:38:00

Sato decides to put all his eggs in one basket. The game would last longer
after 104.+B2c, but even then white cannot take the knight on 4e, because Sx4e
is met with P*2d. With the knight on 4e, a move like B*6d would be too devastating.
Instead of being crushed in defense, Sato decides to play a desperate attack.

105.L1ix1f   06:13:00  07:38:00
106.R8bx8f   06:13:00  07:38:00
107.P8gx8f   06:13:00  07:38:00
108.P*8g     06:13:00  07:38:00
109.K8hx8g   06:15:00  07:38:00
110.R*4g     06:15:00  07:38:00
111.N8i-7g   06:27:00  07:38:00
112.R4gx4f+  06:27:00  07:40:00
113.B*4a     06:29:00  07:40:00
114.+R4fx3e  06:29:00  07:40:00
115.+P6c-5c  06:34:00  07:40:00
116.S4dx5c   06:34:00  07:40:00
117.N4ex5c+  06:34:00  07:40:00
118.G4cx5c   06:34:00  07:49:00
119.P*3f     06:40:00  07:49:00
120.+R3e-3c  06:40:00  07:56:00
121.R*8b     06:43:00  07:56:00
122.S*6g     06:43:00  07:56:00
123.P*2d     06:54:00  07:56:00
124.+R3cx2d  06:54:00  07:56:00

Again, white seems to have pulled his position together, as this promoted
rook works well in defense. Even Sato thought that there might be a glimmer
of hope here.

125.B*5g!    06:54:00  07:56:00
This move ends Sato's hopes, because this bishop is going to work in defense
by removing the attacking base on 6f and also will play a deciding role in
the attack. Watanabe's defense of his Ryu-O title will be remembered by two
great bishop drops: B*7i in the third game that turned around the match and
this B*5g which sealed it.

126.S6gx7h=  06:54:00  07:56:00
127.G6hx7h   06:54:00  07:56:00
128.+R2d-2i  06:54:00  07:56:00
129.B5gx6f   06:54:00  07:56:00
130.P*4d     06:54:00  07:56:00
131.P*2d     06:58:00  07:56:00
132.+R2ix2d  06:58:00  07:56:00
133.S*3e     06:58:00  07:56:00
134.+R2d-2i  06:58:00  07:56:00
135.B6fx4d   07:10:00  07:56:00
136.G5cx4d   07:10:00  07:56:00
137.B4ax3b+  07:10:00  07:56:00
138.K2bx3b   07:10:00  07:56:00
139.S*4a     07:10:00  07:56:00
140.K3bx4a   07:10:00  07:57:00
141.G*5b     07:10:00  07:57:00
142.K4a-3b   07:10:00  07:57:00
143.G5bx4b   07:10:00  07:57:00
144.K3b-2c   07:10:00  07:57:00
145.S*3b     07:11:00  07:57:00
146.K2c-1b   07:11:00  07:57:00
147.S3bx2a=  07:11:00  07:57:00
148.+R2ix2a  07:11:00  07:57:00
149.G4b-3a   07:11:00  07:57:00
Resigns      07:11:00  07:59:00
Sato took his final two minutes to come to terms with another failed attempt
to add a title to his Kisei crown. 149.+R2b N*2d K2c Rx2b+ Kx2b G3b is mate
and even though 149.G*2b is not tsume, white has no attack or defense after
150.Gx2a. A great match has come to an end with the status quo intact again.
The Ryu-O title is considered to be very difficult to defend, but Watanabe
wins his third straight Ryu-O title, which has thus far only be done by Fujii.
Because Watanabe is only 22 years old, it seems that he will only get stronger
and has a good chance of hanging on to his title for a while. Beating Sato,
against whom he had an awful record going into this match, will give him even
more confidence.