19th Ryu-O Match Game 6
[Black "Watanabe Akira, Ryu-O"]
[White "Sato Yasumitsu, Challenger"]
[Event "19th Ryu-O sen, Game 6"]
[Date "December 13th and 14th 2006"]
1.P7g-7f     00:01:00  00:00:00
2.G4a-3b     00:01:00  00:03:00

Sato doesn't waste time for a small psychological jab in a game that
he must win. Having the gold on 3b is considered a disadvantage for
the static rook side if black plays ranging rook. Sato is daring Watanabe
to play Furibisha, a strategy he is not so familiar with.

3.P5g-5f     00:22:00  00:03:00
4.P3c-3d     00:22:00  00:07:00
5.P5f-5e     00:22:00  00:07:00
6.S7a-6b     00:22:00  00:09:00
7.R2h-5h     00:22:00  00:09:00

If the match was on the line, Watanabe most likely would have shied away
from calling Sato's bluff, but with a game to spare he decides to bite and
play the Nakabisha opening.

8.S3a-4b     00:22:00  00:10:00
9.G4i-3h     00:29:00  00:10:00

This is a new move by Watanabe. Sato also played this in the 5th game of
the Osho match against Habu. There it followed 9.K4h P5d!? Px5d Bx8h+ Sx8h
B*4e G7h Bx2g+ and the position became really wild early on. Sato won a
close game, but the main reason for Watanabe's new move is probably that
he doesn't like wild, open positions (the gold defends against the promotion
of the bishop on 2g). Watanabe likes to fight in positions were he knows his
king is as safe as possible. He gets what he wants initially.

10.K5a-4a    00:29:00  01:07:00
11.K5i-4i    00:29:00  01:07:00
12.G6a-5b    00:29:00  01:09:00
13.S3i-4h    00:30:00  01:09:00
14.P6c-6d    00:30:00  01:24:00
15.K4i-3i    00:31:00  01:24:00
16.S6b-6c    00:31:00  01:24:00
17.K3i-2h    00:37:00  01:24:00
18.P8c-8d    00:37:00  02:03:00
19.P4g-4f    01:37:00  02:03:00
20.P8d-8e    01:37:00  02:30:00
21.B8h-7g    01:38:00  02:30:00
22.P7c-7d    01:38:00  02:36:00
23.S7i-6h    02:04:00  02:36:00
24.N8a-7c    02:04:00  02:40:00
25.P6g-6f    02:07:00  02:40:00
26.K4a-3a    02:07:00  02:45:00
27.S6h-6g    02:07:00  02:45:00
28.P4c-4d    02:07:00  02:46:00
29.S6g-5f    02:08:00  02:46:00
30.B2b-3c    02:08:00  02:46:00
31.S4h-4g    02:15:00  02:46:00
32.K3a-2b    02:15:00  02:52:00
33.G6i-5i    02:16:00  02:52:00
34.L1a-1b    02:16:00  03:03:00

After the game, Watanabe said he didn't expect Sato to play Anaguma here
and was kind of worried about the difference in king position.

35.G5i-4h    02:17:00  03:03:00
36.K2b-1a    02:17:00  03:03:00
37.L1i-1h    02:18:00  03:03:00

Hard to call this a bad move, but Watanabe said after the game that it
would have been better to first build a Yagura position with P3f-S3g
before moving into the Anaguma.

38.S4b-3a    02:18:00  03:16:00
39.K2h-1i    02:18:00  03:16:00
40.S3a-2b    02:18:00  03:21:00
41.G3h-2h    02:18:00  03:21:00
42.P9c-9d    02:18:00  03:24:00
43.G4h-3h    02:19:00  03:24:00
44.G5b-4b    02:19:00  03:25:00
45.S4g-3f    02:25:00  03:25:00
46.S6c-5b    02:25:00  03:26:00
47.R5h-7h    02:34:00  03:26:00
48.R8b-8d    02:34:00  04:03:00
49.B7g-5i    02:57:00  04:03:00

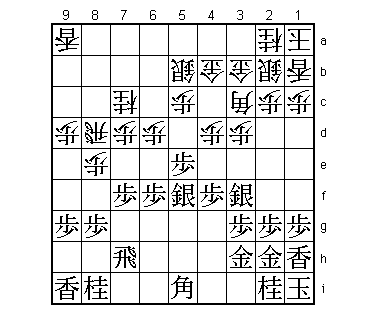
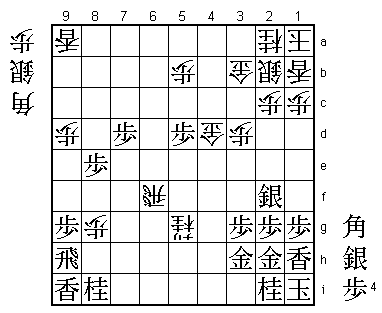
Black has a clear plan in 49.P7e Px7e Rx7e and Sato thought that he was
facing a strategic defeat here if he didn't act quickly. With the black
silvers out of position on 3f and 5f, this is the moment to open the game,
even if white is not completely ready for it.

50.P8e-8f    02:57:00  04:20:00
51.P8gx8f    03:18:00  04:20:00
52.S5b-4c!   03:18:00  04:20:00

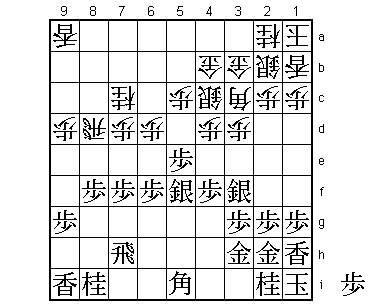
There are many positive moves here for white, like P5d, P4e or P6e (or a
combination of those). Each of them seem to lead to a very close, open
game that suits Sato's style. Therefore, 52.S4c was a surprise for the
professionals in the press room and not considered a very good move at
first. However, Sato has found the perfect moment to give his opponent the
time to think of a plan. As Watanabe admitted after the game: "S4c was a
good move. I had no idea how to play next". Without an obvious way to play
the position, Watanabe's lack of experience in the Furibisha invites the mistake.

53.R7h-8h?   04:08:00  04:20:00

Immediately condemned in the press room and this time rightly so. Putting
the rook in the diagonal of the bishop is very risky and this time there
is no compensation. In the post-mortem analysis moves like 53.P7e and 53.P1f
were analyzed and even though there was no variation found that was good for
black, both moves would have been clearly better than 53.R8h.

54.P7d-7e    04:08:00  04:25:00
55.P7fx7e    04:08:00  04:25:00
56.P6d-6e    04:08:00  04:39:00
57.P6fx6e    04:23:00  04:39:00
58.P5c-5d    04:23:00  04:39:00
59.B5i-7g    04:29:00  04:39:00
60.P5dx5e    04:29:00  05:02:00
61.S5fx5e    04:30:00  05:02:00
62.N7cx6e    04:30:00  05:07:00

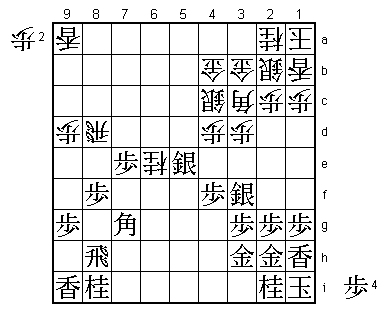
White has managed to put the knight in attack and the black silvers are going
nowhere. The game is already decided, but Sato needs one more good move to
finish it off.

63.B7g-6f    04:30:00  05:07:00
64.P*5d      04:30:00  05:07:00
65.P8f-8e    04:30:00  05:07:00
66.R8d-8a    04:30:00  05:08:00
67.S5e-6d    04:31:00  05:08:00
68.P3d-3e    04:31:00  05:19:00
69.S3fx3e    05:12:00  05:19:00
70.P*3d      05:12:00  05:26:00
71.S3e-2f    05:14:00  05:26:00

With the sacrifice of a pawn, Sato has put the silver into an even deeper
pit of despair.

72.P4d-4e    05:14:00  05:26:00
73.P*5e      05:15:00  05:26:00
74.P5dx5e    05:15:00  05:28:00
75.P4fx4e    05:26:00  05:28:00
76.N6e-5g+!  05:26:00  05:42:00

This knight can't be taken: 76.Bx5g P5f B7i P*7h Rx7h Bx9i+ and white
wins quickly.

77.P4e-4d    05:29:00  05:42:00
78.B3cx4d    05:29:00  05:42:00
79.S6dx5e    05:29:00  05:42:00

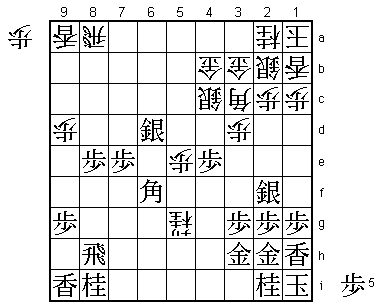
Black seems to have found an answer to 76.N5g+, but Sato has looked deeper.

80.R8a-6a!   05:29:00  05:45:00

This secures the promotion of the rook and thereby the white victory.

81.S5ex4d    05:59:00  05:45:00
82.R6ax6f    05:59:00  05:45:00
83.S4dx4c+   05:59:00  05:45:00
84.G4bx4c    05:59:00  05:45:00
85.P*4d      05:59:00  05:45:00
86.G4cx4d    05:59:00  06:03:00
87.P*5d      06:01:00  06:03:00
88.P*8g      06:01:00  06:24:00
89.R8h-9h    06:07:00  06:24:00
90.P*5b      06:07:00  06:29:00

In a normal game, Sato would probably not have bothered with such a
move and go straight for the kill, but he is making a point here:
"I give you nothing. Resign!".

91.P7e-7d    06:20:00  06:29:00

Nozuki (7-dan) considered this a move that will be remembered for a
long time to come. In a way, it is a useless move because it only
threatens B*7e, which is not even a move that matters much to white.
However, Watanabe is playing on despite the fact that he has no chance
to win. Nozuki said that if he would be playing this position instead
of Sato, it would feel like Watanabe is saying: "I don't trust your
ability to win from here. Show me!." Both players seem to try to do a
little extra with the decisive seventh game coming up...

92.R6f-6i+   06:20:00  06:30:00
93.B*7e      06:21:00  06:30:00
94.+R6ix8i   06:21:00  06:31:00
95.P*4e      06:29:00  06:31:00
96.G4dx5d    06:29:00  06:37:00
97.B7ex5g    06:29:00  06:37:00
98.P8g-8h+   06:29:00  06:37:00
99.N*4d      06:32:00  06:37:00
100.G3b-4b   06:32:00  06:45:00
101.B5g-6f   06:41:00  06:45:00
102.+P8hx9h  06:41:00  06:48:00
103.S*3a     06:41:00  06:48:00
104.S2bx3a   06:41:00  06:49:00
105.N4d-3b+  06:41:00  06:49:00
106.S*5e     06:41:00  06:49:00
107.B6fx5e   06:41:00  06:49:00
108.G5dx5e   06:41:00  06:49:00
109.+N3bx3a  06:41:00  06:49:00
110.B*6e     06:41:00  06:51:00
111.S*5a     06:44:00  06:51:00
112.R*6i     06:44:00  06:52:00
113.S5ax4b+  06:44:00  06:52:00
114.R6ix2i+  06:44:00  06:52:00
Resigns      06:44:00  06:52:00

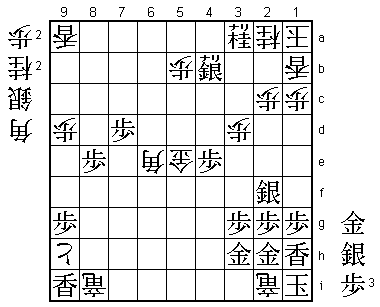
The mate is not so short but quite simple: 115.Gx2i +Rx2i Kx2i Bx3h+
Kx3h B*6e (or N*4f) K4i S*4h Kx4h G*4g etc. A one-sided win by Sato
after three consecutive losses takes this epic contest into a decisive
seventh game. Whoever wins the final game, this match can already be
considered a classic.
