19th Ryu-O Match Game 5
[Black "Sato Yasumitsu, Challenger"]
[White "Watanabe Akira, Ryu-O"]
[Event "19th Ryu-O sen, December 6th and 7th 2006"]
1.P7g-7f     00:00:00  00:00:00
2.P8c-8d     00:00:00  00:02:00
3.P2g-2f     00:01:00  00:02:00
4.G4a-3b     00:01:00  00:03:00
5.G6i-7h     00:02:00  00:03:00
6.P8d-8e     00:02:00  00:06:00
7.B8h-7g     00:02:00  00:06:00
8.P3c-3d     00:02:00  00:06:00
9.S7i-8h     00:02:00  00:06:00
10.B2bx7g+   00:02:00  00:06:00
11.S8hx7g    00:02:00  00:06:00

In this very important fifth game, Sato plays the Kakugawari opening,
just like in the first game which he won convincingly.

12.S3a-4b    00:02:00  00:06:00
13.P9g-9f    00:02:00  00:06:00
14.P9c-9d    00:02:00  00:07:00
15.P1g-1f    00:02:00  00:07:00
16.P1c-1d    00:02:00  00:07:00
17.S3i-4h    00:02:00  00:07:00
18.S7a-7b    00:02:00  00:08:00
19.P4g-4f    00:02:00  00:08:00
20.P6c-6d    00:02:00  00:08:00
21.S4h-4g    00:02:00  00:08:00
22.S7b-6c    00:02:00  00:08:00
23.K5i-6h    00:02:00  00:08:00
24.G6a-5b    00:02:00  00:08:00
25.S4g-5f    00:03:00  00:08:00
26.S6c-5d    00:03:00  00:09:00
27.S5f-4e    00:12:00  00:09:00

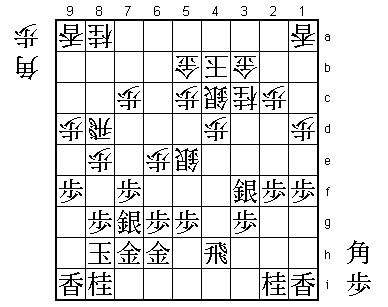
Sato seemed to play the classic Reclining Silver position, but the
silver is only reclining for a little while. At the first opportunity,
Sato shows his characteristically positive opening play.

28.S5d-5e    00:12:00  01:21:00

There have not been many games with this position, but both 28.Sx4e and
28.S5e have been played before. What follows is some interesting silver
maneuvering, where both silvers take a pawn in the opponent camp and then
retreat.

29.S4ex3d    00:17:00  01:21:00
30.S5ex4f    00:17:00  01:21:00
31.R2h-4h    00:41:00  01:21:00
32.S4f-5e    00:41:00  01:28:00
33.K6h-7i    00:49:00  01:28:00
34.P6d-6e    00:49:00  01:36:00
35.G4i-5h    01:39:00  01:36:00
36.R8b-8d    01:39:00  02:13:00
37.S3d-4e    02:16:00  02:13:00
38.P4c-4d    02:16:00  02:14:00
39.S4e-3f    02:21:00  02:14:00
40.S4b-4c    02:21:00  02:15:00
41.K7i-8h    02:22:00  02:15:00
42.K5a-4b    02:22:00  02:36:00
43.G5h-6h    02:25:00  02:36:00
44.N2a-3c    02:25:00  02:47:00

45.L1i-1g    03:18:00  02:47:00

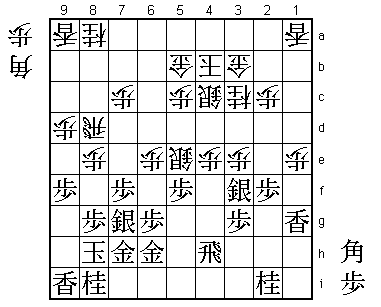
Sato is combining an edge attack with an attack on the silver on 5e.

46.P4d-4e    03:18:00  03:24:00
47.P1f-1e    04:13:00  03:24:00
48.P1dx1e    04:13:00  03:29:00
49.P5g-5f    04:13:00  03:29:00
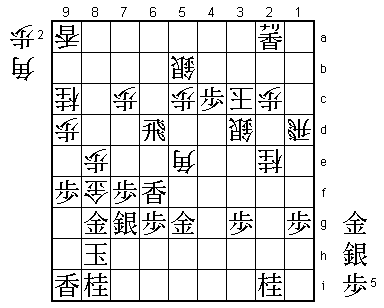
50.P*3e!     04:13:00  04:26:00

Good reply by Watanabe. White looked in trouble, because 50.Sx5f is
answered by P*5g and 50.S5e-4d by 51.R1h P*3e Lx1e. Even if black gives
up the silver, the break through on the edge is too strong.

51.S3fx3e    04:23:00  04:26:00

51.Sx4e also seems playable, but Sato seemed to like his chances after
the silver exchange that follows.

52.P*3d      04:23:00  04:27:00
53.P5fx5e    05:18:00  04:27:00
54.P3dx3e    05:18:00  04:27:00
55.P5e-5d!   05:18:00  04:27:00

Another strong looking move by Sato.

56.R8dx5d    05:18:00  04:58:00
57.R4h-5h    05:18:00  04:58:00
58.R5d-2d    05:18:00  04:58:00

Not much choice. 58.Rx5h+ Gx5h S*6i looks inviting, but after P*4d Sx4d
R*8b black is better.

59.B*7b      05:18:00  04:58:00

With the promotion of the bishop ensured and the black king in a much
stronger castle than the white king it seems that black has the upper hand.
However, in reality the position is still very complicated. The white king
has a lot of space to run and black has not enough pieces to build a decisive
attack.

60.N8a-9c    05:18:00  05:08:00
61.S*6c      05:19:00  05:08:00
62.S*5d      05:19:00  05:10:00
63.S6cx5b+   05:43:00  05:10:00
64.S4cx5b    05:43:00  05:10:00
65.G*6d      06:10:00  05:10:00
66.G3b-4c    06:10:00  05:42:00
67.P2f-2e    06:43:00  05:42:00
68.N3cx2e    06:43:00  05:44:00
69.P*5e      06:44:00  05:44:00
70.S5dx5e    06:44:00  05:46:00
71.R5hx5e    06:44:00  05:46:00
72.R2dx6d    06:44:00  05:46:00
73.R5e-5i!   07:09:00  05:46:00

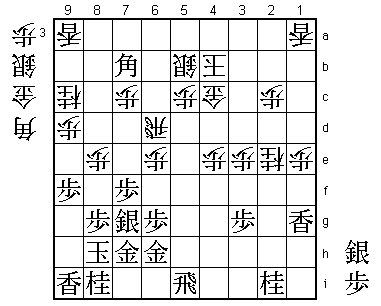
Looks strange because the rook was already in a strong position on 5e, but this
is the common professional practice of giving the opponent a choice of evils.
Black threatens both Bx4e+ and B8a+ and if white spends a silver on the defense
of the pawn on 4e with 74.S*4d, then after 75.+B8c black will put the rook under
pressure. This is a position that white cannot possibly win.

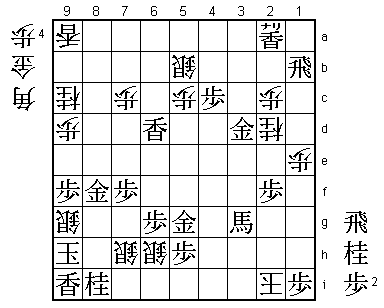
74.P4e-4f!!  07:09:00  06:30:00

If brilliancy is measured by a pressroom full of professionals who think that
this is an awful move while it actually gives you the chance to win the game,
than this move is absolutely brilliant. Watanabe spends two moves on making a
tokin that seems to be going nowhere, giving Sato the chance to attack whichever
way he wants. There is no way this can be good, or can it?

75.B7b-4e+   07:15:00  06:30:00
76.P4f-4g+   07:15:00  06:30:00
77.+B4e-5e   07:15:00  06:30:00
78.R6d-1d    07:15:00  06:35:00
79.P*4d      07:20:00  06:35:00

Sato was pretty happy here, but Watanabe is waiting for his chance.

80.G4cx4d    07:20:00  06:41:00
81.L1gx1e    07:20:00  06:41:00
82.R1d-2d    07:20:00  06:41:00
83.L1ex1a+   07:21:00  06:41:00
84.G4dx5e    07:21:00  06:41:00
85.R5ix5e    07:21:00  06:41:00
86.P8e-8f    07:21:00  06:47:00
87.R5ex3e    07:31:00  06:47:00
88.S*3d      07:31:00  07:16:00
89.R3ex6e    07:32:00  07:16:00
90.+P4g-5g   07:32:00  07:17:00
91.G6hx5g    07:33:00  07:17:00
92.P8fx8g+   07:33:00  07:17:00
93.G7hx8g    07:33:00  07:17:00
94.P*8f      07:33:00  07:26:00
95.G8gx8f    07:33:00  07:26:00
96.P*8e      07:33:00  07:26:00
97.G8f-8g    07:33:00  07:26:00
98.R2d-1d    07:33:00  07:30:00
99.P*1g      07:44:00  07:30:00

The tokin that Watanabe so carefully made, has been sacrificed to weaken the
black castle. The attack on the head of the black king has opened the position
up further. Still, the black king is still quite strong at the top, so things
are very complicated.

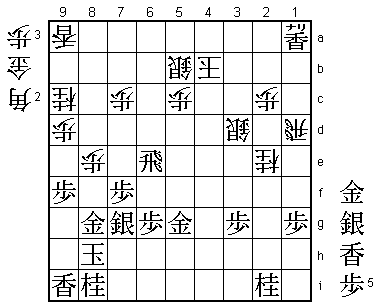
100.G*8f!    07:44:00  07:33:00

Another daring move and generally condemned in the press room. Even after
101.Gx8f Px8f white is not threatening mate, so giving black an extra gold
for his attack is very risky. Even Watanabe was not sure about this move: "I thought
I could be laughed at". His gamble pays off. The white king is still well enough
defended at the top to make attacking for black very difficult. Putting the
pressure on Sato with G*8f invites the mistake.

101.+L1a-2a  07:54:00  07:33:00

The alternative 101.R6b+ Gx8g Kx8g Rx1a K7h is winning for black because the
king can run away, but after 101.R6b+ B*4d P6f Rx1a there is no telling who will
win.

102.P*6d     07:54:00  07:37:00
103.R6ex6d   07:54:00  07:37:00
104.B*5e     07:54:00  07:37:00
105.P*4c     07:54:00  07:37:00
106.K4b-3c   07:54:00  07:41:00
107.L*6f?    07:56:00  07:41:00

Sato throws away the game with only one bad move. If he would have played 107.R6e,
the outcome of this game would have been anybody's guess. For example 108.Gx8g Kx8g
B*6i S*7h G*8f Sx8f Px8f Kx8f P*8e Rx8e Nx8e S*6i and even a deep post-mortem analysis
could not reach a conclusion.

108.B5ex6d   07:56:00  07:51:00
109.L6fx6d   07:56:00  07:51:00
110.K3c-2d   07:56:00  07:51:00

Despite having many pieces in hand, Sato cannot stop the white king from entering.
The game is decided, even though Watanabe is very careful to safely enter before
launching his final attack.

111.S7gx8f   07:58:00  07:51:00
112.P8ex8f   07:58:00  07:51:00
113.G8gx8f   07:58:00  07:51:00
114.R*2h     07:58:00  07:54:00
115.P*5h     07:58:00  07:54:00
116.R2hx2i+  07:58:00  07:54:00
117.G*4d     07:59:00  07:54:00
118.N2ex3g+  07:59:00  07:58:00
119.G4dx3d   07:59:00  07:58:00
120.K2d-2e   07:59:00  07:58:00
121.P*2g     07:59:00  07:58:00
122.R1dx1g+  07:59:00  07:58:00
123.S*2f     07:59:00  07:58:00
124.+R1gx2f  07:59:00  07:58:00
125.P2gx2f   07:59:00  07:58:00
126.K2e-1f   07:59:00  07:58:00
127.R*1b     07:59:00  07:58:00
128.P*1e     07:59:00  07:58:00
129.P*3i     07:59:00  07:58:00
130.S*6h     07:59:00  07:58:00
131.B*3c     07:59:00  07:58:00
132.N*2d     07:59:00  07:58:00
133.K8h-9h   07:59:00  07:58:00
134.K1f-2g   07:59:00  07:58:00
135.B3c-5e+  07:59:00  07:58:00
136.+R2ix3i  07:59:00  07:58:00
137.P*1i     07:59:00  07:58:00
138.S*7h     07:59:00  07:58:00
139.S*1h     07:59:00  07:58:00
140.K2g-3h   07:59:00  07:58:00
141.G*2i     07:59:00  07:58:00
142.+R3ix2i  07:59:00  07:58:00
143.S1hx2i   07:59:00  07:58:00
144.K3hx2i   07:59:00  07:58:00
145.+B5ex3g  07:59:00  07:58:00
146.S*9g     07:59:00  07:59:00
Resigns      07:59:00  07:59:00

Mate after 147.Nx9g B*8i etc. or 147.Kx9g N8e K9h G*9g Nx9g B*8i K8g S7g+. Another
great fight in which Watanabe showed how patient he can be despite his youth.
Not despairing over a position that looks worse, but making it hard for his opponent
and waiting for a chance. After losing the first two games it seems that Watanabe
would yield his Ryu-O title without a fight, but after winning the next three he is
suddenly one game from defending his title. Can he do it with the black pieces in the
sixth game?
