19th Ryu-O Match Game 3
[Black "Sato Yasumitsu, Challenger"]
[White "Watanabe Akira, Ryu-O"]
[Event "19th Ryu-O sen, Game 3"]
[Date "November 14th and 15th 2006"]
1.P7g-7f     00:00:00  00:00:00

The start of this game was eventful. At 8:50, Sato had arrived in the
playing room, and even though the second arbiter Suzuki Daisuke was there,
the chief arbiter Futakami was nowhere to be seen. When a call was made
to his room, he was still asleep. It turned out that he didn't understand
how to set the alarm clock in his room and a little beer and sake at the
party on the evening before did the rest. Despite this, he was in the
playing room at 8:53, just before Watanabe arrived. This was not the only
incident. To start the game at exactly the right time, a special electronic
clock is set up in the playing room that only misses about 1 second every
10,000 years or so. Despite this, Futakami asked Sato to start the game when
this clock read 8:58:30. Sato, who had set his own wristwatch to the electronic
clock, was surprised to hear Futakami starting sign so early. Futakami later
said that because the players had finished setting up their pieces early, he
felt that there was no need to delay the start of the game any longer.
According to the rules, the game is not set to start at the proper time,
but when the chief arbiter calls for the game to start and that is how it
went, however unorthodox...

2.P8c-8d     00:00:00  00:02:00
3.S7i-6h     00:03:00  00:02:00
4.P3c-3d     00:03:00  00:03:00
5.P6g-6f     00:03:00  00:03:00
6.S7a-6b     00:03:00  00:03:00
7.P5g-5f     00:03:00  00:03:00
8.P5c-5d     00:03:00  00:03:00
9.S3i-4h     00:03:00  00:03:00
10.S3a-4b    00:03:00  00:03:00
11.G4i-5h    00:03:00  00:03:00
12.G4a-3b    00:03:00  00:03:00
13.G6i-7h    00:03:00  00:03:00
14.K5a-4a    00:03:00  00:04:00
15.K5i-6i    00:03:00  00:04:00
16.P7c-7d    00:03:00  00:05:00
17.G5h-6g    00:13:00  00:05:00
18.G6a-5b    00:13:00  00:06:00
19.S6h-7g    00:13:00  00:06:00
20.S4b-3c    00:13:00  00:06:00
21.B8h-7i    00:13:00  00:06:00
22.B2b-3a    00:13:00  00:06:00
23.P3g-3f    00:13:00  00:06:00
24.P4c-4d    00:13:00  00:06:00
25.B7i-6h    00:17:00  00:06:00
26.B3a-6d    00:17:00  00:32:00
27.N2i-3g    00:19:00  00:32:00
28.G5b-4c    00:19:00  00:33:00
29.K6i-7i    00:19:00  00:33:00
30.K4a-3a    00:19:00  00:33:00
31.P2g-2f    00:32:00  00:33:00
32.K3a-2b    00:32:00  00:40:00
33.P1g-1f    00:36:00  00:40:00
34.S6b-7c?!  00:36:00  01:48:00
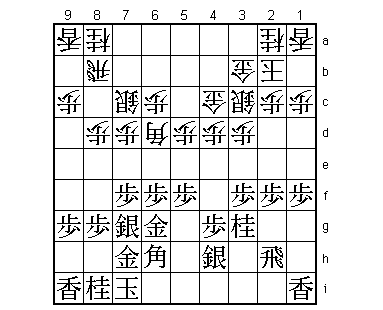
In the Morishita system, the white silver usually goes to 5c. Although
moving the silver to 7c is not a new plan, it is a new move in this position.
In the other games with the position after 33.P1f, white answered almost
exclusively 34.P8e. Watanabe seems to have prepared this, but in this game
it doesn't seem to work.
35.R2h-3h 00:58:00 01:48:00
36.P7d-7e 00:58:00 01:52:00
37.P6f-6e 01:20:00 01:52:00
38.B6d-4b 01:20:00 01:54:00
39.P7fx7e 01:20:00 01:54:00
40.R8b-6b 01:20:00 02:52:00
A difficult choice. 40.P6d Px6d Sx6d is answered with P*6e and whichever
pawn white takes, the silver dies so it has to move back. However, 40.P6d
Px6d R6b seems playable. The other alternative is 40.Bx7e, although it seems
that black is a little better after 41.N2e S2d B4f.
41.S4h-5g 02:01:00 02:52:00
42.B4bx7e 02:01:00 02:52:00
43.S5g-4f 02:26:00 02:52:00
44.S3c-2d 02:26:00 02:55:00
45.K7i-8h 02:29:00 02:55:00
46.S7c-7d 02:29:00 02:58:00
47.P*7f 02:54:00 02:58:00
48.B7e-4b 02:54:00 02:59:00
The white bishop has been moving back and forth and Sato has used the extra
moves to set up his attack.
49.P3f-3e 03:04:00 02:59:00
50.P3dx3e 03:04:00 03:20:00
51.S4fx3e 03:31:00 03:20:00
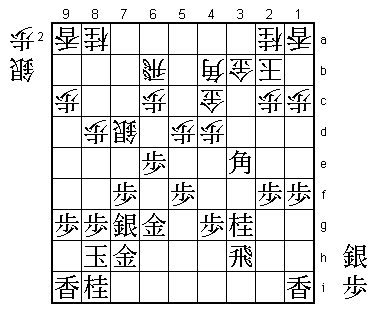
52.S2dx3e 03:31:00 04:01:00
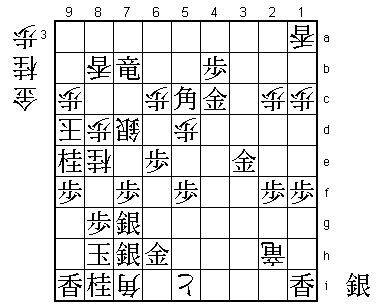
The sealed move.
53.B6hx3e 03:31:00 04:01:00
54.S*2g      03:31:00  04:04:00
55.R3h-3i    03:32:00  04:04:00
56.S2g-2h=   03:32:00  04:04:00

Watanabe had looked at 56.P*3h R2i S3f+ B6h but then +Sx3g fails to B4f,
so he decided to play it differently. Black has the advantage, but white
is fighting back.

57.R3i-3h    03:33:00  04:04:00
58.P*3f      03:33:00  04:04:00
59.N3g-2e    05:32:00  04:04:00
60.P3f-3g+   05:32:00  04:10:00
61.B3e-4f!   05:33:00  04:10:00

Strong move. If 61.Rx2h +Px2h then the future rook drop on 3h works both
in attack and defense. With the tokin on 3h, white has to spent more moves
on making this possible.

62.+P3gx3h   05:33:00  05:24:00
63.B4fx9a+   05:33:00  05:24:00
64.+P3h-4h?! 05:33:00  05:26:00
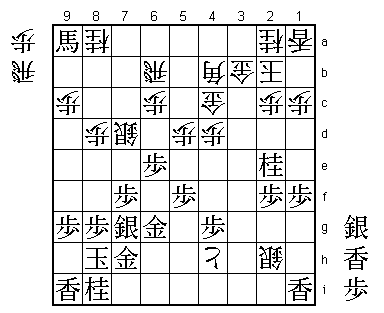
On his weblog Watanabe called this a mistake. This attack comes to late,
so he thought he should have played 64.R6a here. However, Suzuki Daisuke
was very impressed by 64.+P4h. Giving up the silver on 2h to make the
all-important rook drop on 3h possible is good thinking. Furthermore,
the timing is impeccable. Black also wants to take the knight on 8a, so
it is hard to take the silver here. The other alternative is 64.B2d, but
after 65.+Bx8a +P4h +B7a R9b N*3f the black attack is very strong.

65.P*3d      06:13:00  05:26:00
66.R*3h      06:13:00  05:32:00
67.L*3c      06:13:00  05:32:00
68.N2ax3c    06:13:00  05:32:00
69.P3dx3c+   06:13:00  05:32:00
70.G4cx3c    06:13:00  05:32:00
71.N2ex3c+   06:13:00  05:32:00
72.B4bx3c    06:13:00  05:32:00
73.S*5c      06:13:00  05:32:00
74.R6b-6a    06:13:00  05:51:00
75.N*2e      06:46:00  05:51:00
76.B3c-2d    06:46:00  05:53:00
77.S5cx4d+   06:46:00  05:53:00
78.R6a-4a    06:46:00  06:25:00
79.+B9ax2h   07:45:00  06:25:00
80.R3hx2h+   07:45:00  06:26:00
81.S*3c      07:45:00  06:26:00
82.B2dx3c    07:45:00  06:26:00
83.+S4dx3c   07:45:00  06:26:00
84.G3bx3c    07:45:00  06:26:00
85.B*5b      07:45:00  06:26:00
86.+P4h-5i   07:45:00  07:36:00

Here Watanabe thought for a long time. The reason was that after 87.+P5i
G6h R4d G*3e Rx4g+ Nx3c+ Kx3c B3d+ K2b G*3c K2a +Bx2c he was convinced
that white had a mate after S*7i. However, after calculating long and
hard he had to admit that there was no mate. This meant that he had to
change his plans, but he saw no way out of the variation until the very
end, so the game follows it...
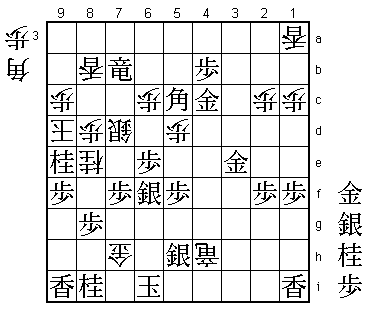
87.G6g-6h 07:51:00 07:36:00
88.R4a-4d?! 07:51:00 07:39:00
There was an alternative that might have given white better chances to
win. After 88.N*6f Nx3c+ Kx3c G*3d K2b Gx2c Kx2c Bx4a+ S*3b Sx6f and
the position seems very difficult. For example, in the post-mortem analysis
Sato suggested L*8e next which seems to be good for white. It was only at
the after party that the record keeper Funae, a 3-dan Shoreikai player who
is quite famous for his tsume shogi skills (he has won a major tsume shogi
composer prize), found that after L*8e there is a difficult mate after +Bx3b.
It remains to be seen if Sato would have found that in the game.
89.G*3e 07:51:00 07:39:00
90.R4dx4g+ 07:51:00 07:47:00
91.N2ex3c+ 07:51:00 07:47:00
92.K2bx3c 07:51:00 07:47:00
93.B5b-3d+ 07:55:00 07:47:00
94.K3c-2b 07:55:00 07:50:00
95.G*3c 07:56:00 07:50:00
Watanabe had expected 95.G4d here and thought that after 95.G*3c K3a +Bx2c
S*2a P*4c he could stop the attack with S*5a.
96.K2b-3a 07:56:00 07:50:00
97.+B3d-4c 07:56:00 07:50:00
Watanabe had overlooked this move and for a moment thought that all was lost.
98.+R4gx4c 07:56:00 07:52:00
99.G3cx4c 07:56:00 07:52:00
100.B*2a 07:56:00 07:52:00
This narrowly holds the white position together, but it is clear that Sato
has a winning position. Sato himself was very much aware of this and decided
to avoid any risks. His cautious play is going to cost him dearly.
101.R*3d? 07:59:00 07:52:00
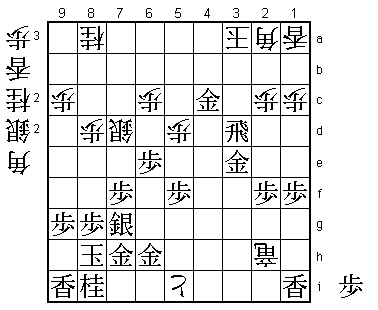
The first mistake. 101.G3d or 101.P*3b Bx3b G3e-4d are both winning.
For example, 101.G3d P*4b R*7a N*4a P*3b Bx3b Gx3b Kx3b B*5b G*3a Bx4a+
Gx4a N*4d K3a G3c and wins. Or 101.G3d N8e P*3b Bx3b R*3c S*4a Gx2c and
wins. It seems that the best defense is 101.G3d L*4b but after P*3b Bx3b
Gx3b Kx3b B*3c N*2b R*8b P*4a Bx4b+ Px4b L*3c K4a G4c it is hisshi (Px4c
L3b+ etc.). Finally, 101.G3d L*8e seems a strong attack, but after P*3b
Bx3b Gx3b Kx3b B*3c the bishop is also working in defense, so Lx8g+ Gx8g
S*7i K9h is no mate.

102.K3a-4a   07:59:00  07:59:00
103.P*4b     07:59:00  07:59:00
104.K4a-5a   07:59:00  07:59:00
105.R3d-3a+  07:59:00  07:59:00
106.K5a-6b   07:59:00  07:59:00
107.+R3ax2a  07:59:00  07:59:00
108.S*6i     07:59:00  07:59:00
109.B*5c     07:59:00  07:59:00
110.K6b-7c   07:59:00  07:59:00
111.+R2a-7a  07:59:00  07:59:00
112.K7c-8c   07:59:00  07:59:00
113.+R7ax8a  07:59:00  07:59:00
114.L*8b     07:59:00  07:59:00
115.P9g-9f   07:59:00  07:59:00
116.S*7b?    07:59:00  07:59:00

Interestingly enough, 116.P9d was the better move here. It is very rare
that a push of the edge pawn is answered by a push of the edge pawn this
late in the game, but here is was the right move. 116.P9d defends against
N*9e, so black has to defend. After 116.P9d G7i N*8e N*7h Nx7g+ Nx7g Sx7h+
G7ix7h N*6f black has a long and difficult mate after S*7b K9c N*8e but it
is very easy to make a mistake, especially in byoyomi.

117.N*9e     07:59:00  07:59:00
118.K8c-9d   07:59:00  07:59:00
119.+R8ax7b  07:59:00  07:59:00
120.N*8e     07:59:00  07:59:00
121.S*7i?    07:59:00  07:59:00

Sato wants to keep his position as thick as possible, but correct was
121.G7i and after Nx7g+ Kx7g white has no mate, so black wins.

122.S6ix7h+  07:59:00  07:59:00
123.S7ix7h?  07:59:00  07:59:00

A blunder, although the power of the next move was very hard to see in
byoyomi. Correct was 123.Gx7h G*6g S*6h Gx7h Sx7h B*6i G*7i Bx7h+ Gx7h
 S*6i B*6g and black wins.

124.B*7i!!   07:59:00  07:59:00
Record keeper Funae's comment: "I saw the Ryu-O picking up the bishop,
but I had no idea where he was going to put it". In the press room, it
was thought that Watanabe was "finding a place to resign", i.e. playing
some checks to make the final position look more close than it actually
was. It turns out that in byoyomi he has found a brilliant endgame sequence.

125.K8hx7i   07:59:00  07:59:00
126.G*6i     07:59:00  07:59:00

Here Sato suddenly realized what was happening. He could not suppress a
small cry of surprise.

127.S7hx6i   07:59:00  07:59:00
128.+P5ix6i  07:59:00  07:59:00
129.K7ix6i   07:59:00  07:59:00
130.S*6g     07:59:00  07:59:00

This silver cannot be taken: 131.Gx6g Nx7g= Nx7g N*5g K5i N4i+ and mate.
Still, black has many pieces in hand so it seems like there is a defense
somewhere. Unfortunately for Sato, there is none. Watanabe admitted on
his weblog that he hadn't been able to read out all the variations in
byoyomi, but that he had seen this position before playing B*7i and
thought that it would be hard to defend for black.

131.S*5h     07:59:00  07:59:00
132.S6gx5h+  07:59:00  07:59:00
133.G6hx5h   07:59:00  07:59:00
134.S*5g     07:59:00  07:59:00
135.S*4i     07:59:00  07:59:00
136.N*6f     07:59:00  07:59:00
137.B*4h     07:59:00  07:59:00
138.S5gx5h+  07:59:00  07:59:00
139.S4ix5h   07:59:00  07:59:00
140.+R2hx4h  07:59:00  07:59:00
141.S7gx6f   07:59:00  07:59:00
142.G*7h     07:59:00  07:59:00
Resigns      07:59:00  07:59:00
Mate after 143.Kx7h +Rx5h and after any piece on 6h there is S*6g and
+Rx6h. Watanabe magically pulled a rabbit out of his hat to win this
one. Interestingly, the passive silver on 7d in the end became the
lifeline of the white king. Sato will be very disappointed to let
this one slip away, but in the second game the roles were more or
less reversed. What goes around comes around, as they say. In any
case, after another thriller, we have a match on our hands, especially
if Watanabe can win the 4th game with the black pieces.