19th Ryu-O Match Game 2
[Black "Watanabe Akira, Ryu-O"]
[White "Sato Yasumitsu, Challenger"]
[Event "19th Ryu-O sen, Game 2"]
[Date "October 31st and November 1st 2006"]
1.P7g-7f     00:01:00  00:00:00
2.P3c-3d     00:01:00  00:01:00
3.P2g-2f     00:01:00  00:01:00
4.P5c-5d     00:01:00  00:02:00
5.P2f-2e     00:04:00  00:02:00
6.R8b-5b     00:04:00  00:02:00

This second game starts with the Gokigen Nakabisha. This was one
of the strategies that Sato was expected to use at least once
in this match, so this was not a real surprise.

7.B8hx2b+    00:06:00  00:02:00

This bishop exchange is an idea by Maruyama. By exchanging the
bishops, black gives up a tempo, but in return the white possibilities
are restricted.

8.S3ax2b     00:06:00  00:02:00
9.P9g-9f     00:06:00  00:02:00

This was first played by Sato in his quarterfinal game of the
23rd Asahi Open against Yamasaki. Yamasaki was in the press room
and when asked about this game he said that at first he had no idea
what the meaning of this move was. The point of 9.P9f is that the
lance can move to 9g if white drops a bishop on 8h after S7h.
By the way, Yamasaki won that game.

10.P9c-9d    00:06:00  00:08:00
11.S7i-7h    00:08:00  00:08:00
12.G6a-7b    00:08:00  00:42:00

This defends the pawn on 8c. Now B*6e is no longer a threat if white
plays P5e. This move was first played in the Shoreikai. In professional
games, there has been only one game with this move in this position:
Toyama (4d) played it in the Asahi Open tournament against amateur Kato.

13.P6g-6f    00:16:00  00:42:00

To answer P5e with S6g.

14.S7a-6b    00:16:00  00:49:00
15.K5i-6h    00:16:00  00:49:00
16.S2b-3c    00:16:00  00:50:00

This move has two meanings. First, because the black pawn on 5g is
defended by the king, P2d Px2d Rx2d B*3e is no longer effective.
Therefore, this silver defends against P2d. The second meaning is
that P5e is no longer a strong attack after S6g, so white can switch
to an opposing rook position with R2b.

17.S3i-4h    00:19:00  00:50:00
18.K5a-6a    00:19:00  01:12:00
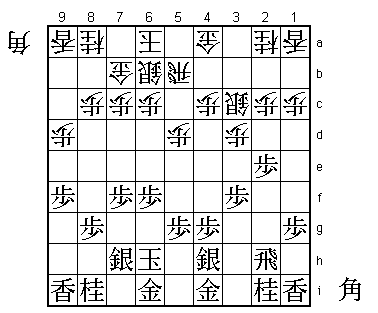
19.P3g-3f!?  00:30:00  01:12:00

This is a new move by Watanabe. The previous three games with this
position all continued with 19.P4f. This looks dangerous, because after
switching to opposing rook, white has the counter attack P3e Px3e S4d.

20.B*8h      00:30:00  01:20:00

White can win a pawn after 20.B*5e S3g Bx6f S7g B4d S4f but black has
developed his right silver and still has the bishop in hand and therefore
has the better position.

21.B*7g      00:32:00  01:20:00
22.B8hx7g+   00:32:00  01:20:00
23.S7hx7g    00:32:00  01:20:00

23.Kx7g P6d is dangerous. However, after taking with the silver, black
can no longer move the king into the strong mino castle.

24.R5b-2b    00:32:00  01:24:00
25.P4g-4f    00:47:00  01:24:00
26.K6a-7a    00:47:00  01:39:00
27.S4h-4g    00:47:00  01:39:00
28.S3c-4d    00:47:00  01:54:00
29.G6i-7h    00:51:00  01:54:00

Not 29.N3g P3e P4e Px3f Sx3f R3b and white has the advantage.

30.P3d-3e    00:51:00  02:04:00

Sato takes any opportunity to attack. This needed some calculation, though.
For example, 31.P4e Sx4e Px3e threatens to win the silver. If white answers
with P5e then B*1h is good for black. However, white also has B*6d and
the silver will not die.

31.K6h-7i    01:10:00  02:04:00
32.K7a-8b    01:10:00  02:11:00
33.K7i-8h    01:14:00  02:11:00
34.P3ex3f    01:14:00  02:23:00
35.S4gx3f    01:14:00  02:23:00
36.R2b-3b    01:14:00  02:23:00
37.P*3g      01:15:00  02:23:00

This move seems hard to play, because black wants to develop the knight
to this square, but black has no choice. 37.S4g S3e gives white a strong
attacking position (P2d Px2d is answered by P*3f, but P2d Sx2d is OK for white).

38.R3b-2b    01:15:00  02:25:00
39.G4i-5h    01:16:00  02:25:00
40.N2a-3c    01:16:00  02:56:00
41.P7f-7e    01:39:00  02:56:00
42.G4a-4b    01:39:00  03:14:00

Inviting the attack: 43.P2d Px2d B*3a R3b Bx4b+ Rx4b Rx2d. The commentators
in the press room couldn't find a good way to defend for white, but it
somehow feels to simple to work. This variation was not analyzed in the
post-mortem analysis. The original comment on the Ryu-O website was
interesting: "Master Bonanza would surely play B*3a". For some reason this
comment was replaced later...

43.S3f-4g    01:53:00  03:14:00
44.R2b-2a    01:53:00  03:17:00
45.P3g-3f    01:54:00  03:17:00
46.P6c-6d    01:54:00  04:12:00

For Sato to play a quiet castle move like this is admitting strategic
defeat in the opening. Watanabe has been looking for a long fight and even
though he couldn't do it in the first game, he gets what he wants in this one.

47.G5h-6g    02:06:00  04:12:00
48.S6b-6c    02:06:00  04:12:00
49.S7g-7f    02:06:00  04:12:00
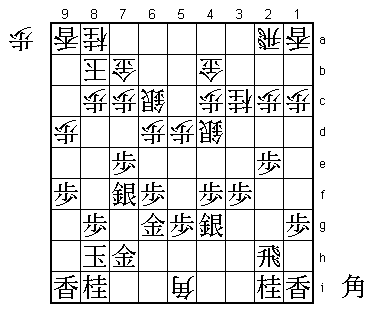
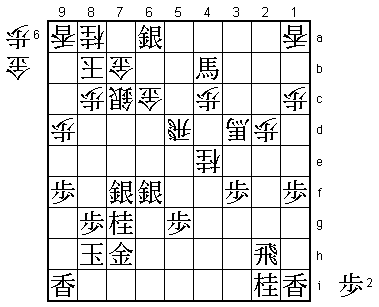
50.B*5i!?    02:06:00  04:18:00

Sato has found a move to activate the position.

51.P6f-6e    03:14:00  04:18:00

The sealed move. The alternative 51.P1f P*3h Rx3h B2f+ R2h +Bx2e P4e S5c
(Sx4e N3g) N3g +B3d S4f, aiming to attack the promoted bishop, seems good
for black as well.

52.P6dx6e    03:14:00  04:24:00

Not 52.B1e+ Px6d Sx6d B*3g +Bx2e P4e and black wins.

53.S7fx6e    03:15:00  04:24:00
54.P*6d      03:15:00  04:30:00
55.S6e-7f    03:16:00  04:30:00
56.B5i-1e+   03:16:00  04:30:00
57.B*7g      03:18:00  04:30:00
58.P2c-2d    03:18:00  04:55:00
59.P1g-1f    04:11:00  04:55:00
60.+B1ex2e   04:11:00  04:56:00
61.P4f-4e    04:11:00  04:56:00
62.S4d-5c    04:11:00  04:59:00
63.S4g-5f    04:27:00  04:59:00

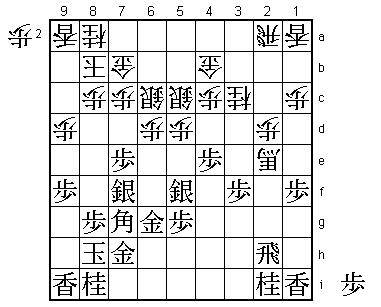
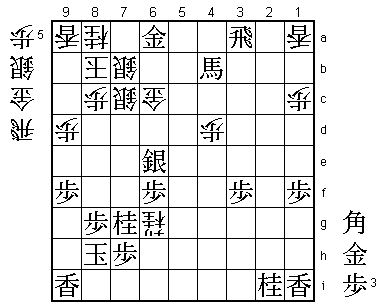
64.P5d-5e?   04:27:00  05:49:00

The first mistake in the game is made by Sato. White wants to play 64.+B3d,
but then 65.R3h is strongly threatening P3e followed by P3d. Correct was
64.P3e (expected by Watanabe) P8f +B3d. If then R3h Px3f Rx3f P*3e and the
promoted bishop is safe on the perfect square 3d.

65.B7gx5e    05:23:00  05:49:00
66.S5c-5d    05:23:00  05:57:00
67.B5e-7g    05:23:00  05:57:00
68.R2a-5a    05:23:00  06:10:00
69.P*6e      05:25:00  06:10:00
70.S5dx6e    05:25:00  06:16:00
71.S5fx6e    05:25:00  06:16:00
72.P6dx6e    05:25:00  06:16:00
73.B7g-8f!   05:29:00  06:16:00

This bishop works very well from here. White is in trouble.

74.G4b-5b    05:29:00  06:35:00
75.N8i-7g    05:35:00  06:35:00
76.+B2e-3d   05:35:00  06:57:00
77.S*5e      06:00:00  06:57:00
78.S*6f      06:00:00  07:07:00
79.G6gx6f    06:17:00  07:07:00
80.P6ex6f    06:17:00  07:07:00
81.P*6d      06:17:00  07:07:00

82.N3cx4e!   06:17:00  07:07:00

Sato is fighting back. 83.Px6c+ G5bx6c Sx6f Nx5g+ is good for white.
Not being able to use the bishop is a big problem for black, so Watanabe
decided not to take the silver on 6c.

83.S5ex6f    06:17:00  07:07:00
84.S6cx6d    06:17:00  07:09:00
85.P7e-7d    06:17:00  07:09:00
86.G5b-6c    06:17:00  07:11:00
87.P7dx7c+   06:38:00  07:11:00
88.S6dx7c    06:38:00  07:14:00
89.B8f-4b+   06:39:00  07:14:00
90.R5a-5d    06:39:00  07:22:00
91.S*6a!     06:47:00  07:22:00

This looks bad, because the silver is in danger after 92.G7b-6b, but then
black can play 93.S7f-6e and then both R4d P*6d or Gx6a Sx5d Gx5d R*3a
are good for black.

92.G*6b      06:47:00  07:45:00
93.S7f-6e    07:13:00  07:45:00
94.R5dx5g+   07:13:00  07:58:00

No choice. Moving the rook anywhere else is answered by P*6d.

95.S6fx5g    07:16:00  07:58:00
96.N4ex5g+   07:16:00  07:58:00
97.P*6d      07:17:00  07:58:00
98.G6bx6a    07:17:00  07:58:00
99.P6dx6c+   07:17:00  07:58:00
100.G7bx6c   07:17:00  07:58:00
101.P*7i     07:23:00  07:58:00
102.S*7b     07:23:00  07:58:00
103.R*3a     07:25:00  07:58:00
104.+B3d-4d  07:25:00  07:58:00
105.R2hx2d   07:26:00  07:58:00
106.P*6f     07:26:00  07:58:00
107.P*6h     07:31:00  07:58:00
108.P6f-6g+  07:31:00  07:58:00
109.P6hx6g   07:31:00  07:58:00
110.P*6f     07:31:00  07:58:00
111.P6gx6f   07:31:00  07:58:00
112.P*6g     07:31:00  07:58:00
113.G*5b     07:32:00  07:58:00
114.P6g-6h+  07:32:00  07:58:00
115.G5bx6a   07:34:00  07:58:00
116.+P6hx7h  07:34:00  07:58:00
117.P7ix7h   07:34:00  07:58:00
118.+N5g-6g  07:34:00  07:59:00
119.R2dx4d   07:36:00  07:59:00
120.P4cx4d   07:36:00  07:59:00

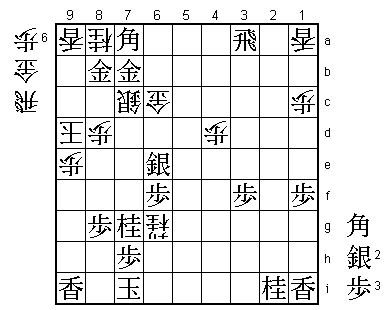
121.B*7a?    07:37:00  07:59:00

A very costly mistake. Watanabe still has 24 minutes, but takes only 1
minute for this move. His gut feeling was that this was deciding, but he
should have calculated more carefully instead. The right move is 121.G7a.
It looks dangerous to give white a gold in hand, but the black king is safe
after 122.P*6a Gx7b Kx7b B*3d! because this bishop works both in attack and
defense.

122.K8b-9b   07:37:00  07:59:00
123.+B4b-7e? 07:37:00  07:59:00

Watanabe had already decided upon this move when he played 121.B*7a so this
move was played immediately. Had he taken a little more time, he would have
seen Sato's reply and played 123.N*8e instead, which is still winning.
For example, 124.S*8b +B7e G*8d G*9c Nx9c Nx9c+ Kx9c N*8e K9b *Bx8d and
there is no defense. Also, 124.S*8d now fails to 125.G6b (Gx6b G*9c is mate).

124.S*8d     07:37:00  07:59:00
125.+B7ex8d  07:58:00  07:59:00

Here Watanabe must have been kicking himself. He had planned 125.R3b+
P*6b Gx6b Gx6b +Rx6b G*8b N*8e and after both Sx6b or Sx7e the white king
is mated, but here he realized that after Sx8e there is no way to win.
He spent almost all of his remaining time to find a win that is not there.

126.P8cx8d   07:58:00  07:59:00
127.P9f-9e   07:59:00  07:59:00
128.K9b-8c?  07:59:00  07:59:00

If Sato would have lost this game, this would have been the decisive
mistake. Correct was 128.Sx6a. Black can't take this silver because
129.Rx6a+ B*7i Kx7i R*6i K8h +Nx7h Kx7h G*6g K8h G*7h leads to mate.
Watanabe had seen this and therefore thought that he had given it all
away by playing B*7a. 128.K8c gave him new hope.

129.G6a-6b   07:59:00  07:59:00

This threatens mate with G*8b and because the rook is now also entering
the attack Watanabe thought that he was winning again.

130.P9dx9e   07:59:00  07:59:00
131.G*8b?    07:59:00  07:59:00

Difficult to see in byoyomi, but 131.Gx6c was winning. This is a mating
threat and defending against the white mate at the same time: 132.B*7i
Kx7i G*6h K8h Gx7h K9h R*8h K9g P9f K8f Rx8g+ Kx8g +Nx7g K8f P8e K7e P7d
Sx7d Sx7d K6d S7b-6c K5c and the black king escapes because there is no
gold on 6c.

132.K8c-9d   07:59:00  07:59:00
133.G6bx7b   07:59:00  07:59:00
134.B*7i     07:59:00  07:59:00
135.K8hx7i   07:59:00  07:59:00

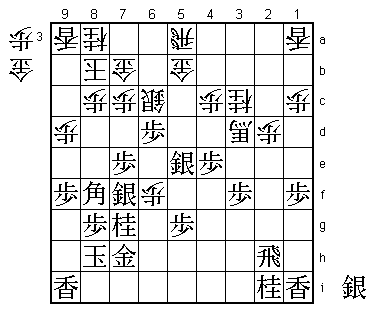
136.R*6i     07:59:00  07:59:00

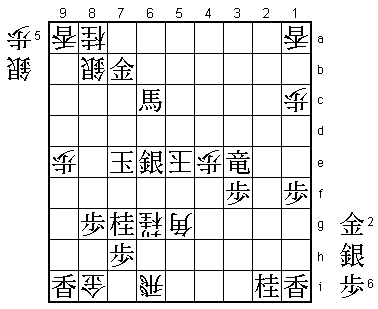
Sato played this convinced it was mate. It isn't and he is very lucky
that the position is still a win for white. Correct was 136.G*6h K8h
Gx7h K9h R*8h K9g Rx8g+ Kx8g +Nx7g K9g Sx8b and white wins.

137.K7i-8h   07:59:00  07:59:00
138.G*8i     07:59:00  07:59:00

Here Sato had planned 138.+Nx7g Kx7g N*8e and mate, but he now realized
that after K7f P*7e K8f Rx6f+ S*7f there is no mate. He can change his
plans just in time...

139.K8h-9g   07:59:00  07:59:00
140.S7cx8b   07:59:00  07:59:00

And even though Watanabe desperately tries to find a way to win, Sato
doesn't make another mistake.

141.B*7f     07:59:00  07:59:00
142.P8d-8e   07:59:00  07:59:00
143.B7fx8e   07:59:00  07:59:00
144.K9d-8d   07:59:00  07:59:00
145.S*7e     07:59:00  07:59:00
146.K8dx7e   07:59:00  07:59:00
147.S*7f     07:59:00  07:59:00
148.K7ex6f   07:59:00  07:59:00
149.B7ax4d+  07:59:00  07:59:00
150.P*5e     07:59:00  07:59:00
151.K9g-8f   07:59:00  07:59:00
152.G*8d     07:59:00  07:59:00
153.+B4dx5e  07:59:00  07:59:00
154.K6fx5e   07:59:00  07:59:00
155.R3a-3e+  07:59:00  07:59:00
156.P*4e     07:59:00  07:59:00
157.B8ex6c+  07:59:00  07:59:00
158.S*7e     07:59:00  07:59:00
159.S7fx7e   07:59:00  07:59:00
160.G8dx7e   07:59:00  07:59:00
161.K8fx7e   07:59:00  07:59:00
162.B*5g     07:59:00  07:59:00
Resigns      07:59:00  07:59:00

Mate after 163.K7d S*8c K8e S8d K8f B7e+ or 163.P*6f Bx6f+ K8f S*7e.
Wonderful game that didn't deserve a loser. Watanabe wrote on his weblog
that after a game he is usually so tired that he sleeps like a log, but
this time he had been tossing and turning for a while. A very tough loss
to take, especially with the black pieces. He is 2-0 down and needs to
win the third game with the white pieces to stay in this match.
