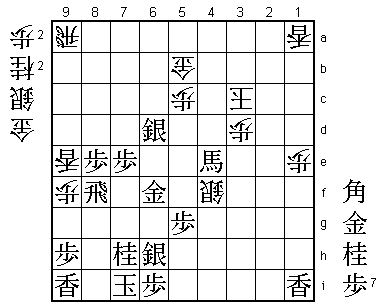
19th Ryu-O Match Game 1
[Black "Sato Yasumitsu, Challenger"]
[White "Watanabe Akira, Ryu-O"]
[Event "19th Ryu-O sen, Game 1"]
[Date "October 10th and 11th 2006"]
1.P7g-7f     00:00:00  00:00:00
2.P8c-8d     00:00:00  00:01:00
3.P2g-2f     00:04:00  00:01:00
4.G4a-3b     00:04:00  00:06:00
5.G6i-7h     00:07:00  00:06:00
6.P8d-8e     00:07:00  00:13:00
7.B8h-7g     00:07:00  00:13:00
8.P3c-3d     00:07:00  00:14:00
9.S7i-8h     00:07:00  00:14:00
10.B2bx7g+   00:07:00  00:15:00
11.S8hx7g    00:07:00  00:15:00

The first game of the Ryu-O match starts with a classic
Kakugawari opening. Unlike the recently popular Kakugawari
with tempo loss, the theory of the "normal" Kakugawari is very
deep. The game follows the NHK tournament game between Matsuo
and Watanabe for a long time.

12.S3a-4b    00:07:00  00:15:00
13.P9g-9f    00:08:00  00:15:00
14.P9c-9d    00:08:00  00:18:00
15.P1g-1f    00:10:00  00:18:00
16.P1c-1d    00:10:00  00:20:00
17.S3i-3h    00:11:00  00:20:00
18.S7a-7b    00:11:00  00:21:00
19.P3g-3f    00:30:00  00:21:00
20.P6c-6d    00:30:00  00:36:00
21.K5i-6h    00:32:00  00:36:00
22.S7b-6c    00:32:00  00:37:00
23.N2i-3g    00:33:00  00:37:00
24.S6c-5d    00:33:00  00:49:00
25.P4g-4f    00:34:00  00:49:00
26.P4c-4d    00:34:00  00:50:00
27.S3h-4g    00:38:00  00:50:00
28.G6a-5b    00:38:00  00:50:00
29.G4i-5h    00:57:00  00:50:00
30.K5a-4a    00:57:00  00:52:00
31.S4g-5f    01:00:00  00:52:00
32.K4a-3a    01:00:00  00:55:00
33.K6h-7i    01:02:00  00:55:00
34.P7c-7d    01:02:00  00:56:00
35.P6g-6f    01:03:00  00:56:00
36.N8a-7c    01:03:00  01:01:00
37.P2f-2e    01:05:00  01:01:00
38.S4b-3c    01:05:00  01:01:00
39.P4f-4e    01:22:00  01:01:00
40.P4dx4e    01:22:00  01:03:00
41.P3f-3e    01:22:00  01:03:00
42.P6d-6e    01:22:00  01:39:00
43.P6fx6e    01:31:00  01:39:00
44.S3c-4d    01:31:00  01:51:00
45.P2e-2d    02:29:00  01:51:00
46.P2cx2d    02:29:00  01:52:00
47.P1f-1e    02:31:00  01:52:00
48.N7cx6e    02:31:00  02:45:00
49.P*2b      03:19:00  02:45:00
50.G3bx2b    03:19:00  02:48:00
51.B*6d      03:50:00  02:48:00

52.R8b-8a    03:50:00  03:45:00

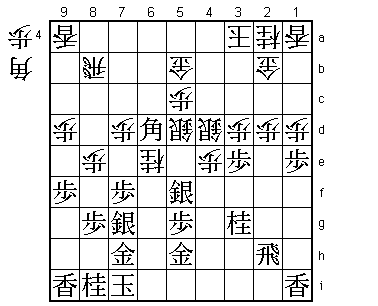
The sealed move. There are two alternatives here: 52.R9b or 52.R8a.
Watanabe didn't play 52.R9b because he didn't like 53.Sx6e Sx6e Px1d.
This gives black a strong attack on the edge, and the rook on 9b has
not much force in a counter attack. However, Sato said in the post-mortem
that he intended to play 53.S6f after R9b. He expected 54.G6c B9g and
the game gets relatively quiet. The opinion in the press room was that
Watanabe would not play 54.G6c because this would put the gold to far
away from the king. It is hard to say who was right here, but it is
interesting that both players looked at very different things. This will
be a theme in the rest of this game and maybe in the rest of this match
and one of the reasons the shogi world has been expecting a lot from this
match. Habu and Sato have played so many matches against each other that
their perception of the game has become very similar and often seems at a
level difficult to understand for others. There is little chance that this
will happen with Watanabe, who is known for his down-to-earth thinking and
behavior.

53.S7g-6f    03:53:00  03:45:00
54.P8e-8f    03:53:00  03:48:00
55.P8gx8f    03:55:00  03:48:00
56.P*8h      03:55:00  04:07:00
57.G7hx8h    04:24:00  04:07:00
58.P*6g      04:24:00  04:43:00
59.P*6i      04:55:00  04:43:00
60.P*8e      04:55:00  05:21:00
61.P8fx8e    05:00:00  05:21:00
62.P1dx1e    05:00:00  05:22:00
63.G5hx6g    05:21:00  05:22:00
64.G2b-3b    05:21:00  05:33:00
65.P*2c      05:26:00  05:33:00
66.G3bx2c    05:26:00  05:37:00
67.P*2e      05:31:00  05:37:00
68.P2dx2e    05:31:00  05:37:00
69.B6d-7c+   05:34:00  05:37:00

70.S4dx3e    05:34:00  06:35:00

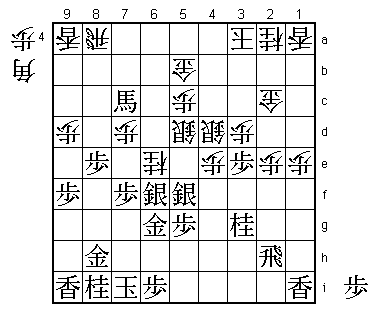
Watanabe thought quite a long time about playing 70.P*8f, but decided
against it because of 71.+Bx7d G6c +Bx6c Sx6c G*4c and he felt white was
losing. However, when this variation was played in the post-mortem analysis,
Sato's face indicated that he thought this was a very hard variation to play.
He didn't think the black attack was strong enough. Instead, he had planned
71.N7g Nx7g+ G8hx7g or Sx7g. "If so, I would have dropped the pawn", was
Watanabe's prompt reaction. Again a difference of opinion, but it seems
that Watanabe is right here. For example, if white plays Sx3e after G*4c,
then Nx2e strongly threatens P*3c and B*4f P*2d Gx2d Rx2e! is a very strong
sacrifice. Because black has a pawn on 6i, he can give up the rook for a
strong attack.

71.+B7c-7b!  06:23:00  06:35:00

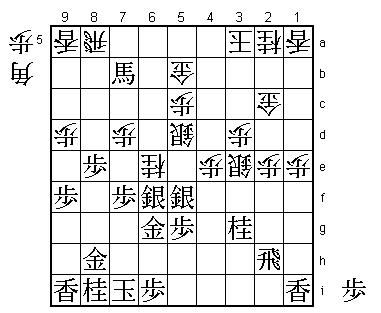
With so many captures and other powerful looking moves, it is easy to
overlook a quiet move like this. Watanabe was taken by surprise by the
bishop maneuvering in this game (from 6d to 7c to 7b). 71.S5fx6e is not
good because of 72.Sx6e Sx6e P*8g Gx8g Rx8e forking gold and silver.

72.R8a-5a?   06:23:00  07:07:00

The point of 71.+B7b is that because of 72.Rx8e N9g R8f P*8g the knight
on 6e is easier to capture than before. Still, moving the rook to 5a is
an important mistake. Better was 72.R4a, which gives the rook more attacking
power. This move is difficult to play because of S5fx6e followed by N*6d
which attacks the undefended gold on 5b. However, after 72.S5fx6e Sx6e Sx6e
P*6f Gx6f B*3i! is a strong bishop drop because R5h is answered by P4f,
bringing the rook on 4a in play. Therefore, it seems that black has to play
R6h and after Bx5g+ P*5h +B4f P*4g or K7h the position is unclear.

73.S5fx6e    06:25:00  07:07:00
74.S5dx6e    06:25:00  07:07:00
75.S6fx6e    06:25:00  07:07:00
76.P*6f      06:25:00  07:07:00
77.G6gx6f    06:46:00  07:07:00
78.P*8g      06:46:00  07:11:00
79.G8hx8g    06:57:00  07:11:00
80.P*8f      06:57:00  07:11:00
81.G8gx8f    06:58:00  07:11:00
82.B*5i      06:58:00  07:12:00

83.R2h-8h!   06:58:00  07:12:00

This is a difficult move to play, because it leaves the knight on 3g for
white to pick up. This knight on 3g is an important attacking piece in the
Kakugawari and giving it up often leads to entering king possibilities.
In the press room 83.+B7c Bx8f+ N*4c Gx4c +Bx5a was analyzed, which is
good for black, but if white plays 84.R7a instead of +Bx8f then after
+B8b Bx8f+ +Bx7a P*8h white is behind in material but has a strong attack
that seems hard to stop. Sato has seen this and has judged that saving the
gold on 8f is more important than the knight on 3g. After 84.+Bx3g, black
will win quickly with 85.N*6d G4b P*4c etc.

84.S*7g      06:58:00  07:28:00

Watanabe tries a desperate attack, but Sato is too good a player to allow
his young opponent back into the game.

85.N8ix7g    07:01:00  07:28:00
86.B5ix7g+   07:01:00  07:28:00
87.N*7h      07:07:00  07:28:00
88.P9d-9e    07:07:00  07:32:00
89.P9fx9e    07:10:00  07:32:00
90.P*9f      07:10:00  07:39:00
91.S*6h      07:12:00  07:39:00
92.+B7gx8f   07:12:00  07:40:00
93.R8hx8f    07:14:00  07:40:00
94.L9ax9e    07:14:00  07:43:00
95.P*9h      07:28:00  07:43:00
96.P*6d      07:28:00  07:43:00
97.S6ex6d    07:29:00  07:43:00
98.P7d-7e    07:29:00  07:55:00
99.P7fx7e    07:30:00  07:55:00
100.S3e-4f   07:30:00  07:59:00
101.N3gx2e   07:31:00  07:59:00
102.R5a-9a   07:31:00  07:59:00
103.P*3c     07:38:00  07:59:00
104.K3a-2b   07:38:00  07:59:00
105.S*3b     07:41:00  07:59:00
106.N2ax3c   07:41:00  07:59:00
107.S3bx2c+  07:44:00  07:59:00
108.K2bx2c   07:44:00  07:59:00
109.N2ex3c+  07:44:00  07:59:00
110.K2cx3c   07:44:00  07:59:00
111.+B7bx4e  07:48:00  07:59:00
Resigns      07:48:00  07:59:00

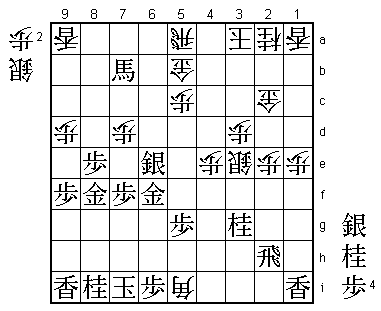
Watanabe resigned because black has many devastating attacking moves like
N*2e while the black rook on 8f works perfectly in defense, giving white
no access to the black king. Still, after the post-mortem analysis,
Watanabe came in the press room and when he saw a computer screen with
the final position he asked: "Why not first 111.N*2e and then +Bx4e?".
A different opinion about the position until the very end... This is going
to be a very interesting match.
