18th Ryu-O Match Game 1
[Black "Kimura Kazuki, Challenger"]
[White "Watanabe Akira, Ryu-O"]
[Event "18th Ryu-O sen, Game 1"]
[Date "October 25th and 26th 2005"]
1.P2g-2f 00:01:00 00:00:00
2.P3c-3d 00:01:00 00:02:00
3.P7g-7f 00:02:00 00:02:00
4.G4a-3b 00:02:00 00:05:00
5.G6i-7h 00:06:00 00:05:00
6.P8c-8d 00:06:00 00:10:00
7.P2f-2e 00:12:00 00:10:00
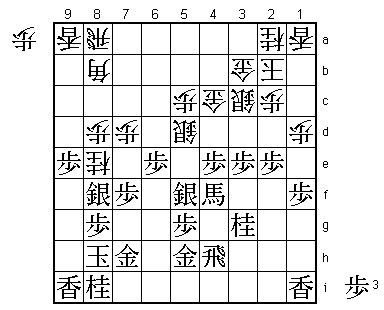
8.B2bx8h+ 00:12:00 00:18:00
A big surprise! Watanabe and Kimura are both specialists in the
R8e-Yokofudori opening and some expected that this match would have
this opening in every game. Instead, Watanabe plays the Kakugawari
opening with tempo loss. A popular opening, but Watanabe has never
played this opening in an official game before. Still, since this is
not a single game but a match, this is a reasonable strategy. Save
your best opening for the time when you really need it. Being beaten
in the first game of a long title match playing your favorite opening
is a serious problem. On the other hand, winning the first game even
without playing your favorite opening could cause serious psychological
damage to the opponent.
9.S7ix8h 00:14:00 00:18:00
10.S3a-2b 00:14:00 00:19:00
11.S3i-3h 00:22:00 00:19:00
12.S2b-3c 00:22:00 00:23:00
13.P4g-4f 00:40:00 00:23:00
14.S7a-7b 00:40:00 00:35:00
15.S3h-4g 00:43:00 00:35:00
16.P6c-6d 00:43:00 00:39:00
17.P1g-1f 00:50:00 00:39:00
18.P1c-1d 00:50:00 00:47:00
19.K5i-6h 01:08:00 00:47:00
20.S7b-6c 01:08:00 00:52:00
21.S8h-7g 01:15:00 00:52:00
22.K5a-4b 01:15:00 01:00:00
23.P9g-9f 01:22:00 01:00:00
24.P9c-9d 01:22:00 01:07:00
25.G4i-5h 01:57:00 01:07:00
26.G6a-5b 01:57:00 01:15:00
27.S4g-5f 02:01:00 01:15:00
28.P7c-7d 02:01:00 01:23:00
29.P3g-3f 02:05:00 01:23:00
30.K4b-3a 02:05:00 01:29:00
31.K6h-7i 02:10:00 01:29:00
32.S6c-5d 02:10:00 01:36:00
33.P6g-6f 02:17:00 01:36:00
34.P4c-4d 02:17:00 01:49:00
35.N2i-3g 02:28:00 01:49:00
36.G5b-4c 02:28:00 01:57:00
37.R2h-4h 02:59:00 01:57:00
38.K3a-2b 02:59:00 02:15:00
39.K7i-8h 03:08:00 02:15:00
40.N8a-7c 03:08:00 02:20:00
41.P4f-4e 03:19:00 02:20:00
42.N7c-8e 03:19:00 02:58:00
43.S7g-8f 03:37:00 02:58:00
44.P6d-6e 03:37:00 03:09:00
45.B*7c 04:44:00 03:09:00
46.R8b-8a 04:44:00 03:13:00
47.P4ex4d 04:49:00 03:13:00
48.S3cx4d 04:49:00 03:18:00
49.P*4e 04:52:00 03:18:00
50.S4d-3c 04:52:00 03:22:00
51.P6fx6e 04:54:00 03:22:00
52.P9d-9e 04:54:00 04:13:00
53.P9fx9e 04:57:00 04:13:00
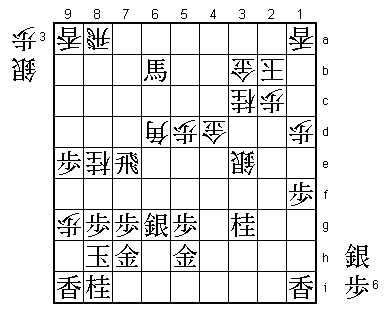
54.P3d-3e?! 04:57:00 04:19:00
Until this move, the position is identical to the 7th game of the Oi
match and the first game of the Kisei match between Habu and Sato.
Actually, Watanabe was a commentator in Tokyo for the 7th game of the
Oi match, while Kimura followed the game in the press room. Therefore,
they were both very familiar with this position in which 54.P7e was played
both times. Watanabe's new 54.P3e doesn't seem to be an improvement.
55.B7c-4f+ 05:10:00 04:19:00
56.B*8b 05:10:00 04:20:00
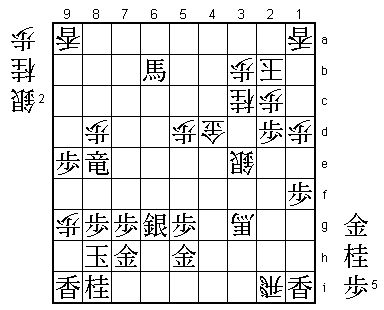
57.P3fx3e! 06:01:00 04:20:00
Not an easy move to play. After 58.Bx4f 59.Rx4f, black has handed over
the promoted bishop and with the rook on 4f, it seems that white has all
kinds of nasty attacks. However, the obvious 60.B*2h is answered by 61.R3f
Bx1i+ P3d Sx3d B*6f even though white has won a lance, the promoted bishop
is out of play and the black bishop on 6f is working much better. From now
on, the black position is better, but somehow Watanabe manages to keep it
very close...
58.B8bx4f 06:01:00 05:10:00
59.R4hx4f 06:01:00 05:10:00
60.P*6f 06:01:00 05:11:00
61.R4f-2f 06:29:00 05:11:00
62.P7d-7e 06:29:00 05:28:00
63.S8fx7e 06:37:00 05:28:00
64.R8a-7a 06:37:00 05:53:00
65.S7ex6f 06:43:00 05:53:00
66.R7ax7f 06:43:00 06:16:00
67.S5f-6g 06:49:00 06:16:00
68.R7f-7b 06:49:00 06:18:00
69.B*6a 06:55:00 06:18:00
70.R7b-7a 06:55:00 06:25:00
71.B6a-8c+ 06:56:00 06:25:00
72.P*6d 06:56:00 07:05:00
73.P*7g 07:07:00 07:05:00
74.P6dx6e 07:07:00 07:14:00
75.S6fx6e 07:07:00 07:14:00
76.P*9g 07:07:00 07:17:00
77.S6ex5d 07:14:00 07:17:00
78.P5cx5d 07:14:00 07:17:00
79.P2e-2d 07:18:00 07:17:00
80.S3cx2d 07:18:00 07:24:00
81.+B8cx8d 07:32:00 07:24:00
82.R7a-8a 07:32:00 07:24:00
83.P4e-4d 07:33:00 07:24:00
84.G4cx4d 07:33:00 07:25:00
85.+B8d-6b 07:33:00 07:25:00
86.S2dx3e 07:33:00 07:32:00
87.P*3c 07:34:00 07:32:00
88.N2ax3c 07:34:00 07:33:00
89.R2f-7f 07:40:00 07:33:00
90.P*7e 07:40:00 07:33:00
91.R7fx7e 07:41:00 07:33:00
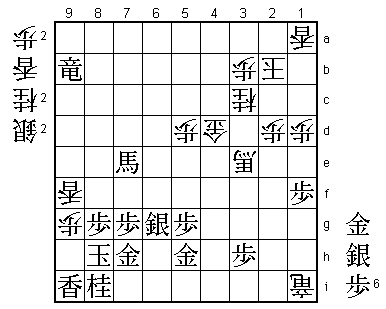
92.B*6d! 07:41:00 07:34:00
White has been struggling with the lack of pawns in hand, but this shows
that the position is still unclear.

93.R7e-7b+   07:44:00  07:34:00

If the rook moves to another square, then 93.P9h+ Lx9h P*9g is very strong.

94.R8a-8b!   07:44:00  07:34:00

The second point of B*6d: white can now exchange the rooks, which gives
him good chances for a counterattack.

95.+R7bx8b   07:48:00  07:34:00
96.B6dx8b    07:48:00  07:34:00

The bishop is no longer pointing at 9g, but still threatens Bx3g+ followed
by N*9f next, so black has to act quickly.

97.S*4a      07:48:00  07:34:00
98.P*3a      07:48:00  07:37:00
99.S4ax3b+   07:51:00  07:37:00
100.P3ax3b   07:51:00  07:38:00
101.R*8a     07:51:00  07:38:00
102.B8bx3g+  07:51:00  07:40:00
103.R8ax8e+  07:51:00  07:40:00
104.R*2i     07:51:00  07:42:00
105.P*2d     07:52:00  07:42:00
106.P*8d!    07:52:00  07:45:00
An obvious move. The promoted rook on 8d is defending against the knight
drop on 9f, is eyeing the silver on 3e and also threatens to enter the
attack with +R8a at any time. Of course, Kimura had seen this, but he
counted on a move that didn't work.

107.+B6bx8d  07:54:00  07:45:00

A change of plan. Kimura thought he could play 107.+Rx3e Gx3e +Bx3e here,
but at the last moment saw that he is mated after R*9h then! (Lx9h Px9h+
Kx9h P*9g and the pawn on 8d and the promoted bishop on 3g are working
together to create the mate). 107.+Bx8d blocks the rook and moves the bishop
away from the action and suddenly the position is difficult to win for black.

108.R2ix1i+  07:54:00  07:48:00
109.P*3h     07:55:00  07:48:00
110.+B3g-3f  07:55:00  07:50:00
111.+B8d-7e  07:55:00  07:50:00
112.P2cx2d   07:55:00  07:51:00
113.N*4g     07:55:00  07:51:00
114.P*8d     07:55:00  07:54:00
115.N4gx3e   07:55:00  07:54:00
116.+B3fx3e  07:55:00  07:55:00
117.+R8ex8d  07:56:00  07:55:00
118.P*8c     07:56:00  07:55:00
119.+R8dx8c  07:56:00  07:55:00
120.L9ax9e   07:56:00  07:55:00
121.P*9f     07:57:00  07:55:00
122.L9ex9f   07:57:00  07:55:00
123.+R8c-9b? 07:57:00  07:55:00
The losing move, based on the confidence of the born defender Kimura. He
thought he could survive the next move, but overlooked an important attacking
option. If he would have seen it, he would have played 123.Lx9g or 123.P7f here.

124.S*9h     07:57:00  07:56:00
125.G7h-7i   07:59:00  07:56:00

A change of plan, but it is all white from now on. 125.Lx9h Px9h+ of course
leads to mate and 125.+Rx9f +Rx8i Kx9g +Rx9i is winning for white because
there is also the threat of P*9e +Rx9e N*8c. However, what Kimura overlooked
here is that 125.P7f doesn't work because of 126.N*6e +Bx6e N*8e which is hisshi
(only possible because the rook has moved from 8c to 9b). Kimura's confidence in
his defending skills let him down here. Almost every player would have preferred
123.Lx9g to take away attacking options, but Kimura's style is to force the
opponent into a misplacement of pieces and then kill the attack. Indeed, the
position of L9f, P9g and S9h is heavy, but in this position it just works for
white.

126.S9hx9i=  07:59:00  07:57:00
127.K8h-7h   07:59:00  07:57:00
128.P9g-9h+  07:59:00  07:57:00
129.P*4i     07:59:00  07:57:00
130.+R1ix4i  07:59:00  07:57:00
131.G*5i     07:59:00  07:57:00
132.+R4i-2i  07:59:00  07:57:00
133.+B7e-4b  07:59:00  07:57:00
134.S*4c     07:59:00  07:58:00
135.+R9bx9f  07:59:00  07:58:00
136.N*4f     07:59:00  07:59:00
137.P*4i     07:59:00  07:59:00
138.N4fx5h+  07:59:00  07:59:00
139.S6gx5h   07:59:00  07:59:00
140.P*9e     07:59:00  07:59:00
141.+R9fx9e  07:59:00  07:59:00
142.N*6f     07:59:00  07:59:00
143.K7h-6g   07:59:00  07:59:00
144.N6fx5h+  07:59:00  07:59:00
145.G5ix5h   07:59:00  07:59:00
146.L*7a     07:59:00  07:59:00

Watanabe has taken his time, which is his style. First make a position from
which it is difficult to lose and then go for the kill. 146.L*7a is the
deciding move.

147.N*4g     07:59:00  07:59:00
148.P*6f     07:59:00  07:59:00
149.K6gx6f   07:59:00  07:59:00
150.S*5e     07:59:00  07:59:00
151.N4gx5e   07:59:00  07:59:00
152.G4dx5e   07:59:00  07:59:00
153.+R9ex5e  07:59:00  07:59:00
154.P5dx5e   07:59:00  07:59:00
155.S*3a     07:59:00  07:59:00
156.K2b-2c   07:59:00  07:59:00
Resigns      07:59:00  07:59:00

Kimura plays a final check, but there is no mate and after 157.+Bx4c the
black king is mated with 158.G*7e etc. Watanabe had a tough time in this
game, but in the end he got all he wanted: winning with white using an
opening he has never used before. Still, challenger Kimura didn't seem to
be too shaken: "I played at the big stage, used my time, played a difficult
game. Maybe it is strange to say this when you lose, but it was fun." Feeling
too much pressure is not good, but as Yamasaki pointed out, winning at the
big stage is not easy. It needs a life-or-death attitude in every game and
Kimura might be a little too satisfied with reaching this stage. This was
a game he should have won and that can be costly at the highest level...