17th Ryu-O Match Game 5
[Black "Watanabe Akira, Challenger"]

[White "Moriuchi Toshiyuki, Ryu-O"]

[Event "17th Ryu-O sen, Game 5"]

[Date "December 7th and 8th 2004"]

1.P7g-7f     00:01:00  00:00:00

2.P8c-8d     00:01:00  00:02:00

3.S7i-6h     00:02:00  00:02:00

4.P3c-3d     00:02:00  00:02:00

5.P6g-6f     00:02:00  00:02:00

6.P5c-5d     00:02:00  00:02:00

7.P5g-5f     00:04:00  00:02:00

8.S3a-4b     00:04:00  00:09:00

9.S3i-4h     00:11:00  00:09:00

10.S4b-5c    00:11:00  00:09:00

11.S4h-5g    00:23:00  00:09:00

12.P6c-6d    00:23:00  00:20:00

13.G6i-7h    00:26:00  00:20:00

14.R8b-3b    00:26:00  00:24:00


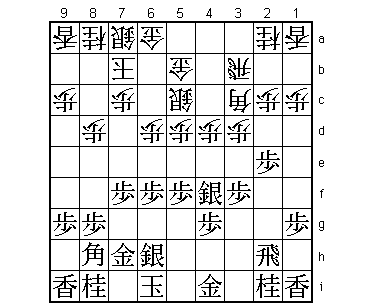
After two Yagura games, Moriuchi tries something different with

white: the Yodo-furibisha opening. This will not have been a big

surprise to Watanabe, because Moriuchi played this opening also

against Habu in the Kio tournament four days before this Ryu-O game.

Moriuchi won that game convincingly, which will have given him the

confidence to try it in this very important title match game as well.


15.P2g-2f    00:30:00  00:24:00

16.P4c-4d    00:30:00  00:26:00

17.P2f-2e    00:39:00  00:26:00

18.B2b-3c    00:39:00  00:26:00

19.K5i-6i    00:39:00  00:26:00

20.K5a-6b    00:39:00  00:29:00

21.P3g-3f    00:53:00  00:29:00

22.G4a-5b    00:53:00  01:33:00

23.S5g-4f    00:56:00  01:33:00

24.K6b-7b?   00:56:00  01:34:00

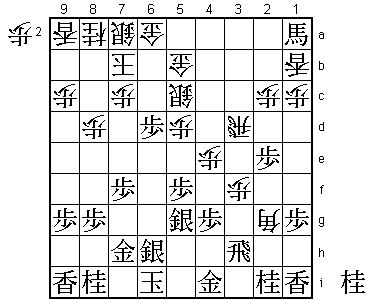
An important mistake that gives black a very good position. Correct

was 24.G4c, after which black has no strong attack. For example,

25.P3e B5a R3h Px3e Sx3e P*3d S4f. Moriuchi did not like this

position: "If it comes out like this, I should have played a normal

Furibisha from the start".


25.P3f-3e    01:45:00  01:34:00

26.B3c-5a    01:45:00  01:44:00

27.R2h-3h    01:56:00  01:44:00

28.P4d-4e?   01:56:00  01:48:00


The second mistake. Watanabe had counted on 28.Px3e, after which Sx3e

K8b P*3d S7b R3f P7d N3g led to a position with completely different

opinions. Moriuchi feared that he might be pushed off the board from

here, while Watanabe worried about the problems of opening up the

position with a closed bishop diagonal and how to properly castle his

king. It seems that this variation was better than the game.


29.S4f-5g    02:19:00  01:48:00

30.P3dx3e    02:19:00  01:54:00

31.P6f-6e    02:23:00  01:54:00

32.B5a-3c    02:23:00  02:14:00

33.B8hx3c+   02:45:00  02:14:00

34.N2ax3c    02:45:00  02:52:00

35.P6ex6d    02:48:00  02:52:00

36.N3cx2e    02:48:00  02:57:00

37.P*2f      03:08:00  02:57:00

38.P3e-3f    03:08:00  04:34:00


The sealed move and one of those rare occasions where a position after

the first day already looks more or less decided. Black seems to have

an overwhelming advantage and Moriuchi's body language was already

quite bad when he was contemplating the sealed move. Quite unusual

for him, as it is normally very hard to read to tell from looking at

him how good or bad his position is.


39.P2fx2e    03:09:00  04:34:00

40.R3b-3d    03:09:00  05:03:00

41.B*2b      03:34:00  05:03:00

42.L1a-1b    03:34:00  05:13:00

43.B2b-1a+   03:40:00  05:13:00

44.B*2g      03:40:00  05:23:00

45.+B1ax1b!  03:54:00  05:23:00


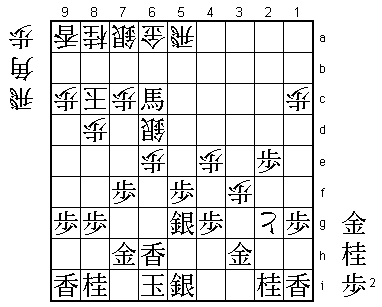
Fukuzaki, who followed the game from the press room, was especially

impressed with this move. It looks like the black position is badly

defended against a rook drop, but Watanabe has judged correctly that

46.Bx3h+ Gx3h R*4i can be answered by S5i and white has no way to get

to the king. For example Rx2i+ N*7e Sx6d B*8c K6b L*6c Gx6c Bx6a+ Kx6a

Nx6c+ and black wins.


46.B2gx3h+   03:54:00  05:54:00

47.G4ix3h    03:54:00  05:54:00

48.S5cx6d    03:54:00  05:54:00

49.+B1bx2c   04:06:00  05:54:00

50.R3d-3a    04:06:00  05:55:00

51.+B2c-2b   04:12:00  05:55:00

52.R3a-5a    04:12:00  05:56:00

53.S6h-5i    04:34:00  05:56:00

54.P*2f      04:34:00  06:30:00

55.L*6h      04:48:00  06:30:00

56.P*6e      04:48:00  06:30:00

57.+B2b-4d   04:48:00  06:30:00

58.P2f-2g+   04:48:00  06:32:00

59.+B4dx5d   04:54:00  06:32:00

60.G5b-6c    04:54:00  06:32:00

61.B*8c      04:55:00  06:32:00


This might have been a mistake, but an alternative is not given.


62.K7bx8c    04:55:00  06:42:00


Here Watanabe realized that there was a problem, but it is too late.

He thought that 62.K6b was the only move here.


63.+B5dx6c   04:55:00  06:42:00

64.P*5h?     04:55:00  06:51:00


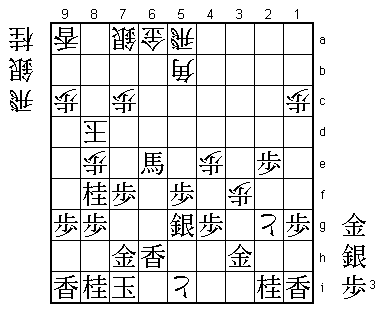
Despite the overwhelming advantage that black seems to have, only this

is losing move. If white would have played 64.G7b, things are still

unclear. For example, 65.+Bx6d +Px3h S*6c P*5h +Bx6e G*7d N*7e K8b

Sx7b+ Sx7b and now G*6b would be winning if white did not have Px5i+

K7i R*6i K8h B*4d which picks up the gold on 6b. Also, 65.+Bx6d +Px3h

N*7e K9b S*6c G*8b +Bx6e B*7d Sx7d+ Px7d +Bx7d S*8c and the black attack

is stopped. This position was analyzed extensively, even after the

post-mortem was over, but a clear win for black was not found. Moriuchi

admitted after the game that he had already given up on the game here and

regretted not to have thought about his moves a little longer.


65.N*9e      05:07:00  06:51:00

66.K8c-9d    05:07:00  06:51:00

67.+B6cx8a   05:07:00  06:51:00

68.P5hx5i+   05:07:00  06:51:00

69.K6i-7i    05:07:00  06:51:00

70.K9dx9e    05:07:00  07:01:00

71.N*8f      05:08:00  07:01:00

72.P8d-8e    05:08:00  07:03:00

73.+B8a-6c   05:09:00  07:03:00

74.B*5b      05:09:00  07:13:00

75.+B6cx6d   05:10:00  07:13:00

76.K9e-8d    05:10:00  07:13:00

77.+B6dx6e   05:10:00  07:13:00

Resigns      05:10:00  07:13:00

After 78.Px8f S*7e is a simple mate and there is no good attack or

defense for white. Suddenly, Watanabe is within one win of taking the

Ryu-O title from Moriuchi. Still, this is a situation he has been in

before, leading 2-1 in the Oza match against Habu last year. He then

lost both games, so he knows the difficulty of that final win. Let's

see how he fares with the white pieces in game 6.
