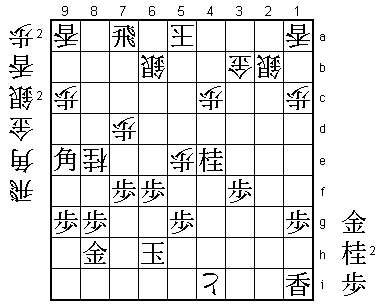
17th Ryu-O Match Game 2
[Black "Moriuchi Toshiyuki, Ryu-O"]
[White "Watanabe Akira, Challenger"]
[Event "17th Ryu-O sen, Game 2"]
[Date "November 4th and 5th 2004"]
1.P7g-7f 00:00:00 00:00:00
2.P3c-3d 00:00:00 00:02:00
3.P2g-2f 00:00:00 00:02:00
4.P8c-8d 00:00:00 00:03:00
5.P2f-2e 00:00:00 00:03:00
6.P8d-8e 00:00:00 00:04:00
7.G6i-7h 00:00:00 00:04:00
8.G4a-3b 00:00:00 00:04:00
9.P2e-2d 00:00:00 00:04:00
10.P2cx2d 00:00:00 00:04:00
11.R2hx2d 00:00:00 00:04:00
12.P8e-8f 00:00:00 00:05:00
13.P8gx8f 00:00:00 00:05:00
14.R8bx8f 00:00:00 00:05:00
15.R2dx3d 00:00:00 00:05:00
16.B2b-3c 00:00:00 00:05:00
17.R3d-3f 00:00:00 00:05:00
18.S3a-2b 00:00:00 00:06:00
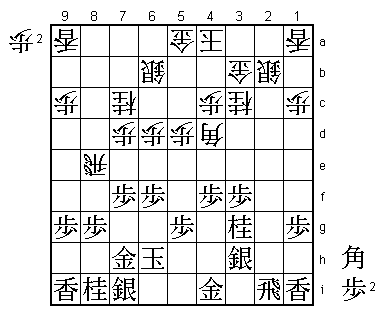
19.P*8g 00:04:00 00:06:00
20.R8f-8e 00:04:00 00:08:00
Like in the first game, Watanabe's choice of opening is no surprise.
He plays what he knows and let Moriuchi think of a way to counter that.
21.R3f-2f 00:04:00 00:08:00
22.K5a-4a 00:04:00 00:09:00
23.K5i-6h 00:06:00 00:09:00
24.P7c-7d 00:06:00 00:14:00
25.P3g-3f 00:07:00 00:14:00
26.S7a-6b 00:07:00 00:17:00
27.S3i-3h 00:14:00 00:17:00
28.N8a-7c 00:14:00 00:18:00
29.N2i-3g 00:16:00 00:18:00
30.G6a-5a 00:16:00 00:19:00
31.P4g-4f 00:22:00 00:19:00
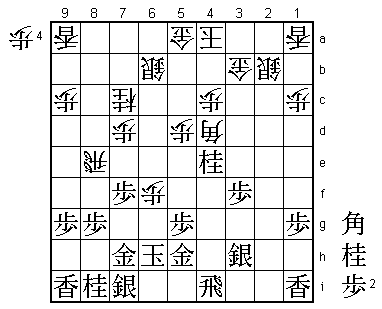
32.P5c-5d?! 00:22:00 01:00:00
But this is a surprise. Even though it is the classic attack of the
R8e Yokofudori, white is not playing this pawn push in the center
anymore. It is considered to risky and this game seems to indicate
that this conclusion is correct. Why Watanabe picked this strategy
only he knows.
33.B8hx3c+ 00:53:00 01:00:00
34.N2ax3c 00:53:00 01:00:00
35.P6g-6f 00:53:00 01:00:00
36.B*4d 00:53:00 01:05:00
37.R2f-2i 01:13:00 01:05:00
38.P6c-6d 01:13:00 01:07:00
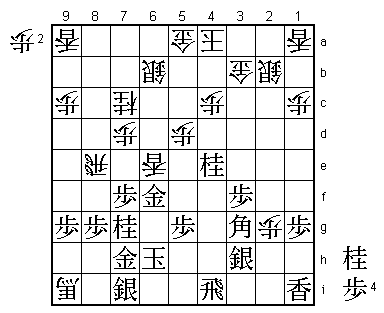
39.G4i-5h! 02:41:00 01:07:00
Three years ago, Tanigawa and Habu played the same position in a
Ryu-O tournament qualification game. There Tanigawa played 39.B*4g
and won. It might be that Watanabe prepared something here, although
after the game he admitted that he already had doubts about the white
position here. Anyway, Moriuchi thought about B*4g, said he did not
like the feeling of it and decided to vary play.
40.P6d-6e 02:41:00 02:26:00
40.Bx6f is not good because of 41.N7g R8b G5b-6g and black is very
strong in the center, making it almost impossible to attack for white.
41.P4f-4e 02:43:00 02:26:00
42.N3cx4e 02:43:00 02:59:00
Sacrifices a knight to avoid the end of the attack. 42.Bx6f again fails
to N7g and G5h-6g. Here it is even worse than before, because white has
not pushed the pawn to 6e to take the pawn on 6f with the bishop.
43.N3gx4e 04:39:00 02:59:00
44.P6ex6f 04:39:00 03:04:00
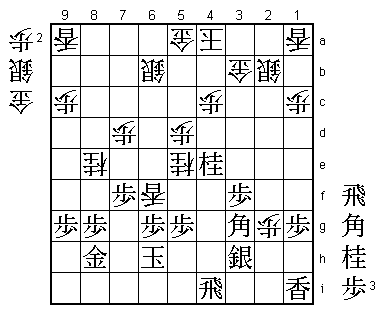
45.R2i-4i! 04:39:00 03:04:00
Suzuki (8-dan) commented that almost every professional would play 45.B*5f

here. This defends the knight, attacks the pawn on 7d and also helps in

attack after P*2c Sx2c N*1e next. Even P*4b then becomes a strong possibility.

Moriuchi just calmly defends the knight with the rook. This invites the white

attack, but Moriuchi is very confident that it will not be string enough.


46.P*2g      04:39:00  04:30:00

47.B*3g      04:56:00  04:30:00

48.P6f-6g+   04:56:00  05:19:00

49.G5hx6g    05:00:00  05:19:00

50.B4dx9i+   05:00:00  05:23:00

51.N8i-7g    05:37:00  05:23:00

52.P*6f      05:37:00  05:26:00

53.G6gx6f    05:40:00  05:26:00

54.L*6e      05:40:00  05:27:00
55.P*6g!     05:45:00  05:27:00


Again good defense. 55.Nx8e is risky because of 56.+Bx6f 57.P*6g 58.+Bx7f

and the idle bishop comes strongly into play. For example, 59.Nx7c+ P*6f!

is very hard to defend against (Px6f is mate after G*5h). By dropping

the pawn on 6g here, Moriuchi keeps the promoted bishop in its bad spot.


56.L6ex6f    05:45:00  05:27:00

57.N7gx8e    05:46:00  05:27:00

58.N7cx8e    05:46:00  05:27:00

59.S7i-8h    06:17:00  05:27:00

60.+B9ix8h   06:17:00  05:30:00

61.G7hx8h    06:17:00  05:30:00

62.N*5e      06:17:00  05:30:00
Watanabe's final attempt. 63.Px6f G*6g K5i Gx5g or 63.N*5i Lx6g+ Nx6g P*6f

Nx5e G*6g is good for white, but...


63.B3gx5e!   06:25:00  05:30:00


Game over. Black takes both of white's attacking pieces and then finally

turns to attack himself. An attack that is impossible to defend against.


64.P5dx5e    06:25:00  05:30:00

65.P6gx6f    06:39:00  05:30:00

66.P2g-2h+   06:39:00  05:31:00

67.L*5d      07:01:00  05:31:00

68.+P2hx3h   07:01:00  05:32:00

69.L5dx5a+   07:11:00  05:32:00

70.K4ax5a    07:11:00  05:32:00

71.B*9e      07:12:00  05:32:00


Important. If black plays 71.N*5d here, things become complicated again

after 72.B*9e.


72.+P3hx4i   07:12:00  05:42:00

73.R*7a      07:15:00  05:42:00

Resigns      07:15:00  05:43:00
After dropping any piece on 6a, it is mate after 75.Bx6b+ Kx6b S*7c K5b

(K6c G*5c) Rx6a+ K4b G*5b. A total victory for Moriuchi, who showed perfect

defense in this game. Watanabe will be unhappy about being blown away, but

it is easier to recover from a total defeat than from losing a close game.

Game three is going to be very important for him, playing black.