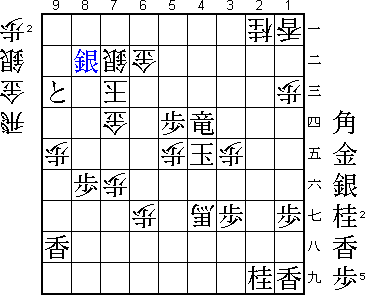
16th Zen Nihon Pro Tournament Game 2
Black: Habu, 4K
White: Moriuchi, 8-dan
16th Zen Nihon Pro Tournament, Game 2, April 16th 1998
1.P7g-7f           0/0          0/0
2.P3c-3d           0/0          0/0
3.P2g-2f           1/1          0/0
4.P4c-4d           0/1          0/0
5.P2f-2e           1/2          0/0
6.B2b-3c           0/2          0/0
7.S3i-4h           1/3          0/0
8.S3a-3b           0/3          0/0
9.P5g-5f           0/3          0/0
10.S3b-4c          0/3          0/0
11.K5i-6h          2/5          0/0
12.R8b-2b          0/5          0/0
13.K6h-7h          0/5          0/0
14.K5a-6b          0/5          0/0
15.G4i-5h          2/7          0/0
16.K6b-7b          0/7          0/0
17.B8h-7g          2/9          0/0
18.K7b-8b          0/9          2/2
19.K7h-8h          0/9          0/2
20.S7a-7b          0/9          0/2
21.S7i-7h          1/10         0/2
22.P9c-9d          0/10         2/4
23.P9g-9f          1/11         0/4
24.G4a-5b          0/11         14/18
25.S4h-5g          11/22        0/18
26.P6c-6d          0/22         3/21
27.P6g-6f          1/23         0/21
28.G5b-6c          0/23         21/42
29.G5h-6g          0/23         0/42
30.P7c-7d          0/23         10/52
31.P8g-8f          10/33        0/52
32.P5c-5d          0/33         19/71
33.S7h-8g          31/64        0/71
34.N8a-7c          0/64         14/85
35.G6i-7h          2/66         0/85
36.P6d-6e          0/66         5/90
37.L9i-9h          4/70         0/90
38.P8c-8d          0/70         16/106
39.K8h-9i          3/73         0/106
40.R2b-3b          0/73         0/106
41.S5g-6h          24/97        0/106
42.P6ex6f          0/97         6/112
43.B7gx6f          0/97         0/112
44.P3d-3e          0/97         8/120
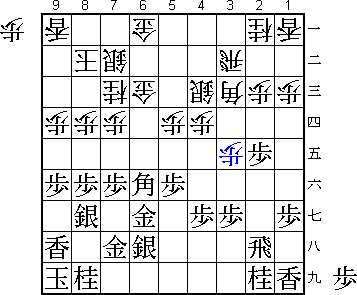
No quick attacks in this game and it was expected that there would be a
long middlegame before the fight would finally start. However, Moriuchi
decides to sacrifice a pawn for an attacking position. A brave decision.
Not that Moriuchi had much choice, though. He realised that after 44.S8c P3f
he would soon run out of moves.
45.B6fx8d 9/106 0/120
46.P4d-4e 0/106 13/133
47.S6h-7g 3/109 0/133
48.S4c-4d 0/109 10/143
49.B8d-4h 18/127 0/143
50.P5d-5e 0/127 3/146
51.P9f-9e 12/139 0/146
52.P9dx9e 0/139 0/146
53.P2e-2d 0/139 0/146
54.P2cx2d 0/139 0/146
55.P7f-7e 0/139 0/146
56.P5ex5f 0/139 8/154
57.P*9b 9/148 0/154
58.L9ax9b 0/148 1/155
59.P7ex7d 0/148 0/155
60.G6cx7d 0/148 4/159
61.P*9c 1/149 0/159
62.L9bx9c 0/149 0/159
63.B4hx9c+ 0/149 0/159
64.K8bx9c 0/149 0/159
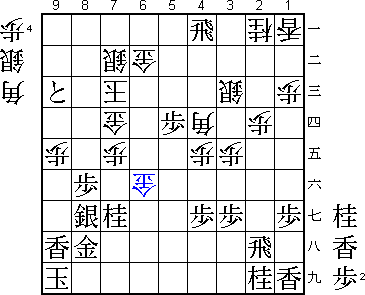
65.L*3d 0/149 0/159
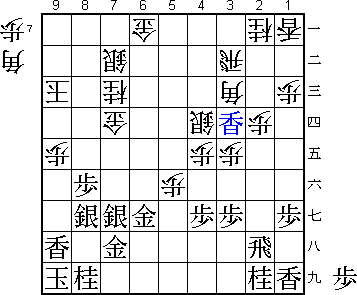
Both players were not sure about this position. Habu: "Wasn't sacrificing the
bishop a little violent?". Moriuchi: "The dropping of this lance gave me a
bad feeling about this position". It looks like black might be a little better
here. There is a big difference between the position of the black king and
the white king.

66.R3b-6b          0/149        5/164
67.L3dx3c+         0/149        0/164
68.S4dx3c          0/149        0/164
69.P*5d            4/153        0/164
70.B*4d            0/153        2/166
71.B*5c            2/155        0/166
72.P5f-5g+         0/155        3/169
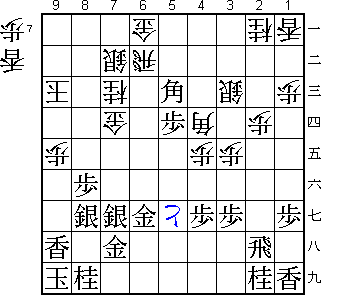
73.B5cx6b+?! 3/158 0/169
This is not the right move. The simple 73.Gx5g was better. Then after 74.R6i+
Bx4d+ Sx4d R6h or 74.Bx7g+ (the move Moriuchi had planned) Gx7g R6i+ Lx9e P*9d
Lx9d Kx9d B*5h forking dragon and king, black has no worries.
74.G6ax6b 0/158 1/170
75.G6gx5g 0/158 0/170
76.K9c-8b 0/158 2/172
77.R*4a 1/159 0/172
78.P*7f 0/159 3/175
79.S8gx7f 3/162 0/175
80.P*7e 0/162 0/175
81.S7f-8g 0/162 0/175
82.L*7f 0/162 2/177
83.P*9d 8/170 0/177
84.N7c-6e 0/170 1/178
85.P9d-9c+ 1/171 0/178
86.K8b-7c 0/171 0/178
87.G5g-6g 0/171 0/178
88.L7fx7g+ 0/171 0/178
89.G6gx7g 1/172 0/178
90.N6ex7g+ 0/172 0/178
91.N8ix7g 0/172 0/178
92.P*8h 0/172 1/179
93.G7hx8h 2/174 0/179
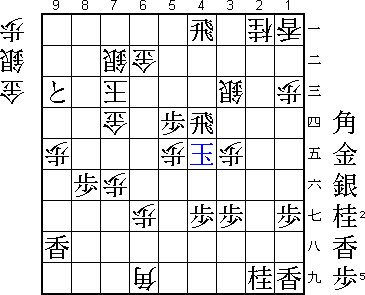
94.G*6f! 0/174 0/179
A strong move that keeps the game close. Moriuchi was not so sure though: "I
don't know if this is best". It could have been good enough after Habu's
reply.

95.R2hx2d?         3/177        0/179

If Habu would have lost this game, this would have been the losing move. There
is still a black win in this position after 95.R4c+. For example:
a) 96.S6c P*6g Gx7g (Gx6g N*5f) L*6f and black is safe.
b) 96.K6d P*6g and white can not play Gx7g because of the fork N*5f.
c) 96.P*5c L*6g! and now Gx6g Px5c+ Gx5c N*6e or Gx7g +Rx4d Sx4d B*8b
K8d Gx7g is winning for black.

96.G6fx7g          0/177        0/179
97.R2dx4d          0/177        0/179

This looks very strong because black threatens mate with B*8b and white can
not take the rook because of 97.Sx4d B*8b K6c R4c+ P*5c L*6i P*6d Gx7g.
However, with a rush of checks, Moriuchi is able to stop this double threat.

98.G7gx8h          0/177        0/179
99.K9ix8h          0/177        0/179
100.N*7f           0/177        0/179
101.S8gx7f         0/177        0/179
102.S*7g           0/177        0/179
103.K8h-8g         1/178        0/179
104.B*6i           0/178        0/179
105.K8gx7g         0/178        0/179
106.P7ex7f         0/178        0/179
107.K7g-6h         0/178        0/179
108.P*6g           0/178        0/179
109.K6h-5g         0/178        0/179
110.P*5f           0/178        0/179
111.K5gx5f         0/178        0/179
112.P*5e           0/178        0/179
113.K5fx4e         0/178        0/179
"...and white wins" was the opinion in the press room. The square 7e is free
for the white king, so there is no mate.

114.S3cx4d??       0/178        0/179

A terrible blunder. After 114.Bx4g+ white is safe and black has no defence.
However, in byoyomi it was not easy to see through all the variations. For
example 114.Bx4g+ B*8b K8d Bx5e+ and black has defended mate with a mating
threat. Still, white can win after S*5f +Bx5f G*3d Rx3d Sx3d.

115.R4ax4d+        0/178        0/179
116.B6ix4g+        0/178        0/179
117.S*8b           0/178        0/179
Resigns            0/178        0/179
Time:              02:58:00     02:59:00

Because the rook on 4d is now promoted, there is an easy mate after 117.K6d
+Rx5e and also after 117.K8d B*6f.