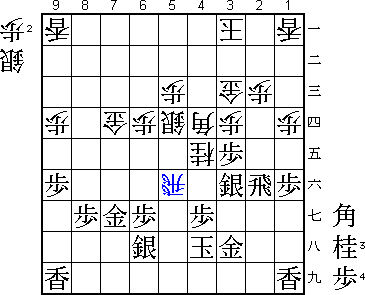
16th Zen Nihon Pro Tournament Game 1
Black: Moriuchi, 8-dan
White: Habu, 4K
16th Zen Nihon Pro Tournament, Game 1, April 2nd 1998
1.P2g-2f           0/0          0/0

This year the first game of the Zen Nihon Pro tournament was held for the
first time outside of Japan. The game was played in Hong Kong. Game recording
was not done by a Shoreikai professional, but by the experienced Kitajima
(4-dan). His high pawn toss at the furigoma gave five tokins and so Moriuchi
starts with black.

2.P8c-8d           0/0          1/1
3.P2f-2e           0/0          0/1
4.P8d-8e           0/0          0/1
5.G6i-7h           0/0          0/1
6.G4a-3b           0/0          0/1
7.P2e-2d           0/0          0/1
8.P2cx2d           0/0          0/1
9.R2hx2d           0/0          0/1
10.P*2c            0/0          0/1
11.R2d-2f          0/0          0/1
12.S7a-7b          0/0          1/2
13.P1g-1f          0/0          0/2
14.P1c-1d          0/0          1/3
15.S3i-3h          0/0          0/3
16.P6c-6d          0/0          2/5
17.P7g-7f          1/1          0/5
18.P8e-8f          0/1          1/6
19.P8gx8f          0/1          0/6
20.R8bx8f          0/1          0/6
21.P*8g            0/1          0/6
22.R8f-8b          0/1          0/6
23.P3g-3f          0/1          0/6
24.P3c-3d          0/1          2/8
25.P3f-3e          0/1          0/8

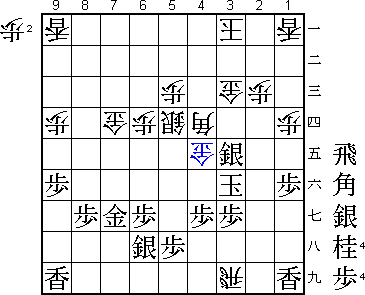
The Nakahara attack in the Ai-gakari opening. The Zen Nihon Pro tournament is
a one-day best-of-five match with both players having 3 hours for the game.
The limited time puts the emphasis more on opening preparation than in longer
matches. Moriuchi indoubtedly studied this opening deeply before the game.

26.P3dx3e          0/1          2/10
27.S3h-3g          0/1          0/10
28.S7b-6c          0/1          11/21
29.S3g-4f          1/2          0/21
30.S6c-5d          0/2          4/25
31.G4i-3h          0/2          0/25
32.B2bx8h+         0/2          11/36
33.S7ix8h          0/2          0/36
34.S3a-2b          0/2          0/36
35.K5i-5h          29/31        0/36
36.S2b-3c          0/31         0/36
37.S4fx3e          0/31         0/36
38.P*3d            0/31         10/46
39.S3e-4f          0/31         0/46
40.K5a-4b          0/31         0/46
41.P7f-7e          10/41        0/46
42.K4b-3a          0/41         3/49
43.S8h-7g          2/43         0/49
44.P4c-4d          0/43         8/57
45.S4f-3g          1/44         0/57
46.G6a-5b          0/44         1/58
47.P9g-9f          7/51         0/58
48.P9c-9d          0/51         0/58
49.R2f-8f          11/62        0/58
50.P*8e            0/62         0/58
51.R8f-6f          0/62         0/58
52.G5b-6c          0/62         14/72
53.R6f-2f          6/68         0/72
54.P4d-4e          0/68         5/77
55.S3g-3f          4/72         0/77
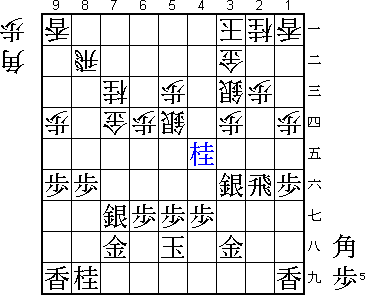
56.P7c-7d!?        0/72         6/83

White is in trouble. Black has slowly taken all his moves and has a big
strategic advantage. Oyama's shogi is based on prefering not to give the
opponent anything concrete, even if that means not having anything oneself.
Habu's shogi is the other way around: if you allow your opponent to attack,
you will be able to attack yourself. You could say that Oyama likes to win
1-0, while Habu likes to win 10-8. The move 56.P7d is a good example. Habu
opens up the game in a bad position and his gold will be in a very bad spot
throughout the game. Rather than wait, he prefers to do something. It is
probably one of the reasons he sometimes loses badly.

57.P7ex7d          23/95        0/83
58.G6cx7d          0/95         4/87
59.N2i-3g          13/108       0/87
60.P8e-8f          0/108        22/109
61.P8gx8f          2/110        0/109
62.N8a-7c          0/110        0/109
63.N3gx4e          20/130       0/109

64.N7c-6e!         0/130        31/140

There is no way back. 64.S4d is being answered by 65.P*3c Nx3c Nx3c+ Gx3c
N*6f and black wins.

65.N4ex3c+         26/156       0/140

Black has no choice but to take. After the quiet 65.S6f white can play S4d,
since the move N*6f is no longer possible.

66.N2ax3c          0/156        1/141
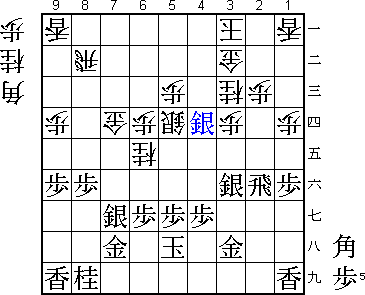
67.S*4d?           2/158        0/141

"Drop where your opponent wants to drop". Morichi feared B*4d and N*4d, so he
drops a piece there himself. He did not like either B*4d and N*4d so decided
to play S*4d. However, better would have been the natural 67.S6f. Then 68.N*4d
B*7a R8c P*7c! and because of the threat Bx5c+, white is almost forced to play
Rx7c, after which B6b+ is very severe. Also, 68.B*4d is easily met with the
simple R2i and black has nothing to worry about.

68.N*4e!           0/158        16/157

Now white also gets a strong attack.

69.S7g-6h          7/165        0/157
70.R8bx8f          0/165        5/162
71.S4dx3c=         7/172        0/162
72.G3bx3c          0/172        6/168
73.P*8g            0/172        0/168
74.B*4d            0/172        5/173
75.P*3e            1/173        0/173
76.P*7g            0/173        1/174
77.N8ix7g          3/176        0/174
78.N6ex7g+         0/176        0/174

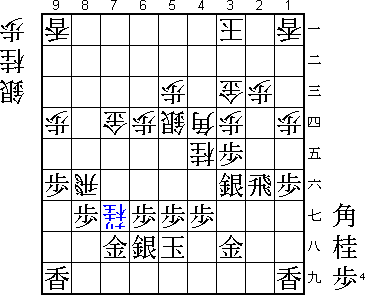
79.G7hx7g?         2/178        0/174

The losing move. Moriuchi probably thought that he could still weather the
storm here. However, after Gx7g the rook comes into play and white's attack
gets decisive force. There was no other way but to go all out after 79.Px8f
+Nx7h Sx4e Sx4e R*7a P*4a B*6c S*3b Bx4e+ and black has good prospects to
win the semeai (mutual attack).

80.N4ex5g+         0/178        1/175
81.K5hx5g          0/178        0/175
82.N*4e            0/178        0/175
83.K5g-4h          1/179        0/175
84.R8f-5f!         0/179        1/176

The deciding move.

85.P*5h            0/179        0/176

Or 86.P*5g Nx5g+ Sx5g S*5i K5h Rx5g+ Kx5g Bx7g+ P4f S*3g! and white has a
nice hisshi. For example: Gx3g +B6h K4g G*4h K5f G6e mate. Also R*7a followed
by Rx7d+ does not work because of simple +B6h. It must be a great feeling for
Habu that there is a variation where he is able to use his gold on 7d after
all.

86.S*3g            0/179        0/176

In good Habu fashion going straight for the kill.

87.G3hx3g          0/179        0/176
88.N4ex3g+         0/179        0/176
89.K4hx3g          0/179        0/176
90.P3dx3e          0/179        0/176
91.S3fx3e          0/179        0/176
92.P*3f            0/179        1/177
93.R2fx3f          0/179        0/177
94.R5fx3f          0/179        0/177
95.K3gx3f          0/179        0/177
96.R*3i            0/179        0/177
97.P*3g            0/179        0/177
98.G*4e            0/179        0/177
Resigns            0/179        0/177
Time:              02:59:00     02:57:00

After 99.K2g Gx3e K2h S*3h black has no defense. Morichi will be disappointed
he lost this game after having had such a good position in the middle game.
