16th Ryu-O Match Game 4
[Black "Moriuchi Toshiyuki, Challenger"]
[White "Habu Yoshiharu, Ryu-O"]
[Event "16th Ryu-O sen, Game 4"]
[Date "November 26th and 27th 2003"]
1.P2g-2f     00:00:00  00:00:00
2.P3c-3d     00:00:00  00:01:00
3.P7g-7f     00:03:00  00:01:00
4.P4c-4d     00:03:00  00:01:00
5.P2f-2e     00:05:00  00:01:00
6.B2b-3c     00:05:00  00:02:00
7.S3i-4h     00:05:00  00:02:00
8.P9c-9d     00:05:00  00:03:00
9.K5i-6h     00:05:00  00:03:00
10.R8b-4b    00:05:00  00:06:00

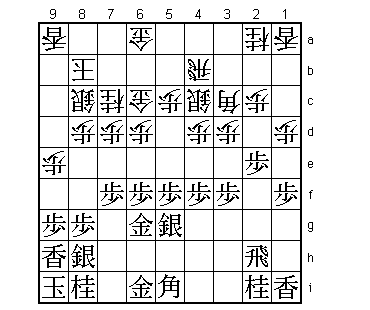
The second time that the Shikenbisha appears in this match, but the
first time Habu plays it (Moriuchi played it in the opening game).
Habu wants to change the flow of this match at all costs. For a
while, the game now follows the game between Sato and Moriuchi
(played 1 month earlier in the Osho league). Habu is playing the
winning side of this game, which was Moriuchi. A small psychological
stab, but Moriuchi is ready for it.

11.K6h-7h    00:07:00  00:06:00
12.S7a-7b    00:07:00  00:07:00
13.P5g-5f    00:08:00  00:07:00
14.P9d-9e    00:08:00  00:26:00
15.G4i-5h    00:21:00  00:26:00
16.G4a-5b    00:21:00  00:35:00
17.S4h-5g    00:42:00  00:35:00
18.S3a-3b    00:42:00  00:55:00
19.B8h-7g    00:42:00  00:55:00
20.P6c-6d    00:42:00  01:09:00
21.P3g-3f    00:55:00  01:09:00
22.K5a-6b    00:55:00  01:11:00
23.K7h-8h    00:56:00  01:11:00
24.P7c-7d    00:56:00  01:33:00
25.P6g-6f    01:03:00  01:33:00
26.N8a-7c    01:03:00  01:52:00
27.G5h-6g    01:03:00  01:52:00
28.K6b-7a    01:03:00  02:26:00
29.L9i-9h    01:05:00  02:26:00
30.K7a-8b    01:05:00  02:27:00
31.K8h-9i    01:05:00  02:27:00
32.G5b-6c    01:05:00  02:28:00
33.S7i-8h    01:05:00  02:28:00
34.P8c-8d    01:05:00  02:29:00
35.B7g-5i    01:24:00  02:29:00
36.S3b-4c    01:24:00  02:40:00
37.P1g-1f    01:52:00  02:40:00
38.P1c-1d    01:52:00  02:45:00
39.P4g-4f    01:53:00  02:45:00
40.S7b-8c?   01:53:00  03:16:00

"Why not 40.S5d?", wondered Furibisha specialists Suzuki Daisuke
and Sugimoto in the press room. This was actually the move Habu
intended to play, but he did not like the position after 41.N3g
R3b S6h B5a R2f P3e Px3e Rx3e P*3f R3d S6h-7i S8c G7h G7b. However,
in this position white has managed to exchange the pawns on the
3rd file and his position is much better than in the game. "Much
better than the game", Habu had to admit afterwards. His eagerness
to make something happen backfires.

41.P5f-5e    02:03:00  03:16:00
42.G6a-7b    02:03:00  03:52:00
43.S5g-5f    02:18:00  03:52:00
44.R4b-5b    02:18:00  03:52:00
45.R2h-5h    02:20:00  03:52:00
46.R5b-2b    02:20:00  03:52:00

Aiming for sennichite if black plays 47.R2h but Moriuchi wants
nothing of it.

47.N2i-3g    02:55:00  03:52:00
48.B3c-5a    02:55:00  04:14:00
49.P4f-4e    03:42:00  04:14:00
50.P4dx4e    03:42:00  04:15:00
51.R5h-4h    03:47:00  04:15:00
52.N2a-3c    03:47:00  04:28:00
53.B5i-6h    04:01:00  04:28:00
54.R2b-2a    04:01:00  04:38:00
55.G6i-7i    04:14:00  04:38:00
56.P5c-5d    04:14:00  05:18:00
57.P5ex5d    04:49:00  05:18:00
58.S4cx5d    04:49:00  05:20:00
59.P*5e      04:49:00  05:20:00
60.S5d-4c    04:49:00  05:20:00
61.N3gx4e    05:02:00  05:20:00
62.P*4d      05:02:00  05:21:00
63.N4ex3c+   05:03:00  05:21:00
64.B5ax3c    05:03:00  05:21:00
65.R4h-3h    05:04:00  05:21:00
66.N7c-8e    05:04:00  05:28:00
67.P3f-3e    05:45:00  05:28:00
68.P3dx3e    05:45:00  05:31:00
69.P6f-6e    05:45:00  05:31:00
70.P9e-9f    05:45:00  05:37:00
71.P9gx9f    05:56:00  05:37:00
72.P*9g      05:56:00  05:37:00
73.N8ix9g    05:56:00  05:37:00
74.N8ex9g+   05:56:00  05:37:00
75.L9hx9g    05:56:00  05:37:00
76.N*8e      05:56:00  05:37:00
77.P6ex6d    05:57:00  05:37:00
78.G6cx6d    05:57:00  05:37:00
79.P*6e      05:58:00  05:37:00
80.G6d-6c    05:58:00  05:39:00
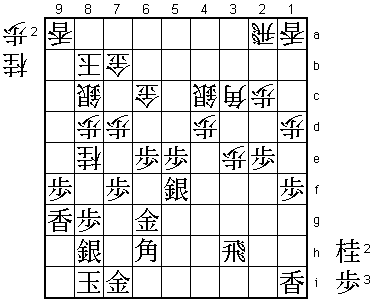
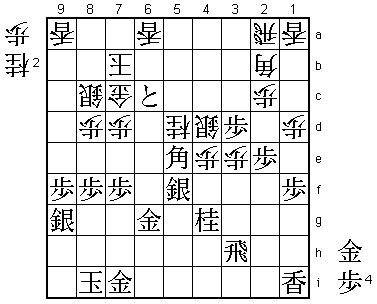
81.K9i-8i!   06:04:00  05:39:00

White is in trouble, but there is some potential for a counterattack,
so black must be very careful. Moriuchi is not phased at all and
shows us another textbook endgame. First step: take the king out
of the fire line.

82.P4d-4e    06:04:00  05:47:00
83.N*6d      06:10:00  05:47:00
84.G7b-6b    06:10:00  06:17:00
85.P8g-8f!   06:15:00  06:17:00

Second step: put pressure on the attacking pieces. This must be
calculated carefully, as this also opens the head of the king to
white drops. In the press room, P8f was a little frowned upon,
but the final position in this game will show how right Moriuchi was.

86.N8ex9g+   06:15:00  06:21:00
87.S8hx9g    06:15:00  06:21:00
88.P*5d      06:15:00  06:21:00
89.B6h-7g    06:27:00  06:21:00
90.P5dx5e    06:27:00  06:56:00
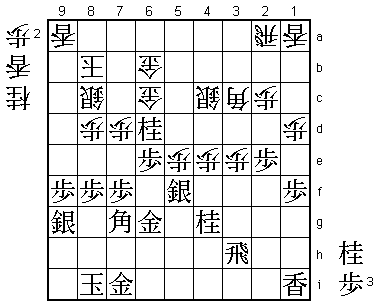
91.N*4g!     06:29:00  06:56:00

Perfect. White can no longer hold the position in the center.

92.P*6f      06:29:00  06:58:00

Of course 92.Px5f fails to 93.Bx3c+, but also after 92.S5d Rx3e
P*3b Nx5e Sx5e Bx5e N*4c Bx3c+ Nx3e +B8h black has the better
position. With the pawn on 8f there is not way for white to attack.

93.B7gx6f    06:30:00  06:58:00
94.N*5d      06:30:00  06:58:00
95.B6fx5e    06:43:00  06:58:00
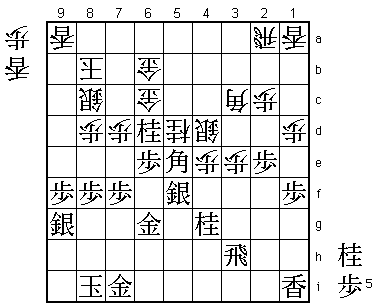
96.S4c-4d    06:43:00  06:58:00

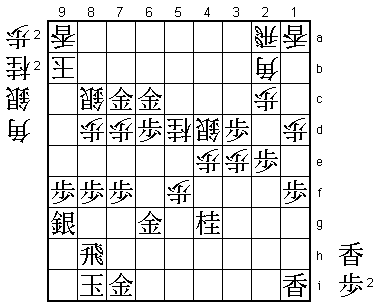
How should black continue from here? 96.N5b+ fails to 97.Sx5e
+Nx6b Sx5f +Nx6c Sx6g+ and white wins. Did Habu create some magic
here?

97.N6d-7b+!  06:47:00  06:58:00

No magic. This is the winning move.

98.K8bx7b    06:47:00  07:02:00
99.P6e-6d    06:47:00  07:02:00
100.G6c-7c   06:47:00  07:06:00
101.N*6e     06:47:00  07:06:00
102.L*6a     06:47:00  07:06:00
103.P*3d     07:03:00  07:06:00
104.B3c-2b   07:03:00  07:06:00
105.N6ex7c+  07:15:00  07:06:00
106.G6bx7c   07:15:00  07:06:00
107.P6d-6c+! 07:16:00  07:06:00

Moriuchi shows another devastating attack. This pawn sacrifice in
combination with the next move is difficult to find.

108.L6ax6c   07:16:00  07:11:00
109.B5ex7c+! 07:16:00  07:11:00
110.K7bx7c   07:16:00  07:11:00
111.P*6d     07:16:00  07:11:00
112.L6cx6d   07:16:00  07:17:00
113.P*6e     07:16:00  07:17:00
114.P*5e     07:16:00  07:17:00
115.P6ex6d   07:23:00  07:17:00
116.P5ex5f   07:23:00  07:17:00
117.G*6c     07:23:00  07:17:00
118.K7c-8b   07:23:00  07:17:00
119.G*7c     07:23:00  07:17:00
120.K8b-9b   07:23:00  07:17:00
121.R3h-8h   07:26:00  07:17:00
Resigns      07:26:00  07:20:00

Habu took 3 minutes to make sure that there is no defense against
123.P8e Px8e Gx8c Kx8c P*8d (Kx8d Rx8e leads to mate) and to say
goodbye to his Ryu-O title. A surprisingly one-sided game that
ended a surprisingly one-sided match. Habu has never lost a match
in straight games before, but he was completely overpowered by
Moriuchi. Time will tell if the new Ryu-O just had one of those
periods where everything worked or if Moriuchi has taken his game
to a new level.
