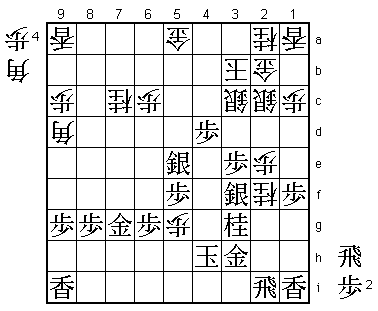
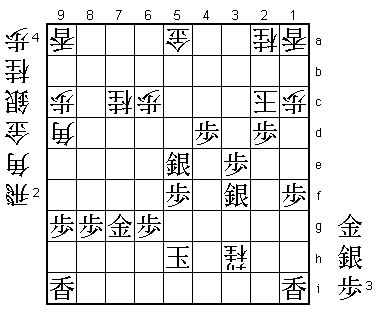
16th Ryu-O Match Game 2
[Black "Moriuchi Toshiyuki, Challenger"]
[White "Habu Yoshiharu, Ryu-O"]
[Event "16th Ryu-O sen, Game 2"]
[Date "November 4th and 5th 2003"]
1.P7g-7f     00:00:00  00:00:00
2.P3c-3d     00:00:00  00:03:00
3.P2g-2f     00:01:00  00:03:00
4.P8c-8d     00:01:00  00:05:00
5.P2f-2e     00:01:00  00:05:00
6.P8d-8e     00:01:00  00:07:00
7.G6i-7h     00:01:00  00:07:00
8.G4a-3b     00:01:00  00:09:00
9.P2e-2d     00:01:00  00:09:00
10.P2cx2d    00:01:00  00:12:00
11.R2hx2d    00:01:00  00:12:00
12.P8e-8f    00:01:00  00:22:00
13.P8gx8f    00:02:00  00:22:00
14.R8bx8f    00:02:00  00:23:00
15.R2dx3d    00:02:00  00:23:00
16.B2b-3c    00:02:00  00:29:00
17.R3d-3f    00:03:00  00:29:00
18.S3a-2b    00:03:00  00:34:00
19.P*8g      00:08:00  00:34:00
20.R8f-8d    00:08:00  00:53:00

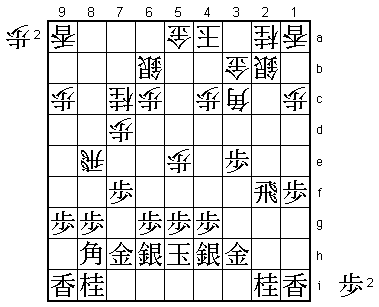
Because of the recent popularity of the R8e-Yokofudori, this move
almost looks like an anachronism. Habu is planning to follow an idea
often played by Fukaura these days: leave the pawn on 7c and switch
the rook to 3d to make a Hineribisha shape. However, Moriuchi comes
prepared and has the perfect counter to this approach.

21.R3f-2f    00:09:00  00:53:00
22.K5a-4a    00:09:00  00:55:00
23.K5i-5h    00:26:00  00:55:00
24.S7a-6b    00:26:00  00:59:00
25.P3g-3f    00:26:00  00:59:00
26.P5c-5d    00:26:00  01:02:00
27.S3i-4h    00:37:00  01:02:00
28.P5d-5e    00:37:00  01:12:00
29.S7i-6h    00:42:00  01:12:00
30.P7c-7d    00:42:00  01:49:00

Habu gives up his plans to switch to rook to 3d. The reason is that
Moriuchi has kept his gold on 4i, which is the perfect place for
defending against a rook attack from the right side.

31.P3f-3e    01:28:00  01:49:00
32.N8a-7c    01:28:00  01:53:00
33.G4i-3h    01:30:00  01:53:00
34.G6a-5a    01:30:00  02:02:00
35.P1g-1f    01:46:00  02:02:00
36.R8d-8e    01:46:00  02:32:00

Trying to get back to a normal R8e position. Not really the optimal
way to get into that position, but recently a number of strategies
where black or white give up moves have popped up. In shogi there are
many positions where losing moves is not a serious problem. The question
is: is this position one of those? It seems like it is not...

37.N2i-3g    02:43:00  02:32:00
38.B3c-4d    02:43:00  03:18:00
39.P4g-4f!   03:06:00  03:18:00

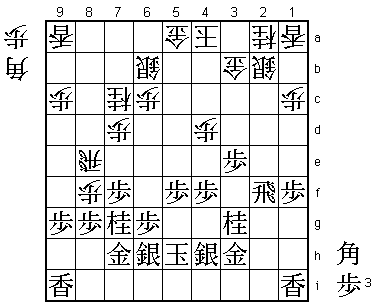
Good move. Moriuchi ignores the attack on the pawn on 3e. He has
correctly judged that 40.Bx3e S4g is good for black, as the silver
will move up very quickly by using the white bishop as a target.

40.P5e-5f    03:06:00  04:33:00
41.B8hx4d    03:15:00  04:33:00
42.P4cx4d    03:15:00  04:34:00
43.P5gx5f    04:21:00  04:34:00
44.P*8f      04:21:00  04:38:00
45.N8i-7g!   05:33:00  04:38:00

Shows that Habu's opening play was suspect. Habu underestimated this
move, counting on 45.Px8f Rx8f P*8g Rx7f which is interesting for white.

46.R8e-8d    05:33:00  05:58:00

Admitting the mistake, but giving black a big advantage. Habu intended
to play 46.Px8g+, but after Nx8e +Px7h Nx7c+ Sx7c the move B*5d! is
very strong. For example, B*6i K4i P*2e Nx2e +Px6h Nx3c+ leads to mate
after Nx3c Bx3b+ Kx3b Rx2b+ Kx2b N*3d. There are of course a lot of
other things white can try, but it seems that white loses the mutual
attack in all cases.

47.P8gx8f    05:52:00  05:58:00
48.R8dx8f    05:52:00  05:59:00
49.P*8g      06:06:00  05:59:00
50.P*2e      06:06:00  06:01:00
51.R2f-2i    06:44:00  06:01:00
52.R8f-8d    06:44:00  06:05:00
53.S4h-4g    06:46:00  06:05:00
54.P7d-7e    06:46:00  06:06:00
55.B*6f      06:47:00  06:06:00
56.R8d-5d    06:47:00  06:15:00

The professionals in the press room expected the simple 56.R7d, but
Habu had seen that after 57.Px7e R8d P8f! P*7f N8e N6e Rx2e he has no
pawns in hand which makes it impossible to defend or attack.

57.B6fx7e    06:51:00  06:15:00
58.R5d-7d    06:51:00  06:15:00
59.S6h-5g    06:58:00  06:15:00
60.B*5d      06:58:00  06:22:00
61.P4f-4e    07:03:00  06:22:00
62.B5dx7f    07:03:00  06:35:00
63.B7e-6f    07:03:00  06:35:00
64.S6b-5c    07:03:00  06:35:00
65.P*2c      07:13:00  06:35:00
66.S2bx2c    07:13:00  06:36:00
67.P*2b      07:13:00  06:36:00
68.G3bx2b    07:13:00  06:43:00
69.P4ex4d    07:13:00  06:43:00
70.K4a-3b    07:13:00  06:44:00
71.S4g-3f!   07:30:00  06:44:00

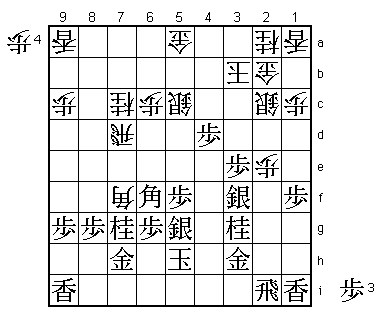
Coolly played. There was a subtle trap here that Moriuchi had to
evade. 71.P*2d 72.Sx2d 73.P*2c 74.Kx2c 75.Sx3f looks very good for
black. However, if white plays the hidden move 74.G1b! (instead of
Kx2c), the black attack is suddenly stopped. The terrible looking
gold on 1b is actually keeping the white position together.

72.S5cx4d    07:30:00  06:54:00
73.P*4e      07:30:00  06:54:00
74.S4d-3c    07:30:00  07:10:00
75.B6f-5e!   07:30:00  07:10:00

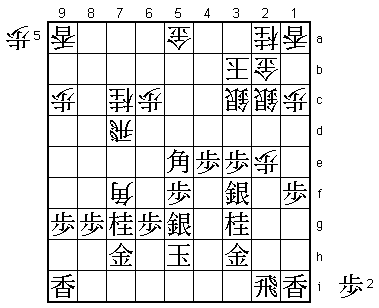
Another good move. This aims at P*7e Rx7e S6f R7d P*7e winning the
knight on 7c. If white defends with 76.G6b, the gold is no longer
defending the king and 76.P*7b makes it no longer possible for white
to attack with P*7f.

76.B7f-9d    07:30:00  07:22:00
77.P*7e      07:35:00  07:22:00
78.R7dx7e    07:35:00  07:24:00
79.P4e-4d    07:35:00  07:24:00
80.P*7f      07:35:00  07:29:00
81.S5g-6f    07:52:00  07:29:00
82.R7ex5e    07:52:00  07:32:00
83.S6fx5e    07:52:00  07:32:00
84.P7fx7g+   07:52:00  07:32:00
85.G7hx7g    07:52:00  07:32:00
86.P*5g      07:52:00  07:36:00
87.K5h-4h    07:55:00  07:36:00
88.N*2f      07:55:00  07:37:00

89.N3gx2e!   07:58:00  07:37:00

The white attack looks dangerous, but despite being in time trouble,
Moriuchi manages to find the winning continuation.

90.P5g-5h+   07:58:00  07:37:00
91.K4hx5h    07:58:00  07:37:00
92.N2fx3h+   07:58:00  07:37:00
93.N2ex3c+   07:58:00  07:37:00
94.G2bx3c    07:58:00  07:37:00

Habu decides to gamble on the difficult mate rather than the simple
hisshi. 94.Nx3c is not mate, but a simple win for black after 95.S*4c
K2a Rx2c+.

95.S*4c      07:58:00  07:37:00
96.K3b-2b    07:58:00  07:37:00
97.R*3b      07:59:00  07:37:00
98.G3cx3b    07:59:00  07:37:00
99.S4cx3b+   07:59:00  07:37:00
100.K2bx3b   07:59:00  07:37:00
101.R2ix2c+! 07:59:00  07:37:00

Moriuchi had one final hurdle to take. 101.P4c+ Kx4c Rx2c+ K5b S*6a
looks mate, but after K6b or even Kx6a +Rx6c P*6b the bishop on 9d
is working in defense, so there is no mate.

102.K3bx2c   07:59:00  07:37:00
103.P*2d     07:59:00  07:37:00
Resigns      07:59:00  07:37:00

Mate after 103.Kx2d G*3d K1d P1e or 103.K3c S*3d K3b P4c+. A perfect
game by Moriuchi, who punished Habu's indecisiveness in the opening.
He is 2-0 up and the pressure is now all on Habu in the third game.
