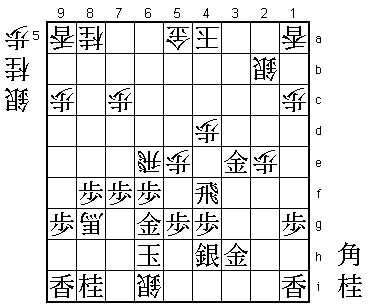
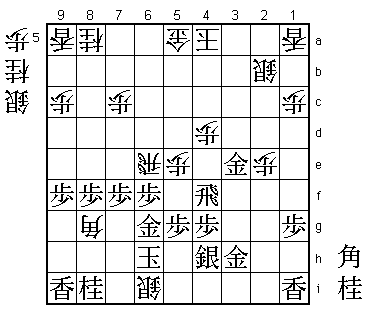
15th Ryu-O Match Game 5
Black: Habu Yoshiharu, Ryu-O
White: Abe Takashi, Challenger
15th Ryu-O sen, Game 5, December 18th and 19th 2002
1.P7g-7f     00:01:00  00:00:00
2.P3c-3d     00:01:00  00:02:00
3.P2g-2f     00:04:00  00:02:00
4.P8c-8d     00:04:00  00:05:00
5.P2f-2e     00:08:00  00:05:00
6.P8d-8e     00:08:00  00:06:00
7.G6i-7h     00:11:00  00:06:00
8.G4a-3b     00:11:00  00:08:00
9.P2e-2d     00:15:00  00:08:00
10.P2cx2d    00:15:00  00:08:00
11.R2hx2d    00:15:00  00:08:00
12.P8e-8f    00:15:00  00:09:00
13.P8gx8f    00:15:00  00:09:00
14.R8bx8f    00:15:00  00:09:00
15.R2dx3d    00:30:00  00:09:00
16.B2b-3c    00:30:00  00:10:00
17.R3d-3f    00:40:00  00:10:00
18.K5a-4a    00:40:00  00:13:00
19.G4i-3h    00:53:00  00:13:00
20.G6a-5a    00:53:00  01:11:00

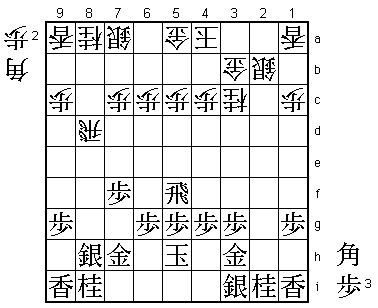
After the convincing win in the third game, it was expected that Abe
would stick to the latest variations in the Chuza-style Yokofudori.
Getting back from 2-0 down must have given Abe a lot of confidence and
he is challenging Habu to come up with something new in this extremely
complex opening.

21.K5i-5h    01:09:00  01:11:00
22.S3a-2b    01:09:00  01:21:00
23.B8hx3c+   02:10:00  01:21:00
24.N2ax3c    02:10:00  01:21:00
25.S7i-8h    02:10:00  01:21:00
26.R8f-8d    02:10:00  01:24:00
27.R3f-5f    02:26:00  01:24:00

An interesting black strategy that was first played about a year ago
and most recently in the A class Junisen game between Tanigawa and
Maruyama (Tanigawa won that game with black). The idea is that white
has kept his silver on 7a to defend against a pawn drop on 8b. This
relieves the rook of this duty, so this rook can still move freely
on the fourth rank, defending the head of the white knight. However,
27.R5f threatens to promote the rook, so white is more or less forced
to play 28.S6b, which is where the silver eventually should go. The
problem is that after S6b, the white rook now has the double task of
defending the 8th file and the head of the knight. In theory, this
sounds all good for black and black's results with this move are
pretty good (the black side won 5 out of the 8 games). However, this
game shows that in the long run white hasn't much to fear.

28.S7a-6b    02:26:00  01:33:00
29.B*6f      02:27:00  01:33:00

The point. White can not keep the rook on the 4th rank, for example
30.R2d P*2f and there is no defence against P*8b next.

30.R8d-8b    02:27:00  01:41:00
31.P3g-3f    02:27:00  01:41:00

With the rook on 8b, the head of the knight on 3c becomes a target
for attack.

32.P4c-4d    02:27:00  02:14:00
33.P3f-3e    02:31:00  02:14:00
34.G3b-4c    02:31:00  02:14:00
35.R5f-3f    02:35:00  02:14:00
36.B*4e      02:35:00  02:49:00

Black has forced white to drop the bishop as well, but this actually
is not a big problem. The white bishop is on a much more active square
than the black bishop so black needs to be very careful not to get
stuck for active moves.

37.R3f-2f    04:00:00  02:49:00
38.P*2e      04:00:00  02:56:00
39.R2f-2h    04:10:00  02:56:00
40.P6c-6d    04:10:00  03:26:00
41.S3i-4h    04:27:00  03:26:00
42.P5c-5d    04:27:00  04:05:00
43.B6f-7g    04:40:00  04:05:00
44.P6d-6e    04:40:00  04:12:00
45.P*8f      05:01:00  04:12:00
46.P6e-6f    05:01:00  04:50:00
47.B7gx6f    05:01:00  04:50:00
48.S6b-5c!   05:01:00  04:50:00

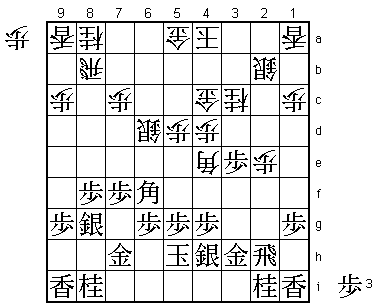
The prime target for attack is point 6g and white's pawn sacrifice
46.P6f is a tesuji to speed up the activation of the silver by
drawing the black bishop closer.

49.S8h-8g    05:09:00  04:50:00
50.S5c-6d    05:09:00  04:54:00

Threatens either S6e or S5e followed by P*6f.

51.N2i-3g?   05:29:00  04:54:00

A mistake that more or less ends the game. The following attack
looks good, but is an illusion. Black's only option here is 51.B8h
and hope that he can stop the white attack and make the pawn
advantage work in his favour.

52.B4e-1b    05:29:00  05:05:00
53.N3gx2e    05:32:00  05:05:00
54.N3cx2e    05:32:00  05:25:00
55.R2hx2e    05:32:00  05:25:00
56.S6d-5e    05:32:00  05:25:00
57.B6fx5e    05:49:00  05:25:00

No choice. 57.B8h is no longer an option because of 58.P*6f Px6f N*9e.

58.P5dx5e    05:49:00  05:25:00
59.R2e-2f    05:49:00  05:25:00

Admitting failure. Black has been forced to sacrifice the bishop and
has to follow that up with a move that gives white the initiative.
59.R2f is necessary because of the nasty white threat N*4f (Px4f
is answered by B*3f).

60.R8b-6b!   05:49:00  06:26:00

Good move that increases the pressure on the black king.

61.S*3d      06:41:00  06:26:00

The white position looks far from solid and maybe Habu thought that
there would be something for black here. However, here he realised
that black has no good way to take advantage of the white weaknesses.

62.G4cx3d    06:41:00  06:34:00
63.P3ex3d    06:43:00  06:34:00
64.B1bx3d    06:43:00  06:41:00
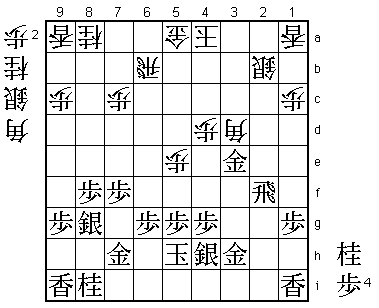
65.G*3e!?    07:04:00  06:41:00

With his back to the wall, Habu tries his magic powers. This is
objectively a questionable move, but it gives Abe a chance to play
the attack wrong.

66.P*2e      07:04:00  06:54:00
67.R2f-4f!?  07:34:00  06:54:00

No time for 67.R2i because of 68.P*6f Px6f N*7d. Also 67.R6f Rx6f Px6f
N*7d wins for white. Still, 67.R4f is an unbelievable move. Habu puts
all his eggs in one basket in a final attempt to win the game. If Abe
finds the right attack, the game will be over in an instant.

68.B3dx6g+   07:34:00  07:19:00
69.G7hx6g    07:34:00  07:19:00
70.B*6i      07:34:00  07:19:00
71.K5h-6h    07:34:00  07:19:00

72.B6ix8g+!  07:34:00  07:33:00

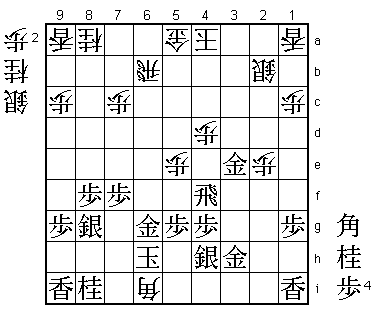
The right move. 72.S*7i is very tempting, but would have thrown it all
away after 73.Kx6i 74.Rx6g+ 75.Kx7i 76.N*9e. This looks winning but
after 77.Rx4d 78.P*4b 79.N*3c Abe would have fallen in Habu's trap.
80.Sx2c is answered by B*2c and 80.K5b by B*3d, in both cases winning
the rook on 6g. Abe not only had to calculate this correctly, he also
needed to worry about 73.B*9f in reply to 72.Bx8g+. Fortunately for
him, he had enough time to find the win.

73.P*6c      07:34:00  07:33:00
74.R6bx6c    07:34:00  07:33:00
75.P*6d      07:34:00  07:33:00
76.R6cx6d    07:34:00  07:37:00
77.P*6e      07:34:00  07:37:00
78.R6dx6e    07:34:00  07:37:00
79.P*6f      07:34:00  07:37:00
80.S*6i!     07:34:00  07:37:00

Winning. At any of the pawn sacrifices on the 6th file Rx4d instead
is pointless after P*4c Rx4c+ P*4b.

81.B*9f      07:37:00  07:37:00
82.+B8gx9f   07:37:00  07:37:00
83.P9gx9f    07:37:00  07:37:00
84.B*8g      07:37:00  07:37:00
Resigns      07:52:00  07:37:00

The final thing that Abe had to find was the right way to deal with
85.G7g which looks like a possible defence. White then has 86.P*6g
Kx6g N*7e!, which leads to mate after Px7e S*7f K6h (Gx7f B7h+) Sx7g+
Kx7g Rx7e. Habu took 15 minutes to make sure that there is no magic
left in his position. A very convincing victory for Abe, who wins his
third game in a row and is now very close to taking the Ryu-O title
from Habu. A development very few will have predicted when Abe became
challenger.
