15th Ryu-O Match Game 4
Black: Abe Takashi, Challenger
White: Habu Yoshiharu, Ryu-O
15th Ryu-O sen, Game 4, December 9th and 10th 2002
1.P7g-7f 00:00:00 00:00:00
2.P8c-8d 00:00:00 00:04:00
3.G6i-7h 00:06:00 00:04:00
4.G4a-3b 00:06:00 00:06:00
5.S7i-6h 00:08:00 00:06:00
6.P3c-3d 00:08:00 00:08:00
7.P6g-6f 00:08:00 00:08:00
8.S7a-6b 00:08:00 00:12:00
9.P5g-5f 00:11:00 00:12:00
10.P5c-5d 00:11:00 00:16:00
11.S3i-4h 00:13:00 00:16:00
12.S3a-4b 00:13:00 00:19:00
13.G4i-5h 00:16:00 00:19:00
14.K5a-4a 00:16:00 00:20:00
15.K5i-6i 00:18:00 00:20:00
16.G6a-5b 00:18:00 00:36:00
17.S6h-7g 00:26:00 00:36:00
18.S4b-3c 00:26:00 00:44:00
19.B8h-7i 00:30:00 00:44:00
20.B2b-3a 00:30:00 00:45:00
21.P3g-3f 00:31:00 00:45:00
22.P4c-4d 00:31:00 00:47:00
23.G5h-6g 01:15:00 00:47:00
24.P7c-7d 01:15:00 00:56:00
25.B7i-6h 01:16:00 00:56:00
26.P9c-9d 01:16:00 02:19:00
27.K6i-7i 01:34:00 02:19:00
28.P9d-9e 01:34:00 02:35:00
29.S4h-3g 02:21:00 02:35:00
30.L9a-9c 02:21:00 03:37:00
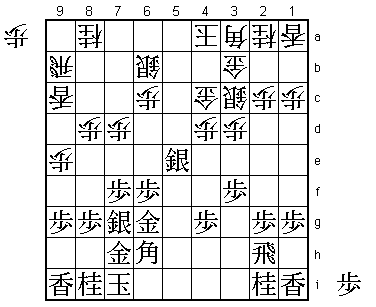
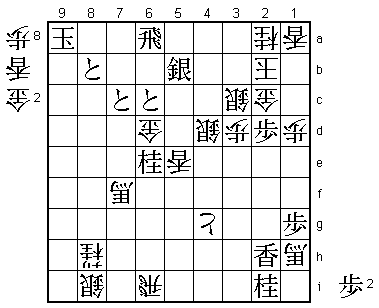
The same opening as in the second game. Abe's way of thinking seems to
be: "If I can't win with my favourite opening, I will never take the
Ryu-O title". Habu again answers the Morishita system with the Suzeme
Sashi (Spearing the Sparrow). The general opinion among professionals
is that the Morishita System (S3g-S4f-N3g without P2f) has weaknesses
against the Suzume Sashi. As a result, the Morishita System has almost
disappeared from the professional scene.
31.S3g-4f 02:45:00 03:37:00
32.R8b-9b 02:45:00 03:39:00
33.P5f-5e 02:59:00 03:39:00
34.P5dx5e 02:59:00 03:46:00
35.S4fx5e 02:59:00 03:46:00
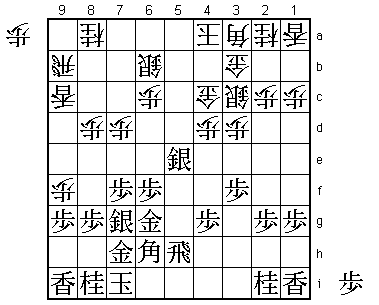
Abe builds up the pressure in the centre to balance the white edge
attack. In the second game he never really got his attack into gear.
36.G5b-4c!? 02:59:00 03:46:00
Meijin Moriuchi found this one of the most interesting moves in this
game. 36.N7c or 36.P9f are the usual ways for white to play this
position. 36.G5b-4c is difficult to play, as it gives black another
target for his attack in the centre and also weakens the position of
the white king. In general, it is not a good idea to play the gold
to 4c in the Susume sashi when the king is still on 4a.

37.R2h-5h    03:25:00  03:46:00

The alternative is 37.K8h, but Abe didn't like 38.P*5d S4f P7e Px7e
Bx7e. 37.R5h is also not without risks, as there is always the
potential silver drop on 6i.

38.P9e-9f    03:25:00  03:49:00
39.P9gx9f?! 03:48:00 03:49:00
The sealed move and everyone thought that this was an easy choice.
However, black could have played the strong 39.S5d! here. White has
three ways to respond to this: 1) 40.B6d, 2) 40.Gx5d and 3) 40.Px9g+
but black seems to get a good position in all three cases: 1) 40.B6d
Sx4c+ Gx4c B4f Bx4f Px4f B*4g R5g Bx2i+ B*8c; 2) 40.Gx5d Rx5d S5c
Rx7d S*7c G*8c; 3) 40.Px9g+ Sx4c+ Gx4c G*8c.
40.L9cx9f 03:48:00 03:51:00
41.L9ix9f 04:59:00 03:51:00
42.R9bx9f 04:59:00 03:51:00
43.P*9g 04:59:00 03:51:00
44.R9f-9b 04:59:00 03:56:00
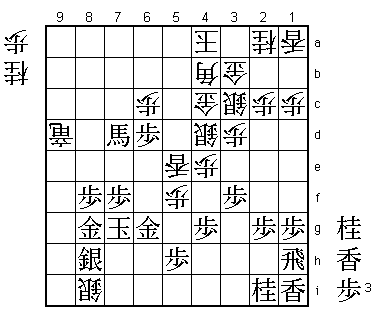
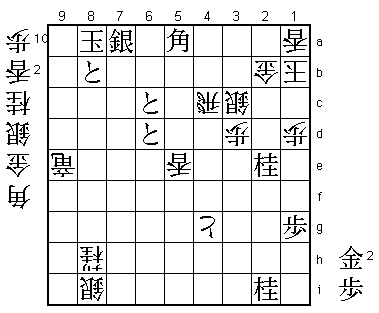
White has succeeded in exchanging lances, which is one of the primary
goals of the white attack. Habu has the upper hand in this position.
45.K7i-8h 05:01:00 03:56:00
46.N8a-7c 05:01:00 04:36:00
47.S7g-8f 05:06:00 04:36:00
48.L*5a 05:06:00 04:51:00
49.P*5d 05:19:00 04:51:00
50.P*5c 05:19:00 04:51:00
51.P5dx5c+ 06:04:00 04:51:00
52.S6bx5c 06:04:00 04:52:00
53.B6h-4f 06:04:00 04:52:00
Abe realises he is in trouble and tries to confuse the position.
54.N7c-8e 06:04:00 05:42:00
Not 54.P*5d because of 55.Sx4d S5cx4d Bx7c+.
55.P6f-6e 06:05:00 05:42:00
56.P4d-4e 06:05:00 05:43:00
57.B4f-5g 06:07:00 05:43:00
58.S5c-4d 06:07:00 05:51:00
59.B5gx8d 06:09:00 05:51:00
Abe is already thinking about making an entering king here. It seems
to be the only way for him to have a chance of winning this game.
60.L5ax5e 06:09:00 05:53:00
61.R5h-1h 06:13:00 05:53:00
62.N8ex9g+ 06:13:00 06:01:00
63.S8fx9g 06:14:00 06:01:00
64.P*9f 06:14:00 06:03:00
65.S9g-8f 06:19:00 06:03:00
66.S*9g 06:19:00 06:23:00
67.K8h-7g 06:46:00 06:23:00
68.S9gx8f+ 06:46:00 06:48:00
69.P8gx8f 06:46:00 06:48:00
70.P9f-9g+ 06:46:00 06:48:00
71.B8d-7c+ 06:56:00 06:48:00
72.+P9g-8g 06:56:00 06:51:00
73.K7gx8g 07:01:00 06:51:00
74.R9b-9i+ 07:01:00 06:54:00
75.S*8h 07:04:00 06:54:00
76.+R9i-9c 07:04:00 07:08:00
77.+B7cx7d 07:06:00 07:08:00
78.S*9h 07:06:00 07:08:00
79.K8g-7g 07:06:00 07:08:00
80.S9hx8i= 07:06:00 07:08:00
81.G7h-8g 07:11:00 07:08:00
82.P*5f 07:11:00 07:15:00
83.P*5h 07:14:00 07:15:00
84.B3a-4b 07:14:00 07:20:00
85.P6e-6d 07:22:00 07:20:00
86.+R9c-9d? 07:22:00 07:30:00
White has a big material advantage, but it is very hard to stop the
black king from entering. After this mistake, white can no longer avoid
this. Better was 86.Bx6d and it is still very much in doubt whether
the black king can find a safe haven in the white camp.

87.P7f-7e    07:26:00  07:30:00
88.K4a-3a    07:26:00  07:32:00
89.P6dx6c+   07:35:00  07:32:00
90.+R9dx7d   07:35:00  07:37:00
91.P7ex7d    07:35:00  07:37:00
92.N*7e      07:35:00  07:37:00
93.K7g-7f    07:35:00  07:37:00
94.N7ex8g+   07:35:00  07:39:00
95.K7f-8e    07:35:00  07:39:00
96.+N8gx8h   07:35:00  07:45:00
97.P7d-7c+   07:35:00  07:45:00

Abe has abandoned all his pieces to make two tokins in the white
position that will give his king enough support to walk to the
other side of the board.

98.K3a-2b    07:35:00  07:46:00
99.R*9a      07:39:00  07:46:00

Now the black king is safe to enter. Habu has no chance to mate the
black king, so his only option is to make an entering king himself
and win on material.

100.B*3i     07:39:00  07:46:00

Threatens both G*8g and G*2h. Getting the black rook on 1h means five
extra points in case of mutual entering kings.

101.K8e-9d   07:42:00  07:46:00
102.G*2h     07:42:00  07:48:00
103.K9d-8c   07:43:00  07:48:00
104.G2hx1h   07:43:00  07:51:00
105.L1ix1h   07:43:00  07:51:00
106.B4bx8f   07:43:00  07:51:00
107.K8c-7b   07:44:00  07:51:00
108.R*9c     07:44:00  07:51:00
109.R9a-8a+  07:44:00  07:51:00
110.R9c-9g+  07:44:00  07:51:00
111.P*6f     07:48:00  07:51:00
112.S*9b     07:48:00  07:52:00
113.+R8a-8e  07:49:00  07:52:00
114.B8f-5i+  07:49:00  07:52:00
115.P*9c     07:51:00  07:52:00
116.P*8d     07:51:00  07:54:00
117.+R8e-7d  07:52:00  07:54:00
118.+R9gx9c  07:52:00  07:54:00
119.P*8c     07:53:00  07:54:00
120.+B5ix5h  07:53:00  07:56:00
121.G6g-7f   07:53:00  07:56:00
122.+B5hx4g  07:53:00  07:56:00
123.P8c-8b+  07:53:00  07:56:00
124.P5f-5g+  07:53:00  07:56:00
125.P6f-6e   07:53:00  07:56:00
126.+P5g-5f  07:53:00  07:56:00
127.G7f-7e?  07:54:00  07:56:00
With his king safe, black has gotten very good winning chances and it
is time for black to find a way to attack the white king. Here Abe
misses a good chance to combine attack and defence. After 127.+Px9b
+Rx9b +P8b +R9f K8b followed by +R7b black's attack is very strong.
It is highly unlikely that the white king will be able to escape up
the board. Now the outcome of the game is again unclear: an incredible
mud fight is ahead.

128.+R9c-9e  07:54:00  07:56:00
129.G7e-6d   07:55:00  07:56:00
130.+P5f-6f  07:55:00  07:56:00
131.+P8bx9b  07:55:00  07:56:00
132.+P6fx6e  07:55:00  07:56:00
133.+P9b-8b  07:56:00  07:56:00
134.+P6ex6d  07:56:00  07:57:00
135.+R7dx6d  07:56:00  07:57:00
136.B3i-7e+  07:56:00  07:57:00
137.G*9f     07:56:00  07:57:00
138.+B7ex6d  07:56:00  07:57:00
139.G9fx9e   07:56:00  07:57:00
140.+B6d-5d  07:56:00  07:57:00
141.G9ex8d   07:56:00  07:57:00
142.R*6i     07:56:00  07:57:00
143.R*6a     07:56:00  07:57:00
144.P4e-4f   07:56:00  07:58:00
145.K7b-8a   07:56:00  07:58:00
146.+B4gx3f  07:56:00  07:58:00
147.K8a-9a   07:56:00  07:58:00
148.P4f-4g+  07:56:00  07:58:00
149.G8d-7d   07:56:00  07:58:00
150.P1c-1d   07:56:00  07:58:00
151.G7d-6d   07:56:00  07:58:00
152.+B5d-7f  07:56:00  07:58:00
153.N*6e     07:56:00  07:58:00
154.+B3fx2g  07:56:00  07:58:00
155.S*5b     07:56:00  07:58:00
156.G4c-5d   07:56:00  07:58:00
157.L*2h     07:58:00  07:58:00
158.+B2gx1h  07:58:00  07:58:00
159.P*2d     07:58:00  07:58:00
160.G5dx6d   07:58:00  07:58:00
161.P2dx2c+  07:58:00  07:58:00
162.G3bx2c   07:58:00  07:58:00
163.P*2d!    07:58:00  07:58:00
Good move. The simple 163.Rx2a+ Kx2a Lx2c+ gives white a later Rx2i+
with defence and the bishop on 1h is still working well.

164.+B1hx2h  07:58:00  07:58:00

Now Rx2i+ no longer defends and the bishop is no longer on an important
diagonal.

165.R6ax2a+  07:58:00  07:58:00
166.K2bx2a   07:58:00  07:58:00
167.P2dx2c+  07:58:00  07:58:00
168.G*2b     07:58:00  07:58:00
169.P*2d     07:58:00  07:58:00
170.S3cx2d   07:58:00  07:59:00
171.+P2cx2d  07:58:00  07:59:00
172.G*3c     07:58:00  07:59:00
173.+P2dx3c  07:58:00  07:59:00
174.S4dx3c   07:58:00  07:59:00
175.N*2e     07:58:00  07:59:00
176.R6ix6e+  07:58:00  07:59:00
177.G*4c     07:58:00  07:59:00
178.+R6e-9e  07:58:00  07:59:00
179.K9a-8a   07:58:00  07:59:00
180.+B7fx4c  07:58:00  07:59:00
181.S5bx4c+  07:58:00  07:59:00
182.R*4a     07:58:00  07:59:00
183.S*7a     07:58:00  07:59:00
184.R4ax4c   07:58:00  07:59:00
185.+P6cx6d  07:58:00  07:59:00
186.+B2h-2g  07:58:00  07:59:00
187.B*6c     07:58:00  07:59:00
188.+B2gx6c  07:58:00  07:59:00
189.+P7cx6c  07:58:00  07:59:00
190.K2a-1b   07:58:00  07:59:00
191.B*5a?    07:58:00  07:59:00
Habu has not been able to find a way to make an entering king and black
has again a winning position. Here Abe missed the simple 191.G*1c Gx1c
B*3b, threatening mate and the rook. The outcome of the game doesn't
change, but now there are still a lot of moves left to play.
192.G*9a 07:58:00 07:59:00
193.+P8bx9a 07:58:00 07:59:00
194.+R9e-8f 07:58:00 07:59:00
195.G*8b 07:58:00 07:59:00
196.S*2d 07:58:00 07:59:00
197.N2ex3c+ 07:59:00 07:59:00
198.S2dx3c 07:59:00 07:59:00
199.S*3a 07:59:00 07:59:00
200.+R8f-2f 07:59:00 07:59:00
201.+P6d-5d 07:59:00 07:59:00
202.R4c-4a 07:59:00 07:59:00
203.S3ax2b+ 07:59:00 07:59:00
204.S3cx2b 07:59:00 07:59:00
205.B5a-6b+ 07:59:00 07:59:00
206.+R2fx2i 07:59:00 07:59:00
207.G*3b 07:59:00 07:59:00
208.R4a-4f 07:59:00 07:59:00
209.+P5dx5e 07:59:00 07:59:00
210.L*3a 07:59:00 07:59:00
211.G3bx2b 07:59:00 07:59:00
212.+R2ix2b 07:59:00 07:59:00
213.G*4e 07:59:00 07:59:00
214.R4f-3f 07:59:00 07:59:00
215.+P5e-4d 07:59:00 07:59:00
216.L*3c 07:59:00 07:59:00
217.P*3e 07:59:00 07:59:00
218.B*6g 07:59:00 07:59:00
219.P3ex3d 07:59:00 07:59:00
220.L3cx3d 07:59:00 07:59:00
221.+B6b-5a 07:59:00 07:59:00
222.N*3c 07:59:00 07:59:00
223.P*2d 07:59:00 07:59:00
224.+R2bx2d 07:59:00 07:59:00
225.S*4c 07:59:00 07:59:00
226.G*2c 07:59:00 07:59:00
227.+P4dx3d 07:59:00 07:59:00
228.G2cx3d 07:59:00 07:59:00
229.S4cx3d+ 07:59:00 07:59:00
230.R3fx3d 07:59:00 07:59:00
231.G4ex3d 07:59:00 07:59:00
232.B6gx3d+ 07:59:00 07:59:00
233.R*4b 07:59:00 07:59:00
234.K1b-1c 07:59:00 07:59:00
235.R4bx4g+ 07:59:00 07:59:00
236.N*3e 07:59:00 07:59:00
237.+R4g-4a 07:59:00 07:59:00
238.N3e-2g+ 07:59:00 07:59:00
239.P*3f 07:59:00 07:59:00
240.N*2c 07:59:00 07:59:00
241.L*3e 07:59:00 07:59:00
242.N2cx3e 07:59:00 07:59:00
243.P3fx3e 07:59:00 07:59:00
244.+B3dx3e 07:59:00 07:59:00
245.N*1f 07:59:00 07:59:00
246.+R2d-2f 07:59:00 07:59:00
247.+R4ax3a 07:59:00 07:59:00
248.S*2b 07:59:00 07:59:00
249.+B5ax3c 07:59:00 07:59:00
250.S2bx3a 07:59:00 07:59:00
251.L*2d 07:59:00 07:59:00
252.+B3ex2d 07:59:00 07:59:00
253.+B3cx2d 07:59:00 07:59:00
254.+R2fx2d 07:59:00 07:59:00
255.N1fx2d 07:59:00 07:59:00
256.K1cx2d 07:59:00 07:59:00
257.G*3f 07:59:00 07:59:00
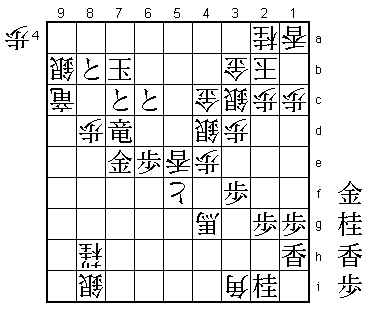
Resigns 07:59:00 07:59:00
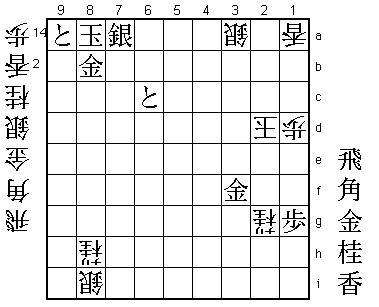
Finally, this historical fight ends with Abe winning and levelling the
match at 2-2. The final position will be printed many times. It almost
looks like a tsume shogi problem with only 14 pieces on the board. There
are so many pieces in hand that the players dropped them numerous times
from the komadai during the post-mortem analysis. A record-breaking
game as it was the longest game ever to be played in the Ryu-O, both
in number of moves (previous record 203 moves) and in time (the game
finished at 20:59 in the evening). Abe will not care much about these
facts, but more about getting completely back in this match after being
2-0 down. The next game will be pivotal...