15th Ryu-O Match Game 3
Black: Habu Yoshiharu, Ryu-O
White: Abe Takashi, Challenger
15th Ryu-O match, Game 3, November 28th and 29th 2002
1.P7g-7f 00:02:00 00:00:00
2.P8c-8d 00:02:00 00:04:00
3.P2g-2f 00:09:00 00:04:00
4.G4a-3b 00:09:00 00:09:00
5.G6i-7h 00:14:00 00:09:00
6.P3c-3d 00:14:00 00:26:00
7.P2f-2e 00:21:00 00:26:00
8.P8d-8e 00:21:00 00:27:00
9.P2e-2d 00:24:00 00:27:00
10.P2cx2d 00:24:00 00:27:00
11.R2hx2d 00:24:00 00:27:00
12.P8e-8f 00:24:00 00:27:00
13.P8gx8f 00:24:00 00:27:00
14.R8bx8f 00:24:00 00:27:00
15.R2dx3d 00:36:00 00:27:00
16.B2b-3c 00:36:00 00:27:00
17.R3d-3f 00:42:00 00:27:00
18.K5a-4a 00:42:00 00:32:00
19.P*8g 01:25:00 00:32:00
20.R8f-8e 01:25:00 00:36:00
21.R3f-2f 01:25:00 00:36:00
22.S3a-2b 01:25:00 00:37:00
23.K5i-5h 01:30:00 00:37:00
24.P7c-7d 01:30:00 02:05:00
25.G4i-3h 02:37:00 02:05:00
26.S7a-6b 02:37:00 02:19:00
27.S3i-4h 02:40:00 02:19:00
28.G6a-5a 02:40:00 02:23:00
29.P3g-3f 02:44:00 02:23:00
30.N8a-7c 02:44:00 03:16:00
31.N2i-3g 03:00:00 03:16:00
32.P1c-1d 03:00:00 03:21:00
33.P4g-4f 03:12:00 03:21:00
34.P7d-7e 03:12:00 03:34:00
35.P4f-4e 03:17:00 03:34:00
36.P7ex7f 03:17:00 04:05:00
37.P3f-3e 03:35:00 04:05:00
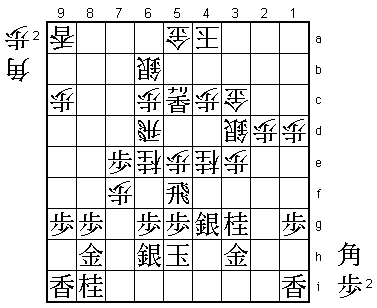
The end of the first day and still in known territory. This is one of
the most popular positions of the R8e Yokofudori and both players will
studied this position thoroughly.
38.P*2d!? 03:35:00 04:18:00
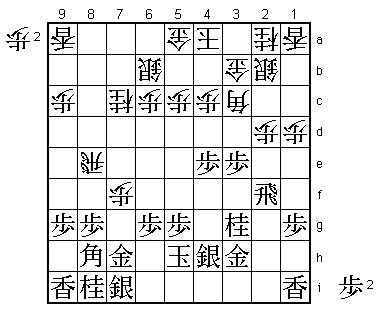
The first surprise. Although not without precedent, 38.P*2c is by far
the more common move. Dropping the pawn on 2d has the advantage that
the white king has more running space and black can't attack with N2e.
The disadvantage is that the pawn on 2d is vulnerable and might become
a target for black. Also, the white bishop no longer has the option of
moving to 2d or 1e.

39.S4h-4g    04:00:00  04:18:00
40.R8e-7e    04:00:00  04:25:00
41.R2f-3f    04:13:00  04:25:00
42.N7c-6e    04:13:00  05:10:00
43.B8hx3c+   05:15:00  05:10:00
44.S2bx3c    05:15:00  05:10:00
45.P3e-3d?   05:15:00  05:10:00
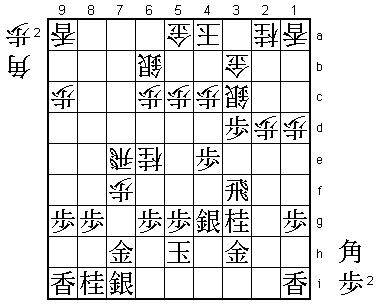
An important mistake (maybe even the losing move). Habu completely
underestimated the power of Abe's reply. If white would have to answer
this pawn push with 46.S2b, black would have had a good position.

46.P*3e!     05:15:00  05:44:00

Perfect reply. This move is hard to play, as black can get two-for-one
after 47.Px3c+ Px3f +Px3b Kx3b. However, black has no good way to use
the two generals, while black's position is very vulnerable to rook
drops. White is both threatening Px3g+ Gx3g R*3i and the strong
attack P7g+.

47.R3f-5f    06:23:00  05:44:00

Admitting failure. 47.Rx3e is answered by 48.S4d! R3f (Px4d Nx5g+ loses
the rook) and now both P7g+ (analysed in the press room) and S5e (the
move Abe intended to play) are good for white.

48.S3cx3d!   06:23:00  06:11:00
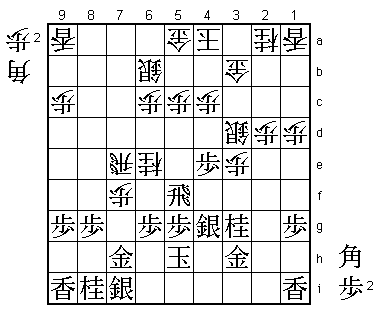
Another good move by Abe. This allows a bishop fork, but Abe has seen
that this will allow all of his forces to join the attack.

49.B*6f      06:23:00  06:11:00
50.R7e-7d    06:23:00  06:14:00
51.B6fx1a+   06:23:00  06:14:00
52.B*3c      06:23:00  06:14:00
53.+B1ax3c   06:52:00  06:14:00
54.N2ax3c    06:52:00  06:14:00
55.P*7e      06:52:00  06:14:00
56.R7d-5d    06:52:00  06:41:00
57.L*5e      06:52:00  06:41:00
58.R5d-6d    06:52:00  06:53:00

The double rocket of rook and lance looks threatening, but white has
nothing to fear here.

59.S7i-6h    07:06:00  06:53:00
60.P*8h      07:06:00  07:07:00
61.G7hx8h    07:10:00  07:07:00
62.N3cx4e    07:10:00  07:09:00
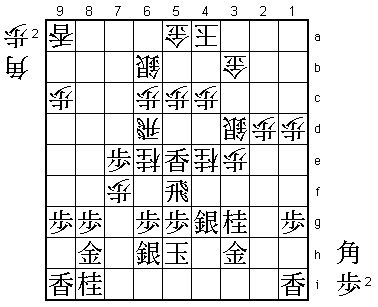
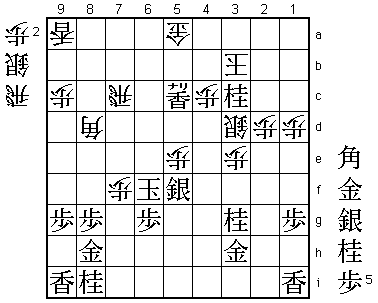
White has managed the most coveted goal of the R8e Yokofudori: both
knights are attacking the black king. White's position is overwhelming.

63.P*3c      07:14:00  07:09:00
64.G3bx3c    07:14:00  07:12:00
65.L5ex5c+   07:14:00  07:12:00
66.P*5e!     07:14:00  07:34:00
Abe doesn't let up. 66.Sx5c looks good after 67.Rx5c+ L*5b, but black
also has 67.Nx4e!. For example, 68.Sx4e Rx5c+ L*5b +Rx6d Px6d R*1a and
because white can't drop a pawn in defence on the third file, the
black attack is quite strong.

67.R5fx5e    07:49:00  07:34:00
68.N4ex5g+   07:49:00  07:34:00
69.S6hx5g    07:49:00  07:34:00
70.S6bx5c    07:49:00  07:34:00
71.N*4e      07:50:00  07:34:00

The difference. Now 71.Rx5c+ L*5b +Rx6d fails to Nx5g+.

72.L*5d      07:50:00  07:38:00

Wins the rook and the game.

73.R5ex6e    07:50:00  07:38:00
74.L5dx5g+   07:50:00  07:38:00
75.K5hx5g    07:50:00  07:38:00
76.R6dx6e    07:50:00  07:38:00
77.N4ex3c=   07:50:00  07:38:00
78.K4a-3b    07:50:00  07:43:00
79.L*6f      07:51:00  07:43:00
80.R6ex7e    07:51:00  07:49:00
81.L6fx6c+   07:54:00  07:49:00
82.P*5f      07:54:00  07:51:00
83.S4gx5f    07:54:00  07:51:00
84.P*5e      07:54:00  07:51:00
85.K5g-6f    07:54:00  07:51:00
86.B*8d      07:54:00  07:54:00
87.+L6cx5c   07:54:00  07:54:00
88.R7e-7c    07:54:00  07:54:00
Resigns      07:54:00  07:54:00
After 89.Kx5e 90.Rx5c black has no attack left. 91.P*5d even leads to
mate after 92.S*4d K4f L*4e. A perfect game by Abe that will have done
his confidence a lot of good (not that I had the impression that lack
of confidence is his problem). He is now back in this match and has a
game with black coming up to try and make things even. Of course, if
he loses the next game, he will be 3-1 down with three to play, so he
definitely needs to convert the advantage of starting the game.