15th Ryu-O Match Game 2
Black: Abe Takashi, Challenger
White: Habu Yoshiharu, Ryu-O
15th Ryu-o sen, Game 2, November 20th and 21st 2002
1.P7g-7f     00:00:00  00:00:00
2.P8c-8d     00:00:00  00:04:00
3.G6i-7h     00:03:00  00:04:00
4.G4a-3b     00:03:00  00:07:00
5.S7i-6h     00:04:00  00:07:00
6.P3c-3d     00:04:00  00:11:00
7.P6g-6f     00:06:00  00:11:00
8.S7a-6b     00:06:00  00:15:00
9.P5g-5f     00:07:00  00:15:00
10.P5c-5d    00:07:00  00:18:00
11.S3i-4h    00:10:00  00:18:00
12.S3a-4b    00:10:00  00:22:00
13.G4i-5h    00:11:00  00:22:00
14.K5a-4a    00:11:00  00:32:00
15.K5i-6i    00:12:00  00:32:00
16.G6a-5b    00:12:00  00:38:00
17.S6h-7g    00:30:00  00:38:00
18.S4b-3c    00:30:00  00:42:00
19.B8h-7i    00:32:00  00:42:00
20.B2b-3a    00:32:00  00:43:00
21.P3g-3f    00:32:00  00:43:00
22.P4c-4d    00:32:00  00:43:00
23.G5h-6g    01:13:00  00:43:00
24.P7c-7d    01:13:00  00:59:00
25.B7i-6h    01:13:00  00:59:00
26.P9c-9d    01:13:00  01:23:00
27.K6i-7i    01:53:00  01:23:00
28.G5b-4c    01:53:00  01:38:00
29.K7i-8h    02:08:00  01:38:00
30.P9d-9e    02:08:00  02:37:00
31.R2h-3h    03:38:00  02:37:00
32.N8a-7c    03:38:00  02:50:00
33.P4g-4f    03:46:00  02:50:00
34.L9a-9c    03:46:00  03:27:00

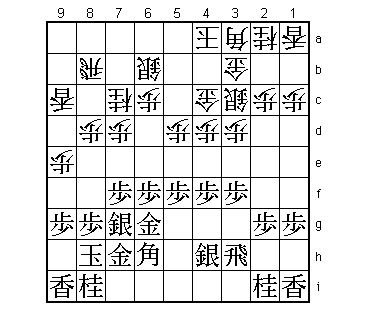
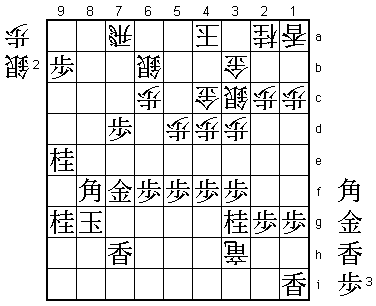
Habu is aiming for the Suzumesashi ("Spearing the Sparrow") formation
with L9c-R9b-N8e followed by Nx9c+. Opening theory dictates that this
attack is best countered by a climbing silver attack in combination
with B4f (B6d if black plays the Suzumesashi). Therefore, Habu only
plays this attack after seeing Abe's 32.R3h and 33.P4f. This makes
both the climbing silver and the B4f counter impossible. Of course,
white had to sacrifice something: the combination of the king on 4a
and the gold on 4c is quite dangerous for white. To be able to attack
first, white has to attack with this formation. The king on 4a would
be much better protected with the gold still on 5b instead of 4c.

35.S4h-4g    03:50:00  03:27:00
36.R8b-9b    03:50:00  03:32:00
37.S7g-8f    04:09:00  03:32:00
38.N7c-8e    04:09:00  03:55:00
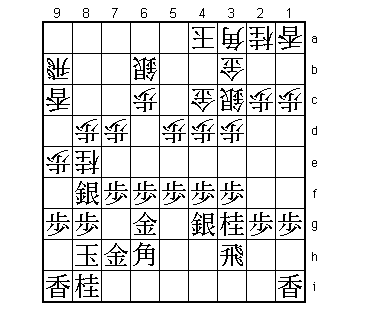
39.N2i-3g?   04:09:00  03:55:00

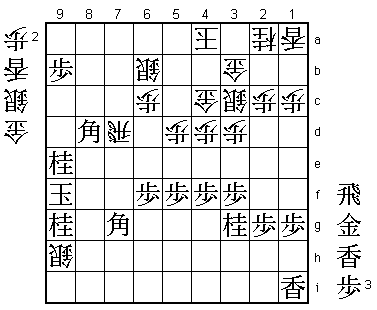
This is dubious. Actually, Habu has experience with this position, as
he played black against Nakahara in a game in the 1992 Osho tournament.
There he played 39.P3e Px3e Rx3e P9f Px9f P*9g Sx8e S3d R3h Px8e Lx9g
and he had enough counter chances against the white attack to win the
game. Abe was surprised when he was told about this game during the
post-mortem analysis, saying he didn't know it. He said that 39.N3g
was the move he intended to play all along. However, this gives white
the first opportunity to attack. Black's attacking pieces just wait
for an opportunity to be activated, but this opportunity never comes.

40.N8ex9g+   04:09:00  04:50:00
41.S8fx9g    04:09:00  04:50:00
42.P9e-9f    04:09:00  04:50:00
43.S9gx9f    04:10:00  04:50:00
44.L9cx9f    04:10:00  04:51:00
45.L9ix9f    04:18:00  04:51:00
46.R9bx9f    04:18:00  05:00:00
47.L*9i      04:46:00  05:00:00
48.P*9g      04:46:00  05:03:00
49.L9ix9g    04:46:00  05:03:00
50.B3ax9g+   04:46:00  05:03:00
51.N8ix9g    04:46:00  05:03:00
52.P7d-7e    04:46:00  05:10:00
53.B*7d      05:49:00  05:10:00
54.P8d-8e    05:49:00  05:16:00
55.B7dx8e    05:50:00  05:16:00
56.R9f-9a    05:50:00  05:16:00
57.P7fx7e    05:59:00  05:16:00
58.L*8b      05:59:00  06:02:00
59.B8e-7d    06:05:00  06:02:00

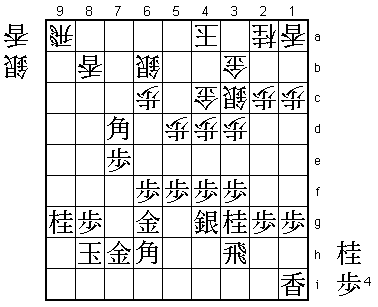
60.L*8c?     06:05:00  06:07:00

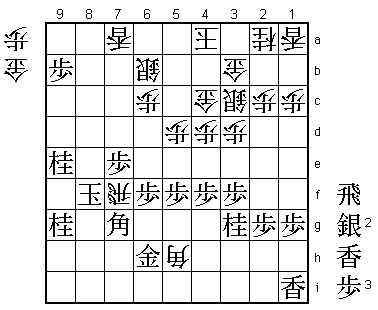
It is very tempting to play 60.L*7c, but 61.P*9b R7a N*9d Lx7d Nx8b+
Lx7e +Nx7a is not good for white. Because of this, Habu played 60.L*8c,
but he underestimated Abe's reply. He should have played 60.S*8c here,
keeping the extra lance in reserve. Then 61.B6e P6d B7f L*7b gives
white a very solid attacking formation that leaves black little
chance of survival.

61.N*9e!     06:31:00  06:07:00

Strong. White has no choice but to give up both lances. This opens up
the road of the king to the other side. One of black's winning
strategies is making an entering king. White has almost no chance
to enter, so jishogi is very unlikely.

62.L8cx8g+   06:31:00  06:22:00
63.G7hx8g    06:31:00  06:22:00
64.L8bx8g+   06:31:00  06:22:00
65.K8hx8g    06:31:00  06:22:00
66.G*8d      06:31:00  06:22:00

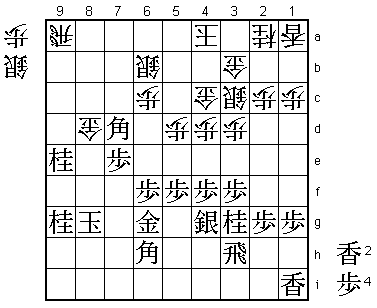
67.P*9b?     06:36:00  06:22:00

A good opportunity missed. In the press room, Ariyoshi (9-dan) found
the brilliant defence 67.S5h!. This defends against both B*6i and
B*4i. Ariyoshi is a pupil of the late Oyama, the greatest defender
of all time. Ariyoshi said that he found the move by thinking about
how his teacher Oyama would play this position. It seemed that Abe
didn't think a lot about 67.S5h, feeling that giving up the initiative
would mean disaster. For example, 67.S5h S*9d P*9f Gx7e B8c+ Sx8c
Nx8c+ and now Abe feared P*8f, but even after that the position is
far from clear. Habu acknowledged after the game that 67.S5h would
make things very difficult for him.

68.R9a-7a    06:36:00  06:42:00
69.L*7h      06:40:00  06:42:00
70.G8dx7d    06:40:00  07:02:00
71.P7ex7d    06:40:00  07:02:00
72.B*4i      06:40:00  07:02:00
73.G6g-7f    07:05:00  07:02:00
74.B4ix3h+   07:05:00  07:36:00
75.S4gx3h    07:07:00  07:36:00
76.R*4h      07:07:00  07:36:00
77.B6h-8f    07:09:00  07:36:00
78.R4hx3h+   07:09:00  07:36:00

79.B*8d?     07:09:00  07:36:00

There goes Abe's final chance to make a long fight of it. Correct
was 79.G*7g. Then 80.+Rx3g B*8d S5c P7c+ and after N*9d Bx5c+ Gx5c
K9f and Habu thought that he couldn't stop the entering king. Abe
disagreed, pointing out P*7e Bx7e S*6d, but things are clearly more
complicated than the variation he chose.

80.S*9h!     07:09:00  07:39:00

Simple but strong.

81.K8g-9f    07:09:00  07:39:00
82.+R3hx7h   07:09:00  07:39:00
83.G7f-7g    07:13:00  07:39:00

Or 83.G*7g S*8g K8e Sx7f= Gx7f Rx7d and white wins.

84.+R7hx7g   07:13:00  07:43:00
85.B8fx7g    07:13:00  07:43:00
86.R7ax7d    07:13:00  07:43:00

In the press room, analysis stopped here. Black has no defence.

87.R*8a      07:21:00  07:43:00
88.L*7a      07:21:00  07:44:00
89.P*7e      07:28:00  07:44:00
90.R7dx8d    07:28:00  07:45:00
91.R8ax8d+   07:30:00  07:45:00
92.S*8g      07:30:00  07:50:00
93.+R8dx8g   07:30:00  07:50:00
94.S9hx8g=   07:30:00  07:50:00
95.K9fx8g    07:30:00  07:50:00
96.B*5h      07:30:00  07:51:00
97.G*6h      07:32:00  07:51:00
98.P*8f      07:32:00  07:52:00
99.K8gx8f    07:38:00  07:52:00

99.Bx8f fails to G*7f and 99.K9f to B7f+.

100.R*7f     07:38:00  07:52:00
Resigns      07:38:00  07:52:00

Abe has the choice between hisshi after 101.K8g Rx7e or mate after
101.K8e Rx7g+ Gx5h B*7f etc. He selected the third option: resigning.
A game that on the surface looks like a strong win by Habu. Attacking
first with white and pulling this off is quite an accomplishment in
the Yagura these days. However, Abe had several opportunities in
this game that he didn't take. He is clearly strong enough to create
such opportunities even against such a brilliant opponent. Still, if
he keeps missing them, this match will be over very quickly.
