15th Ryu-O Match Second Replay Game 1
Black: Habu Yoshiharu, Ryu-O
White: Abe Takashi, Challenger
15th Ryu-O sen, 2nd Replay Game 1, November 6th and 7th 2002
1.P7g-7f 00:00:00 00:00:00
2.P3c-3d 00:00:00 00:03:00
3.P2g-2f 00:02:00 00:03:00
4.P8c-8d 00:02:00 00:08:00
5.P2f-2e 00:07:00 00:08:00
6.P8d-8e 00:07:00 00:10:00
7.G6i-7h 00:11:00 00:10:00
8.G4a-3b 00:11:00 00:12:00
9.P2e-2d 00:17:00 00:12:00
10.P2cx2d 00:17:00 00:13:00
11.R2hx2d 00:17:00 00:13:00
12.P8e-8f 00:17:00 00:13:00
13.P8gx8f 00:24:00 00:13:00
14.R8bx8f 00:24:00 00:13:00
15.R2dx3d 00:32:00 00:13:00
16.B2b-3c 00:32:00 00:15:00
17.R3d-3f 00:44:00 00:15:00
18.S3a-2b 00:44:00 00:31:00
19.P*8g 01:05:00 00:31:00
20.R8f-8e 01:05:00 00:45:00
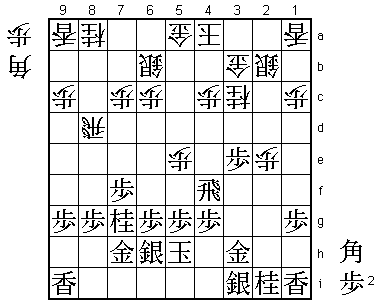
In the first game, Abe gave the Gokigen Nakabisha a try, but in this
game he goes back to his opening of preference, the R8e-Yokofudori.
He also played this in the second game of the Ryu-O challenger match,
so this opening was not a real surprise.
21.R3f-2f 01:10:00 00:45:00
22.K5a-4a 01:10:00 00:50:00
23.K5i-5h 01:14:00 00:50:00
24.S7a-6b 01:14:00 02:17:00
25.P3g-3f 02:19:00 02:17:00
26.P5c-5d 02:19:00 02:50:00
27.B8hx3c+ 02:46:00 02:50:00
28.N2ax3c 02:46:00 02:50:00
29.N8i-7g 02:46:00 02:50:00
30.R8e-8d 02:46:00 03:07:00
31.P3f-3e 02:56:00 03:07:00
32.P5d-5e 02:56:00 03:10:00
33.G4i-3h 03:08:00 03:10:00
34.G6a-5a 03:08:00 03:22:00
35.S7i-6h 03:56:00 03:22:00
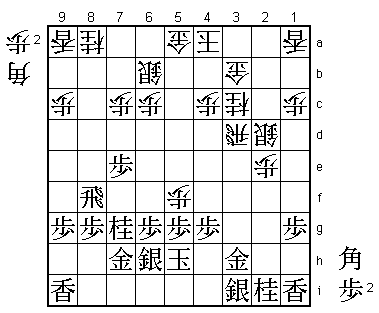
36.P*2e 03:56:00 03:54:00
37.R2f-4f! 04:37:00 03:54:00
After 36.P*2e, the position is exactly the same as in third game of
the Ryu-O challenger match between Abe and Nakata (although the move
order is different). In that game, Abe was black and played 37.R3f.
This threatens P3d next, but after 38.S2c S4h P1d P7e P1e, black was
in trouble. White threatens P1f Px1f P*1h Lx1h B*5d next and black has
no option but to try an desperate attack with P7d (this was played
in the Abe-Nakata game) or admit strategic defeat with P*2g. Because
of this, Abe felt that white had a strong position, but he overlooked
the move that Habu played here. After R4f, white can't develop the
knight with P7d-N7c, because P7d fails to P3d. Therefore, white still
has to play 38.S2c and because black no longer has to fear the bishop
drop on 5d, there is no need to drop a pawn on 2g and black can continue
to play this position at his own pace.
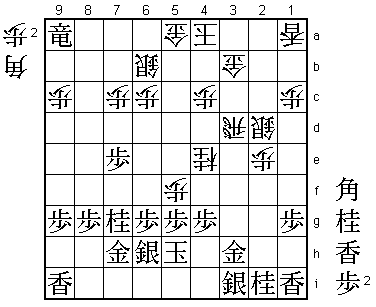
38.S2b-2c 04:37:00 04:57:00
39.P7f-7e! 04:38:00 04:57:00
Not only makes the knight development to P7d-N7c impossible, it also
threatens to switch to rook to 8f. 39.P*2b also looks strong, but
after 40.R4d Rx4d Px4d R*2a R*3a the position is far from clear.
These subtle differences show the difficulty of this opening. After
39.P7e, black has the upper hand.
40.S2c-2d 04:38:00 05:35:00
41.P3e-3d 05:39:00 05:35:00
42.R8dx3d 05:39:00 05:46:00
43.R4f-8f 05:39:00 05:46:00
44.P5e-5f 05:39:00 06:26:00
Abe has no choice but to attack. 44.P*8d is answered by 45.P*3g and
white has no good way to attack the solid, low black position. On the
other hand, B*8c or B*8b next is can't be both defended.
45.R8fx8a+ 06:11:00 06:26:00
45.Rx5f looks like the safer move and after the game Habu said that
he gave this move some serious thought. However, he felt it was kind
of weak to let white determine his moves and after some deep
calculations judged that white's attack was not strong enough.
46.N3c-4e 06:11:00 06:26:00
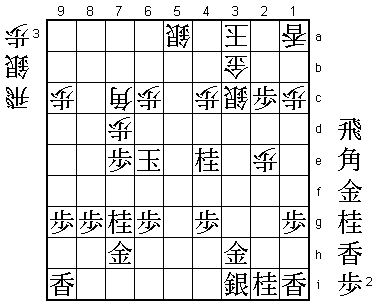
47.+R8ax9a! 06:20:00 06:26:00
Amazing. Habu just seems to ignore the white attack which looks very
threatening. There is a thin line between winning and losing here. For
example, after 47.Px5f black suddenly loses after 48.P*5g Sx5g B*4i
Kx4i Nx5g+. Also, the strong looking defence 47.N*4i is bad after
48.B*2h!.

48.P5fx5g+   06:20:00  07:38:00
49.S6hx5g    06:20:00  07:38:00
50.N4ex5g+   06:20:00  07:38:00

One of the points of having white take the pawn on 5g is that after
50.B*4i Kx4i Nx5g+ black can play P*5h!, which stops the white attack.
Also, black can now drop a pawn on 5b, which importantly strengthens
his attack. The point of taking the lance on 9a is twofold. First,
B*2h can be answered by L*3g. The second point will become clear below.

51.K5hx5g    06:20:00  07:38:00
52.P*5f      06:20:00  07:38:00
53.K5gx5f    06:21:00  07:38:00

The second reason why 47.+Rx9a was such a good move. If the rook would
still be on 8a, Kx5f would fail to B*9b. During the game, Abe actually
thought that he was getting back in the game again with the black king
out in the open. Habu shows that this is an illusion.

54.P7c-7d    06:21:00  07:39:00

There is no good way to get to the black king. Abe first thought that
54.Rx3h+ was good, but after 55.Sx3h B*4h black has the strong defence
P6f!. If white then attacks from the top with P*5e, the king escapes
with K6g and if white attacks from the bottom with G*5g, the king
escapes up the board with K6e. In the press room 54.B*6i was analyzed,
but after 55.G6h P*5e K6f Bx8g+ B*6e! black wins after either +Bx6e
Nx6e P6d N5c+ Sx6c N*6c or R6d P*5b S*5f Px5a+ K3a N*7f.

55.P*5b      07:03:00  07:39:00
56.B*7c      07:03:00  07:58:00
57.P5bx5a+   07:03:00  07:58:00
58.K4a-3a    07:03:00  07:58:00
59.+R9a-8a   07:29:00  07:58:00
60.R3d-5d    07:29:00  07:58:00
61.K5f-6e    07:29:00  07:58:00
62.R5dx5a    07:29:00  07:59:00
63.+R8ax5a   07:30:00  07:59:00
64.S6bx5a    07:30:00  07:59:00
65.P*2c      07:33:00  07:59:00
66.S2d-3c    07:33:00  07:59:00
67.N*4e      07:38:00  07:59:00
Resigns      07:38:00  07:59:00
Nothing left to play for. 68.R*5e is pointless, as 69.Kx7d attacks
the white bishop and 68.Bx1i+ is answered by 69.B*5c which defends
the important square 6d. A strong victory by Habu, who outplayed his
opponent. He was better in opening, middle game and endgame, but
still he only gets one point for it. Abe will just need to forget
about this and strike back with black in the second game.