14th Ryu-O Match Game 2
Black: Fujii Takeshi, Ryu-O
White: Habu Yoshiharu, Challenger
14th Ryu-O sen, Game 2, October 31st and November 1st 2001
1.P7g-7f     00:00:00  00:00:00
2.P3c-3d     00:00:00  00:01:00
3.P6g-6f     00:03:00  00:01:00
4.P8c-8d     00:03:00  00:05:00
5.R2h-6h     00:05:00  00:05:00

An important game for Fujii. He must win to avoid going 2-0 down with
Habu having black in the next game. The sound that the rook made when
played to Fujii's favorite position seemed to be a little louder than
usual.

6.S7a-6b     00:05:00  00:07:00
7.P1g-1f     00:06:00  00:07:00
8.K5a-4b     00:06:00  00:11:00
9.P1f-1e     00:11:00  00:11:00

Pushing the edge pawn before moving the king in the castle is one of
the main points in the Fujii system. In this game this turns out to be
especially important.

10.K4b-3b    00:11:00  00:13:00
11.S7i-7h    00:21:00  00:13:00
12.P5c-5d    00:21:00  00:25:00
13.S7h-6g    00:31:00  00:25:00
14.S6b-5c    00:31:00  00:33:00
15.S3i-3h    01:09:00  00:33:00
16.P7c-7d    01:09:00  00:55:00
17.K5i-4h    01:14:00  00:55:00
18.B2b-3c    01:14:00  01:20:00
19.K4h-3i    02:03:00  01:20:00
20.K3b-2b    02:03:00  01:37:00
21.P4g-4f    02:04:00  01:37:00
22.P8d-8e    02:04:00  02:48:00
23.B8h-7g    02:04:00  02:48:00
24.G6a-5b    02:04:00  02:48:00
25.K3i-2h    02:40:00  02:48:00
26.P4c-4d    02:40:00  03:11:00
27.R6h-7h    02:45:00  03:11:00
28.B3c-2d    02:45:00  03:33:00

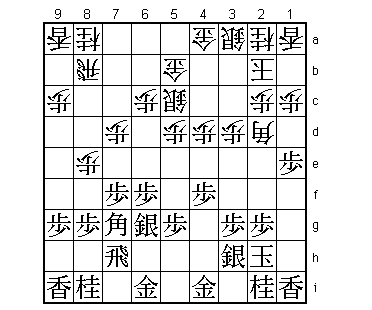
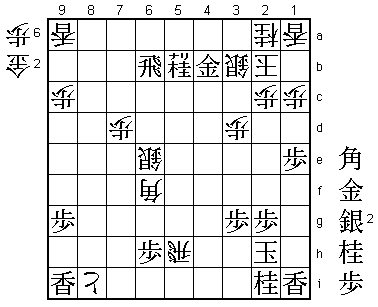
Like in the first game, Habu first stab at Fujii's position is with a
bishop. In game 1 he played at to 5e, here to 2d. Both time the mino
pawn on 4f (6d) is the target. If black would try and defend this pawn
with 29.R4h, the previous 27.R7h will be a waste of a full move. Fujii
decides to sacrifice a pawn for the development of his rook.

29.B7g-6h    02:54:00  03:33:00
30.B2dx4f    02:54:00  03:38:00
31.P7f-7e    02:55:00  03:38:00
32.P7dx7e    02:55:00  03:49:00
33.R7hx7e    02:55:00  03:49:00
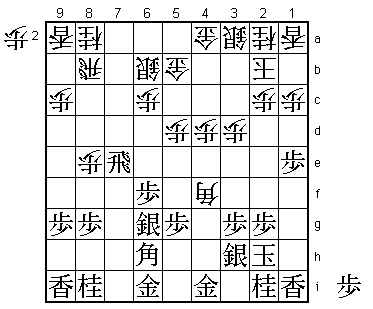
34.S5c-6b?!  02:55:00  03:50:00

Professionals don't like to drop pieces until its absolutely necessary,
but here 34.P*7c might have been a good alternative. After 35.P6e S3b
G6i-5h B2d N7g P8f Px8f Rx8f P*4g P1d white can attack the edge pawn
on 1e and seems to have a good position.

35.P6f-6e!?  03:48:00  03:50:00

The sealed move and a complete surprise to all the commentators. Its
main aim is to take away square 6d from the white bishop.

36.S3a-3b    03:48:00  04:28:00
37.G6i-5h    03:57:00  04:28:00
38.B4f-2d    03:57:00  04:30:00
39.B6h-7g    04:27:00  04:30:00

Black has managed to get his pieces on almost ideal squares. Fujii has
more than enough compensation for the lost pawn.

40.B2d-4b    04:27:00  04:53:00
41.R7e-7d    05:31:00  04:53:00
42.P*7c      05:31:00  05:01:00
43.R7dx5d    05:34:00  05:01:00
44.S6b-5c    05:34:00  05:01:00
45.R5d-5f    05:34:00  05:01:00
46.G5b-4c    05:34:00  05:01:00
47.R5f-7f    05:37:00  05:01:00
48.S5c-5d    05:37:00  05:09:00
49.S6g-6f    05:53:00  05:09:00
50.P8e-8f    05:53:00  05:58:00

Habu probably wanted to play the quiet 50.S3c followed by G3b here,
but it seems that in this case he will be completely overrun by
51.P*7d Px7d S5e.

51.P8gx8f    05:54:00  05:58:00
52.P*8h      05:54:00  05:59:00
53.P*7d      06:35:00  05:59:00
54.P7cx7d    06:35:00  06:15:00
55.S6f-5e    06:35:00  06:15:00
56.S5dx6e    06:35:00  06:39:00
57.R7f-4f    06:39:00  06:39:00
58.P8hx8i+   06:39:00  06:40:00
59.S5ex4d    06:41:00  06:40:00
60.G4cx4d    06:41:00  06:40:00
61.B7gx4d    06:41:00  06:40:00
62.S*3c      06:41:00  06:40:00
63.B4d-7a+   06:47:00  06:40:00
64.R8bx8f?   06:47:00  06:42:00

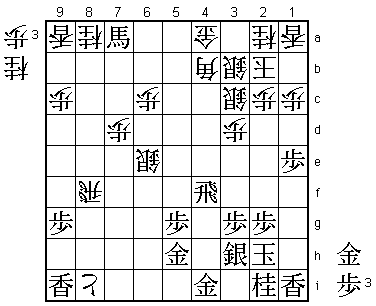
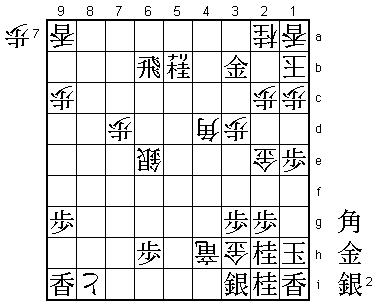
A mistake that give Fujii an important advantage. Fujii feared 64.B6d
and after the wild 65.+Bx8b Bx8b Rx4a+ N*3f K1h Sx4a R*7b R*4b Rx8b+
Rx8b Px3f +Px9i N*2e B*5e it seems like white is dictating the game.

65.R4fx8f    07:12:00  06:42:00
66.B4bx8f    07:12:00  06:42:00
67.+B7ax8a   07:12:00  06:42:00
68.N*4f      07:12:00  06:52:00
69.+B8ax6c   07:12:00  06:52:00
70.R*8h      07:12:00  07:02:00
71.P*7h      07:13:00  07:02:00
72.R8hx7h+   07:13:00  07:29:00
73.P*6h      07:15:00  07:29:00
74.N4fx5h+   07:15:00  07:31:00
75.G4ix5h    07:15:00  07:31:00
76.B8fx6h+   07:15:00  07:31:00
77.G5hx6h    07:16:00  07:31:00
78.+R7hx6h   07:16:00  07:31:00
79.G*3i      07:16:00  07:31:00
80.G*4g      07:16:00  07:35:00
81.P*6i      07:28:00  07:35:00
82.+R6h-5h   07:28:00  07:37:00
83.R*6h      07:31:00  07:37:00
84.+R5hx6h   07:31:00  07:45:00
85.P6ix6h    07:31:00  07:45:00
86.R*5h      07:31:00  07:45:00
87.+B6cx4a   07:32:00  07:45:00
88.S3bx4a    07:32:00  07:45:00
89.G*4i      07:32:00  07:45:00
90.R5hx5g+   07:32:00  07:52:00
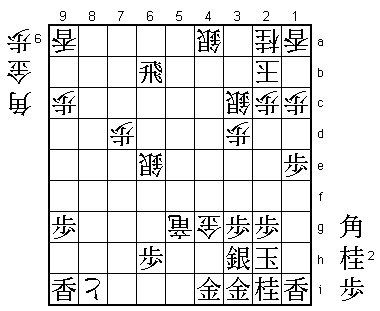
91.R*6b?     07:35:00  07:52:00

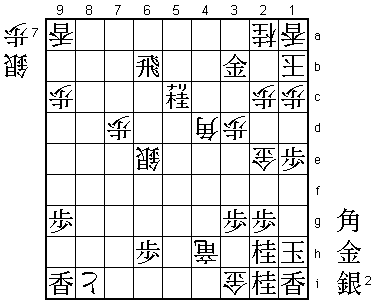
A mistake that makes things very difficult again. Fujii should have
played Sx4g first and then R*6b in which case he keeps his advantage.
It seems like Fujii thought that Habu could only play B*3b here to
defend against the check and the capture of the silver on 6e.

92.G*5b!     07:35:00  07:57:00

Now Fujii realized his mistake. After 93.Rx6e+, white can give his attack
decisive strength with 94.P*4h. Still, the ranging rook side keeps a
slight edge in this endgame.

93.R6b-6a+   07:35:00  07:57:00
94.G5b-5a    07:35:00  07:57:00
95.+R6ax5a   07:38:00  07:57:00
96.G4gx3h    07:38:00  07:57:00
97.G4ix3h    07:38:00  07:57:00
98.+R5gx5a   07:38:00  07:57:00
99.B*3a      07:38:00  07:57:00
100.K2bx3a   07:38:00  07:57:00
101.N*4c     07:38:00  07:57:00
102.K3a-2b   07:38:00  07:57:00
103.N4cx5a+  07:38:00  07:57:00
104.S4a-3b   07:38:00  07:57:00
105.N*4e     07:40:00  07:57:00
106.B*6f     07:40:00  07:57:00
107.N4ex3c+  07:44:00  07:57:00
108.B6fx3c   07:44:00  07:57:00
109.+N5a-5b  07:44:00  07:57:00
110.B*7e     07:44:00  07:59:00
111.R*6b     07:46:00  07:59:00
112.N*4f     07:46:00  07:59:00
113.G*4b     07:47:00  07:59:00
114.N4fx3h+  07:47:00  07:59:00
115.G3ix3h   07:47:00  07:59:00
116.S*3i     07:47:00  07:59:00
117.G3hx3i   07:53:00  07:59:00
118.B7ex3i+  07:53:00  07:59:00
119.K2hx3i   07:53:00  07:59:00
120.B3c-6f   07:53:00  07:59:00
121.K3i-2h   07:53:00  07:59:00
122.R*5h     07:53:00  07:59:00

123.P*4h!    07:54:00  07:59:00

Black has kept his advantage, but needs to be very careful. This is
where the time difference between the players might have made the
difference. Habu is already in byoyomi, while Fujii still had seven
minutes left. Interposing the pawn is vital. After 123.K1g B3i+ K1f
G*2e Kx2e R5e+ white wins.

124.R5hx4h+  07:54:00  07:59:00
125.K2h-1g   07:54:00  07:59:00
126.G*2e     07:54:00  07:59:00
127.G4bx3b   07:56:00  07:59:00
128.K2b-1b   07:56:00  07:59:00
129.N*2h!    07:57:00  07:59:00

Another move for which Fujii had a little time to decide if it was
the best. 129.G*2b looks tempting, but after 130.Bx2b Gx2b Kx2b +N4a
P*4b B*5e K1h things are not easy.

130.B6f-4d?  07:57:00  07:59:00

Habu's best chance would have been 130.+Px9i here. Then 129.G*2b is
still not good enough. Fujii had planned 130.S*2f and after 131.Gx2f
Px2f the exchange of a silver against a gold means that black threatens
mate.

131.K1g-1h   07:57:00  07:59:00
132.G*3h     07:57:00  07:59:00
133.S*3i!!   07:57:00  07:59:00

A brilliant finish. White can't take this silver with the promoted
rook, as this rook needs to keep defending 4b (134.+Rx3i G*2b leads
to mate).

134.G3hx3i   07:57:00  07:59:00
135.+N5b-5c  07:58:00  07:59:00
Resigns      07:58:00  07:59:00

No mate for white and no defense either. In this game Fujii showed why
he has been the Ryu-O for three consecutive years. When the pressure
was really on, he came through with a fine performance. In the end,
pushing the edge pawn early made all the difference. If the pawns would
have been on 1d and 1f, most likely white would have won this game. The
Fujii system prevailed.
