14th Ryu-O Match Game 1
Black: Habu Yoshiharu, Challenger
White: Fujii Takeshi, Ryu-O
14th Ryu-O Sen, Game 1, October 16th and 17th 2001
1.P7g-7f     00:00:00  00:00:00

Last year, Fujii managed to defend his Ryu-O title in the final game
against Habu. However, a year later Habu is back to try again. How much
has he learned from playing Fujii last year and in his two matches with
Kubo, the other leading Shikenbisha specialist?

2.P3c-3d     00:00:00  00:05:00
3.P2g-2f     00:02:00  00:05:00
4.P4c-4d     00:02:00  00:07:00
5.S3i-4h     00:04:00  00:07:00
6.S3a-3b     00:04:00  00:10:00
7.P5g-5f     00:07:00  00:10:00
8.R8b-4b     00:07:00  00:12:00
9.K5i-6h     00:09:00  00:12:00
10.P9c-9d    00:09:00  00:14:00
11.K6h-7h    00:11:00  00:14:00
12.S3b-4c    00:11:00  00:17:00
13.P9g-9f    00:14:00  00:17:00
14.S7a-7b    00:14:00  00:22:00
15.G4i-5h    00:17:00  00:22:00
16.K5a-6b    00:17:00  00:28:00
17.S4h-5g    00:25:00  00:28:00
18.P6c-6d    00:25:00  01:00:00
19.P2f-2e    00:53:00  01:00:00
20.B2b-3c    00:53:00  01:02:00
21.B8h-5e    00:53:00  01:02:00

This is seen quite often lately. Black forces white to play the silver
to 6c, which is not the ideal position for this piece. After this,
black will quietly build a mino castle and pull back the bishop to
the right side of the board, where it is putting some pressure on
the white king.

22.S7b-6c    00:53:00  01:19:00
23.P3g-3f    00:54:00  01:19:00
24.K6b-7a    00:54:00  01:30:00
25.P6g-6f    01:21:00  01:30:00
26.G4a-5b    01:21:00  02:00:00
27.K7h-8h    01:44:00  02:00:00
28.R4b-3b    01:44:00  02:11:00
29.S7i-7h    02:09:00  02:11:00
30.B3c-4b    02:09:00  04:07:00
31.B5e-4f    02:38:00  04:07:00
32.S4c-5d    02:38:00  04:12:00
33.R2h-3h    03:28:00  04:12:00

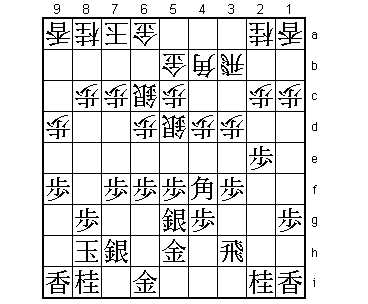
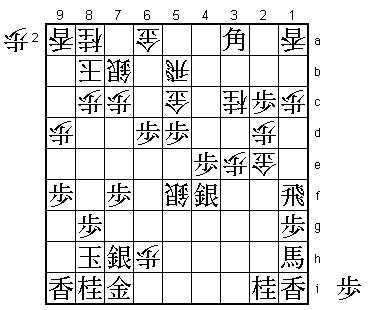
This move ended the first day. The position reached has never appeared
in an official professional tournament game before, but commentator
Shima (8-dan) had some interesting information. He declared the game
a win for white, as this position had appeared in a recent training
game between Moriuchi and Fujii. Analysis after that game showed that
there was no way for black to avoid a bad position from here. Fujii
must have felt very comfortable at this point.

34.P4d-4e    03:28:00  04:16:00
35.B4f-3g    03:30:00  04:16:00
36.P3d-3e    03:30:00  04:17:00
37.B3g-2f    03:37:00  04:17:00
38.P3ex3f    03:37:00  04:20:00
39.B2f-4d    03:38:00  04:20:00
40.N2a-3c    03:38:00  04:32:00
41.R3hx3f    04:21:00  04:32:00
42.S5d-4c    04:21:00  04:33:00

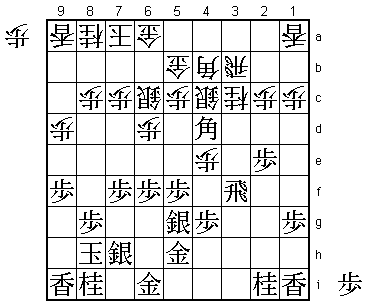
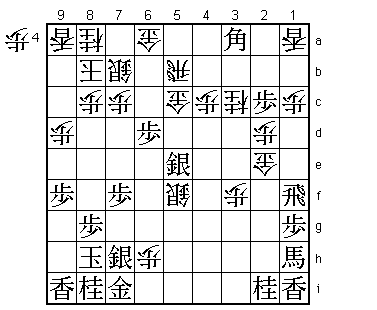
So far the game follows the training game between Moriuchi and Fujii.
Moriuchi played the obvious 42.B5e (42.B2f Nx2e is almost the same),
which is very good for white after 43.P5d B3g Nx2e B2f K7b and black
now must exchange the rooks with Rx3b+ Sx3b. This is good for white
as R*3e S4c Rx2e fails to S3d and white wins. Playing this type of
training games gives a different dimension to professional shogi. It
is not unlikely that a number of games are already decided in these
training sessions before being played in actually tournament games.

43.P2e-2d!!  04:22:00  04:33:00

Habu beats the preparation. This move must have been a shock for Fujii.

44.P2cx2d    04:22:00  04:34:00
45.B4d-2f    04:22:00  04:34:00

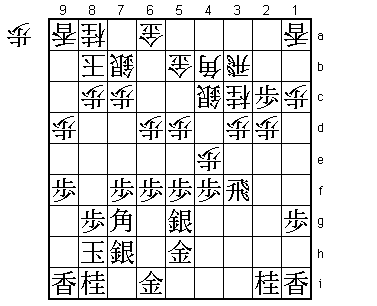
The difference with the Moriuchi-Fujii game now becomes clear. If
white plays 46.N2e, black can play 47.P*3e and avoid the exchange
of rooks. This was not possible in the variation above, as white
could play B2d followed by S4d there, which takes down this
stronghold on 3e.

46.P*3d      04:22:00  05:57:00

After long thought, Fujii decides to settle for an extra pawn. Habu
might not have known it, but he suddenly got a big psychological
advantage here. A game Fujii thought he would win from the study
room has suddenly become a real fight with Habu in the driving seat.

47.P*2c!     05:13:00  05:57:00

Another good Habu move. White's pieces have trouble getting to good
squares.

48.K7a-8b    05:13:00  06:01:00
49.P4g-4f    05:17:00  06:01:00
50.S6c-7b    05:17:00  06:13:00
51.B2f-5i!   05:57:00  06:13:00
52.P5c-5d    05:57:00  06:50:00
53.B5i-7g!   06:51:00  06:50:00

Positive play. Habu activates his bishop. Still, Fujii was not
unhappy that he was given the time to free his own bishop as well.

54.B4b-5c    06:51:00  07:03:00
55.P6f-6e    06:58:00  07:03:00
56.P3d-3e    06:58:00  07:03:00
57.R3f-1f    07:00:00  07:03:00
58.B5c-4d    07:00:00  07:06:00
59.B7gx4d    07:10:00  07:06:00
60.S4cx4d    07:10:00  07:06:00
61.P6ex6d    07:10:00  07:06:00
62.P4ex4f    07:10:00  07:10:00
63.S5gx4f    07:12:00  07:10:00
64.B*3h      07:12:00  07:27:00
65.B*2a      07:22:00  07:27:00
66.R3b-1b    07:22:00  07:38:00
67.B2ax5d+   07:25:00  07:38:00
68.G5b-5c    07:25:00  07:38:00
69.+B5d-1h?! 07:27:00  07:38:00

A small mistake. Better was 69.+B2a followed by P*3d.

70.B3hx5f+   07:27:00  07:39:00
71.P*4e      07:34:00  07:39:00
72.S4d-5e    07:34:00  07:51:00
73.G5h-5g    07:36:00  07:51:00
74.P*6h?!    07:36:00  07:57:00

Fujii realizes that he is in trouble. This move was intended to be
an attempt to turn the tables, but after the game Fujii criticized
it as being too much.

75.G5gx5f    07:47:00  07:57:00
76.S5ex5f    07:47:00  07:57:00
77.G6i-7i    07:47:00  07:57:00
78.G*2e      07:47:00  07:59:00

"A move that makes you cry". Gives up the initiative and a gold
just too attack a rook that wasn't doing much anyway. Still, white
needs this rook to get some attack.

79.B*3a      07:48:00  07:59:00
80.R1b-5b    07:48:00  07:59:00
81.P*5d?    07:48:00  07:59:00

Better was 81.P4d first. Then black threatens 83.P*5d or S5e and white
has no good defense. Things now get quite complicated.

82.G5cx5d    07:48:00  07:59:00
83.P4e-4d    07:48:00  07:59:00
84.P*4b      07:48:00  07:59:00
85.P4d-4c+   07:55:00  07:59:00
86.P4bx4c    07:55:00  07:59:00
87.S4f-5e    07:55:00  07:59:00
88.P3e-3f    07:55:00  07:59:00
89.P*5c      07:57:00  07:59:00
90.G5dx5c?   07:57:00  07:59:00

This is not good enough. Fujii's best chance was 90.Rx5c.

91.+B1hx3f   07:57:00  07:59:00
92.G2ex1f    07:57:00  07:59:00
93.P*5d      07:57:00  07:59:00
94.R*3i      07:57:00  07:59:00
95.P5dx5c+   07:58:00  07:59:00
96.R5b-3b    07:58:00  07:59:00
97.+B3f-5d   07:58:00  07:59:00
98.S5f-4e    07:58:00  07:59:00
99.+B5dx7b   07:58:00  07:59:00
100.G6ax7b   07:58:00  07:59:00
101.P6d-6c+  07:58:00  07:59:00
102.R3bx3a   07:58:00  07:59:00
103.+P6cx7b  07:58:00  07:59:00
104.K8bx7b   07:58:00  07:59:00
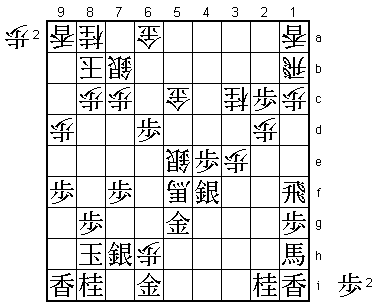
105.N8i-7g!! 07:58:00  07:59:00

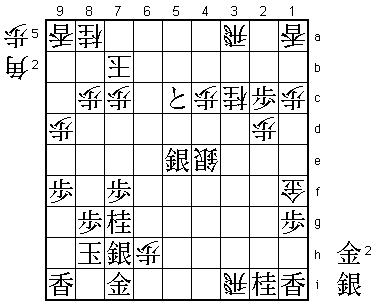
Brilliant. White has 106.N2e next, which is actually a mating threat
(Rx7i+ Kx7i R3i+). Black's attack looks strong enough to play one
extra attacking move before defending, but Habu judges that as too
risky. Instead, he has seen a way to completely kill the white attack.

106.N3c-2e   07:58:00  07:59:00
107.G*8i!    07:58:00  07:59:00

The double punch. 105.N7g was only meant to make this drop possible.
That the knight can help in attack is just a bonus.

108.R3a-3h+  07:58:00  07:59:00
109.S5e-6d   07:58:00  07:59:00
110.K7b-8b   07:58:00  07:59:00
111.+P5c-6c  07:58:00  07:59:00
112.+R3hx2i  07:58:00  07:59:00
113.K8h-9h!  07:58:00  07:59:00
Resigns      07:58:00  07:59:00

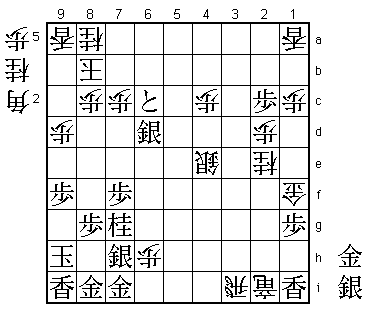
Ends all of white's hope. 113.Rx7i+ Gx7i Rx7i+ fails to R*7b and mate.
White has no other move to get to the black king and black threatens
N8e after which there is no defense. A fine win by Habu and the first
loss by Fujii in the opening game of a Ryu-O match. Habu couldn't wish
for a better start, but Fujii is tough as nails, so every game promises
to be a big struggle.
