13th Ryu-O Match Game 5
Black: Fujii Takeshi, Ryu-O
White: Habu Yoshiharu, Challenger
13th Ryu-O sen, Game 5, December 5th and 6th 2000
1.P7g-7f     0/0       0/0
2.P3c-3d     0/0       1/1
3.P6g-6f     5/5       0/1
4.P8c-8d     0/5       2/3
5.P1g-1f     7/12      0/3
6.P1c-1d     0/12      4/7
7.R2h-6h     2/14      0/7
8.S7a-6b     0/14      7/14
9.S3i-3h     7/21      0/14
10.K5a-4b    0/21      4/18
11.S7i-7h    23/44     0/18
12.K4b-3b    0/44      2/20
13.P4g-4f    15/59     0/20
14.P5c-5d    0/59      16/36
15.K5i-4h    1/60      0/36
16.G6a-5b    0/60      12/48
17.K4h-3i    3/63      0/48
18.S3a-4b    0/63      32/80
19.B8h-7g    8/71      0/80
20.P8d-8e    0/71      4/84
21.K3i-2h    1/72      0/84
22.P7c-7d    0/72      11/95
23.S7h-6g    53/125    0/95
24.S4b-5c    0/125     26/121
25.P9g-9f    15/140    0/121
26.P9c-9d    0/140     34/155
27.L9i-9g    33/173    0/155
28.S6b-7c    0/173     18/173
29.P5g-5f    45/218    0/173
30.G4a-4b    0/218     22/195
31.G6i-5h    48/266    0/195
32.P6c-6d    0/266     13/208
33.G5h-4g    5/271     0/208
34.S7c-8d    0/271     40/248

The Bogin is a rarity at this level, as it is generally believed
that the Ibisha side can not get any advantage from it. All of the
Ibisha attacking strategies have been analysed extensively, so it
is interesting to see what Habu has come up with. Maybe it is just
that he wanted to play a quick attacking system again, as the slow
game has lead to disaster every time.

35.R6h-7h    3/274     0/248
36.P7d-7e    0/274     3/251
37.B7g-5i    6/280     0/251
38.R8b-7b    0/280     23/274
39.B5i-4h    8/288     0/274
40.P7ex7f    0/288     16/290
41.S6gx7f    0/288     0/290
42.P6d-6e    0/288     0/290

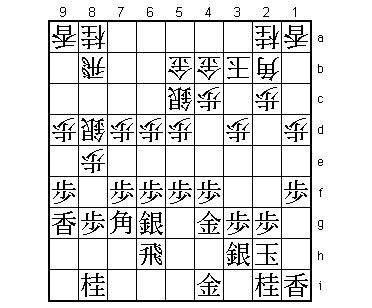
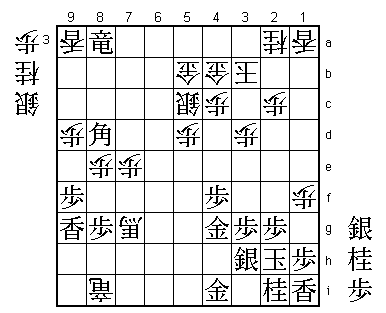
This seems like a perfectly natural position, but it is actually
quite rare. Almost the same position occurred in the 1972 Meijin
match between Oyama and Nakahara, but with the white gold on 4a.
In that game Oyama managed to activate his pieces very well and
scored a convincing victory. Fujii has also some experience with
this type of position. In his game against Iizuka the colours were
reversed and the left lance was still on its original square. Fujii
lost that game, but he thought that not having the lance in the
diagonal of the bishop was an important improvement. This game
shows that he might be right.

43.P5f-5e    1/289     0/290
44.B2bx5e    0/289     5/295
45.S7f-6g    1/290     0/295
46.R7bx7h+   0/290     8/303

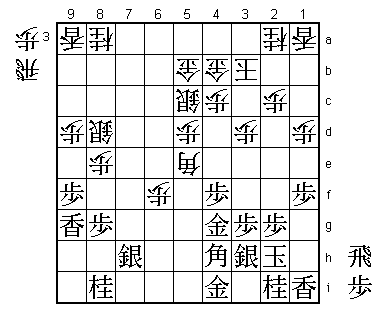
This rook exchange seems to be good for black, as the silver on 8d
is an idle piece (often a problem in the bogin). However, after
46.P*7f G5f B2b Sx7f black has the advantage.

47.S6gx7h    0/290     0/303
48.P6ex6f    0/290     0/303

After 48.R*7i S6g Rx8i+ S5f the difference between the two silvers
on 5f and 8d is too big. Combined with the stronger king position
this position is much better for black.

49.R*6a      40/330    0/303

One of the signs that the Furibisha side has a good position:
dropping the rook in the opponent's camp before the Ibisha side
can do the same. Here the general feeling was that Fujii had again
won the opening. However, things are not so easy here...

50.R*7i      0/330     28/331
51.S7h-7g    1/331     0/331
52.P6f-6g+   0/331     1/332
53.B4hx8d    57/388    0/332
54.R7ix8i+   0/388     33/365
55.R6ax6g+?  0/388     0/365

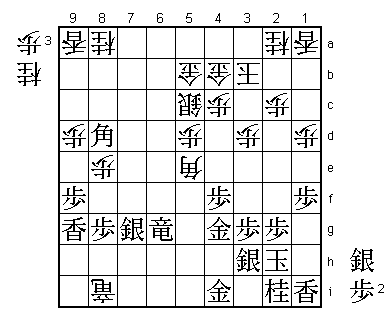
Looks natural, but Fujii underestimated Habu's reply. Better was
55.S7f N*5g G4i-4h (or Gx5g) B7c Bx7c+ Nx7c Rx9a+ B*3i K1h. This
looks a little dangerous, but actually the black attack is stronger
than the white one.

56.P1d-1e!   0/388     4/369

Habu does not hesitate. This edge attack is very strong.

57.+R6g-6a?  24/412    0/369

In two moves, Fujii's position drops from good to losing. Realising
that his previous move was a mistake, Fujii rushes into the attack.
Of course, 57.Px1e P*1g Lx1g N*2d was bad, but after 57.S6h
(suggested by Senzaki) Px1f +R6a (P*1h B6d is good for white) P*6g!
(not P1g+ Lx1g P*1f Lx1f Lx1f P*1g Lx1g+ Kx1g and the black king is hard
to mate on the edge) and the position is still difficult.

58.B5ex7g+   0/412     6/375

This free silver helps a lot.

59.+R6ax8a   0/412     0/375
60.P1ex1f    0/412     22/397
61.P*1h      0/412     0/397
62.P*7e!     0/412     12/409

Habu does not often get the chance to play these types of moves
against Fujii, but this is a nice one. The bishop is blocked from
the defence as 63.Bx7e fails to +B7f with double attack on 7e and
4i. Habu's attack is now in full flow and unstoppable.

63.+R8ax9a   16/428    0/409
64.+B7g-6f   0/428     7/416
65.P*5g      1/429     0/416
66.N*5e      0/429     5/421
67.G4g-4h    21/450    0/421

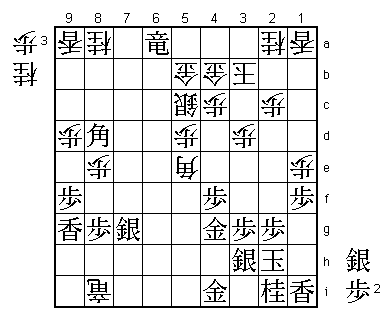
If black could have played 67.G5f here, things would still be
interesting. However, the 68.+B6g L*2f +Bx4i Sx4i G*3h! Kx3h
N4g+ is a nice mate. There is a big difference in being able
to escape through 1g or not.

68.N5e-6g+   0/450     0/421
69.L*5h      3/453     0/421

Dropping a piece in defence always makes a professional cry, but
here there is no choice. +Nx5g next would already have been a
mating threat (after S*3i).

70.S*5i      0/453     6/427
71.S*4g      13/466    0/427

This ends the game quickly, but after 71.N*2f Sx4h+ Gx4h G*5i white
also wins.

72.S5ix4h+   0/466     15/442
73.G4ix4h    0/466     0/442
74.G*8c      0/466     0/442
Resigns      1/467     0/442
Time:        07:47:00  07:22:00

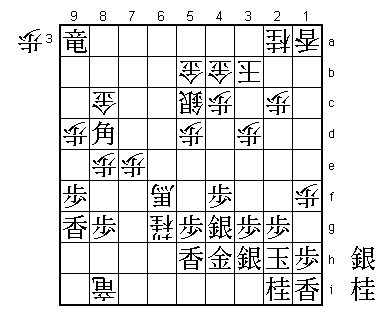
The bishop has no place to go. Furthermore, with this bishop white
has mate in one. An abrupt ending, but losing a full bishop and
no attack to speak of, there is no hope for black.

So Habu pulls one back, but his opening troubles continue as again it
was Fujii who dictated the pace early on. Still, it must give Habu
confidence that he can still crush his opponent in the endgame
if he gets the chance.
