13th Ryu-O Match Game 2
Black: Habu Yoshiharu, Challenger
White: Fujii Takeshi, Ryu-O
13th Ryu-O sen, Game 2, November 1st and 2nd 2000
1.P7g-7f     1/1       0/0

This is a big game for Habu, as he suffered a total defeat in the
first game. Another disaster like that, especially with black, would
make it very difficult to take the Ryu-O title from Fujii. Of
course, Habu knows how to deal with pressure like that.

2.P3c-3d     0/1       7/7
3.P2g-2f     3/4       0/7
4.P4c-4d     0/4       0/7
5.S3i-4h     4/8       0/7
6.S3a-3b     0/8       0/7
7.P5g-5f     8/16      0/7
8.R8b-4b     0/16      1/8
9.K5i-6h     8/24      0/8
10.P9c-9d    0/24      0/8
11.K6h-7h    12/36     0/8
12.S3b-4c    0/36      11/19
13.G4i-5h    13/49     0/19
14.S7a-7b    0/49      1/20
15.P9g-9f    6/55      0/20
16.K5a-6b    0/55      1/21
17.S4h-5g    20/75     0/21
18.P6c-6d    0/75      1/22
19.P2f-2e    8/83      0/22
20.B2b-3c    0/83      0/22
21.P3g-3f    0/83      0/22
22.K6b-7a    0/83      28/50
23.S5g-4f    13/96     0/50

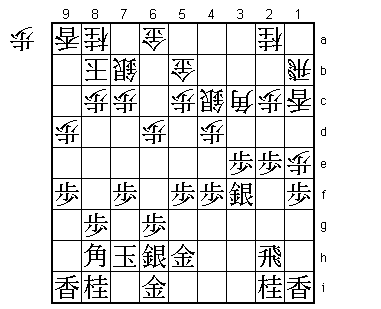
Again, Habu avoids the Fujii System and plays a quick attack. It
is unclear if he actually thinks that this is a good strategy
against Fujii's Shikenbisha or that there are only psychological
reasons. Habu has had some good results with the quick attack against
Fujii, even though he did not get any advantage from the opening
in those games.

24.R4b-3b    0/96      70/120
25.P3f-3e    32/128    0/120
26.K7a-8b    0/128     28/148
27.P1g-1f    72/200    0/148

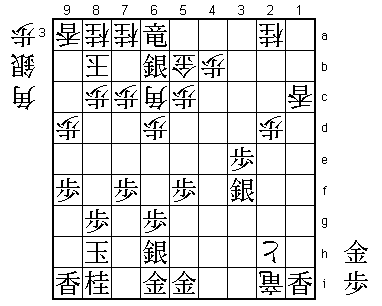
Habu judges that an all-out attack in this position is not good
enough. The white position is a little bit different from the most
common opening theory as the white gold is still on 4a. This might
actually help white, as it is more difficult for black to later
drop a rook in white's camp. Even with the gold on 5b instead of
4a, opening theory says that black's attack is not strong enough
and that positional play like Habu shows in the game is best.

28.P1c-1d    0/200     14/162
29.S7i-6h    49/249    0/162
30.L1a-1c!   0/249     51/213

The sealed move and a sign that Fujii is confident about his
position. He does not want to wait for Habu, but is aiming at
his own attack with R1b followed by P1e.

31.P3ex3d    28/277    0/213
32.S4cx3d    0/277     0/213
33.P*3e      0/277     0/213
34.S3d-4c    0/277     0/213
35.S4f-3g    0/277     0/213
36.G4a-5b    0/277     86/299

Fujii waits until the final moment before settling the shape with
this gold move. Up until this point, it could still go to 5b, 4b
or 3b.

37.S3g-3f    39/316    0/299
38.R3b-1b    0/316     4/303
39.P4g-4f    18/334    0/303
40.P1d-1e    0/334     6/309

41.P2e-2d?!  27/361    0/309

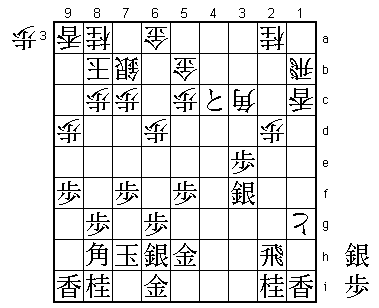
This might not have been the best move. Things now get very wild,
but these complications should have ended in white's favour. The
alternative is 41.Px1e Lx1e P*1h R1d, but Habu thought this was
too passive. It might be that black is in trouble here.

42.P2cx2d    0/361     1/310
43.P4f-4e    18/379    0/310
44.P1ex1f    0/379     1/311
45.P4ex4d    0/379     0/311
46.P1f-1g+   0/379     2/313
47.P4dx4c+   11/390    0/313

Both players ignore the moves of the opponent and suddenly everywhere
pieces are hanging. Habu considered the more quiet 47.R4h here, but
after 48.S3b P3d B1a P3c+ Bx3c S3e P*4b there is no way to proceed
for black.

48.B3cx8h+   0/390     1/314
49.K7hx8h    0/390     0/314
50.+P1gx2h   0/390     0/314
51.B*3d      0/390     0/314
52.R*4i      0/390     13/327
53.+P4cx5b   23/413    0/327

54.R1bx5b?   0/413     5/332

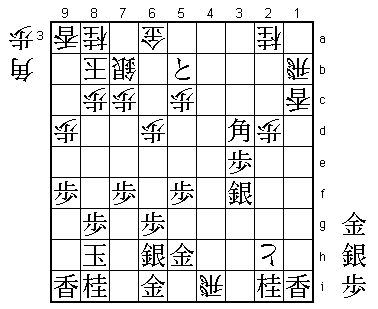
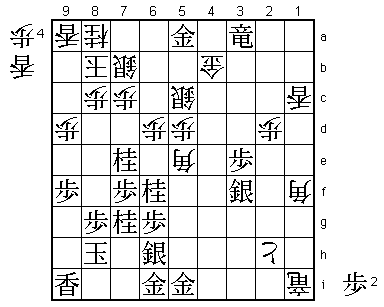
This is a mistake that gives Habu the advantage. Both players
overlooked that after 54.+Rx6i 55.G*7i white can continue strongly
with 56.+Rx7i! Sx7i Rx5b P*4d P*4b R*4a G*5a and the difference
in king safety is too big.

55.G5h-5i    2/415     0/332
56.R4ix2i+   0/415     23/355
57.B3dx5b+   11/426    0/355
58.G6ax5b    0/426     0/355
59.R*3b!     0/426     0/355

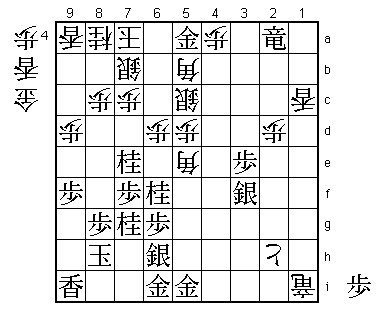
This looks like a simple move, but it is quite subtle. The obvious
drop is 59.R*4a, but after G*5a Rx2a+ P*4a the black dragon is out
of play. With 59.R*3b Habu more or less forces a pawn drop on 4b,
after which the black dragon is much more active.

60.P*4b      0/426     42/397
61.R3b-3a+   11/437    0/397
62.N*7a      0/437     1/398
63.S*6a      15/452    0/398
64.S7bx6a    0/452     5/403
65.+R3ax6a   0/452     0/403
66.B*6c      0/452     0/403
67.S*6b?     9/461     0/403

Very hard to see, but the awful looking 67.S*4a was the best move
here. After 68.S*5a S4g +Rx1i Sx5b= Sx5b +Rx2a Habu would have
kept his advantage.

68.B*4d      0/461     2/405
69.P5f-5e?!  9/470     0/405

Better was 69.N7g.

70.G5bx6b    0/470     1/406
71.+R6ax6b   0/470     0/406
72.S*7b      0/470     0/406
73.G*6a      0/470     0/406
74.P5c-5d    0/470     0/406

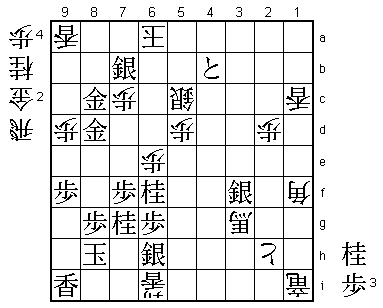
A perfect defence. We now enter a stage of the game where nobody
knew what was happening. The side who just played a move looks to
be better and Shukan Shogi has no comments for this complicated
attack and defence sequence. All moves look reasonable, but it
seems likely that a number of improvements for both players can be
found.

75.+R6bx4b   0/470     0/406
76.S*5c      0/470     13/419
77.+R4b-3a   0/470     0/419
78.B4dx5e    0/470     13/432
79.N8i-7g    1/471     0/432
80.P*4a      0/471     15/447
81.G6ax7a    0/471     0/447
82.K8bx7a    0/471     0/447
83.+R3ax2a   0/471     0/447
84.+R2ix1i   0/471     2/449
85.N*7e      2/473     0/449
86.B6c-7d    0/473     0/449
87.G*4c      1/474     0/449
88.G*4b      0/474     9/458
89.G4cx4b    3/477     0/458
90.S5cx4b    0/477     0/458
91.N*6f      0/477     0/458
92.B7d-5b    0/477     8/466
93.P*5c      1/478     0/466
94.S4bx5c    0/478     0/466
95.G*5a!     0/478     0/466

Even after seeing it so often, it is still amazing to see what moves
Habu can come up with to make things difficult for his opponents. This
gold drop looks very bad, but it is the only way for black to make
progress.

96.B5b-1f?   0/478     2/468

It seems that Fujii should have strengthened his position here with
96.G*6b. Hard to see indeed, and that is what makes Habu so special.
He needs another magical touch, though...

97.+R2ax4a   0/478     0/468
98.G*4b      0/478     0/468
99.+R4a-3a   0/478     0/468
100.K7a-8b   0/478     4/472

And the end of black's attack, Fujii thought...

101.P3e-3d!  0/478     0/472

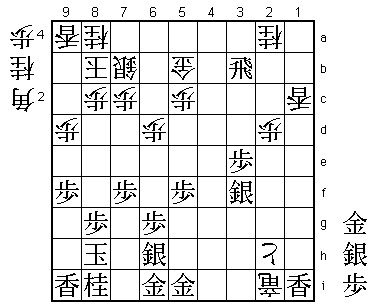
Incredible move. Surely this must be too far from the white king.
It may be that Habu picked this move because he thought it was the
only way he would have a chance of winning, but still his judgement
is perfect. This tokin attack comes just in time, as Fujii's attack
is one move too slow.

102.B5e-3g+  0/478     7/479

Fujii uses his last seven minutes to find a quick attack, but he
is unable to find one. For example, 102.L*7d P*4c Lx7e P4b+ Lx7f G5b
is also losing for white.

103.P3d-3c+  0/478     0/479
104.L*5e     0/478     0/479
105.+P3cx4b  0/478     0/479
106.L5ex5i+  0/478     0/479
107.G5a-5b   0/478     0/479
108.+L5ix6i  0/478     0/479
109.G*7a     0/478     0/479
110.G*6a     0/478     0/479
111.G5bx6a   0/478     0/479
112.S7bx6a   0/478     0/479
113.G7ax8a   0/478     0/479
114.K8bx8a   0/478     0/479
115.N7ex8c+  0/478     0/479

After the game, Habu said that only here he felt sure that he would
win.

116.G*8b     0/478     0/479
117.+N8cx8b  0/478     0/479
118.K8ax8b   0/478     0/479
119.G*8d     0/478     0/479
120.P6d-6e   0/478     0/479
121.G*8c     1/479     0/479
122.K8b-7a   0/479     0/479
123.+R3ax6a  0/479     0/479
124.K7ax6a   0/479     0/479
125.S*7b     0/479     0/479
Resigns      0/479     0/479
Time:        07:59:00  07:59:00

And a simple mate after 126.K6b N*7d Px7d Nx7d. Again a game where
Fujii dominated the opening and early middle game, but that was
decided by Habu's awesome endgame skills. The theme of this match
might be if Fujii can get a big enough advantage after the opening
to win the game or not. A close endgame fight seems to be in Habu's
favour. In game 3 it will be again very interesting to see how
Habu will play in the early stages of the game. The Fujii System
still looks rock solid.
