12th Ryu-O Match Game 3
Black: Suzuki Daisuke, Challenger
White: Fujii Takeshi, Ryu-O
12th Ryu-O sen, Game 3, November 4th and 5th 1999
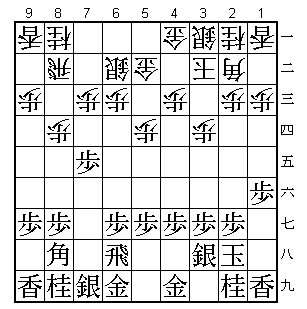
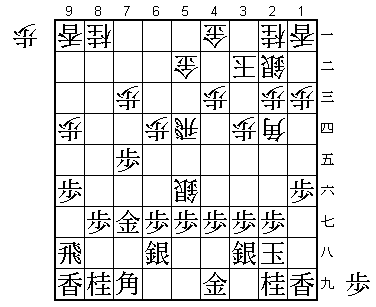
1.P7g-7f 0/0 0/0
2.P3c-3d 0/0 10/10
3.P1g-1f 0/0 0/10
4.S7a-6b 0/0 16/26
5.R2h-6h 1/1 0/26
6.K5a-4b 0/1 5/31
7.K5i-4h 0/1 0/31
8.K4b-3b 0/1 0/31
9.K4h-3h 0/1 0/31
10.P5c-5d 0/1 14/45
11.K3h-2h 0/1 0/45
12.G6a-5b 0/1 1/46
13.S3i-3h 0/1 0/46
14.P8c-8d 0/1 1/47
15.P7f-7e 1/2 0/47
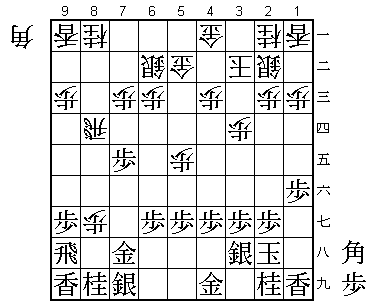
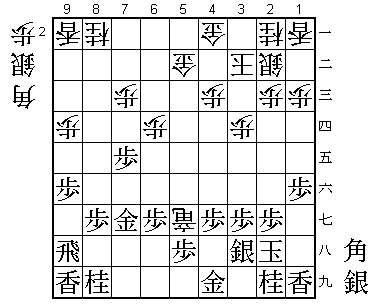
This is an unusual change of plan. Suzuki switches from Shikenbisha to
Masuda Style Ishida variation of the Sankenbisha. Judging from the time
he takes in the opening it seems like he has prepared this. However,
Suzuki is known for his fast play, so it is impossible to be completely
sure.
16.P8d-8e 0/2 32/79
17.R6h-7h 1/3 0/79
18.P8e-8f 0/3 21/100
19.P8gx8f 4/7 0/100
20.R8bx8f 0/7 0/100
21.B8hx2b+ 6/13 0/100
22.S3ax2b 0/13 0/100
23.R7h-8h 0/13 0/100
24.P*8g 0/13 0/100
25.R8h-9h 0/13 0/100
26.R8f-8d 0/13 95/195
27.G6i-7h 4/17 0/195
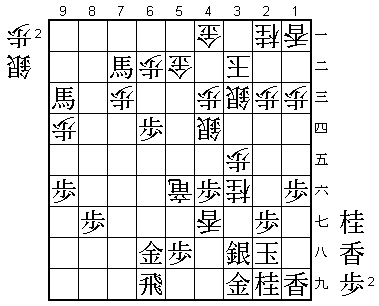
28.P5d-5e! 0/17 3/198
In the press room there was no professional who could figure out the
meaning of this move. Fujii shows his outstanding opening skills again
as will soon become clear.
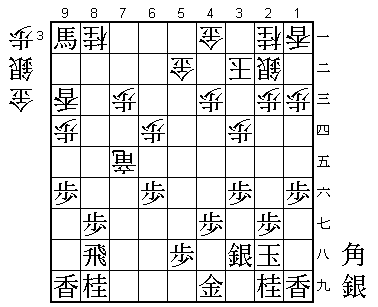
29.P*8h 8/25 0/198
30.B*2d! 0/25 5/203
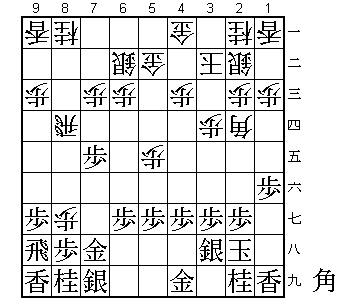
Overlooked by everyone. This strange looking move causes black all kinds of
trouble. The simple reply 31.S6h fails to 32.P5f Px5f P8h+ and white wins.
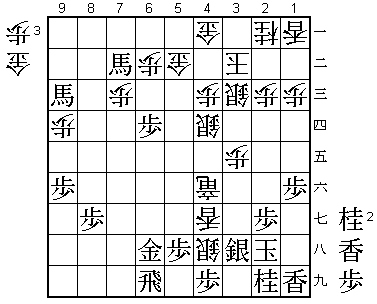
31.B*6f 32/57 0/203
Suzuki also was surprised and takes 32 minutes for his reply. He did not
like to destroy his Mino castle with 31.G5h, so he opts for this bishop
drop.
32.R8d-5d 0/57 49/252
33.P8hx8g 11/68 0/252
34.S6b-5c 0/68 1/253
35.S7i-6h 19/87 0/253
36.S5c-6d 0/87 1/254
Fujii has won the opening again. Despite the loss of a pawn, his major pieces
are working much better. On the other hand, Suzuki's pieces are all on the
left flank where they are in serious danger of being inactive for the rest
of the game.
37.P9g-9f 2/89 0/254
38.S6d-6e 0/89 14/268
39.B6f-8h 103/192 0/268
40.P9c-9d 0/192 5/273
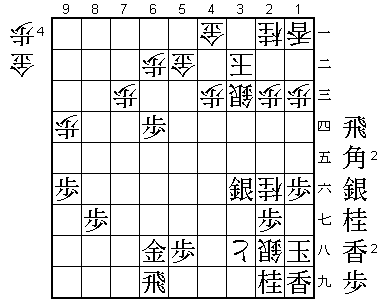
41.B8h-7i! 5/197 0/273
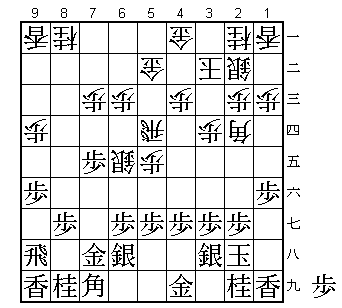
This bishop manoeuvre looks desperate, but it is the right defence against
white's attack.

42.P5e-5f?         0/197        14/287

Fujii rushes his attack and in this case he is a little too quick. Black has
no good moves, so improving his king position with 42.S3c first is much
better. Fujii himself called 42.P5f the "losing move", but that seems a
little harsh on himself.

43.P5gx5f          0/197        0/287
44.S6ex5f          0/197        0/287
45.G7h-7g          2/199        0/287
46.P6c-6d          0/199        27/314
47.P*5g!           12/211       0/314
Strong play. Giving back the pawn and allowing a rook to promote is a small
price to pay for exchanging black's badly positioned pieces.

48.S5fx5g+         0/211        23/337
49.S6hx5g          0/211        0/337
50.B2dx5g+         0/211        0/337
51.B7ix5g          0/211        0/337
52.R5dx5g+         0/211        0/337
53.P*5h?           0/211        0/337
Unnecessary defence. Suzuki was overconfident here, but his position is not
as good as he thinks. 53.B*8b immediately was better.

54.+R5g-5e         0/211        26/363
55.B*8b            2/213        0/363
56.L9a-9c          0/213        3/366
57.B8b-9a+         2/215        0/366
58.B*5d            0/215        3/369
59.G7g-6f          2/217        0/369
60.+R5e-2e         0/217        8/377
61.R9h-8h          3/220        0/377
62.S*5e            0/220        15/392
63.S*3f            62/282       0/392
64.B5dx3f          0/282        1/393
65.P3gx3f          0/282        0/393
66.S5ex6f          0/282        0/393
67.P6gx6f          0/282        0/393
68.+R2ex7e         0/282        0/393
69.S*7g?           1/283        0/393

Suzuki's use of time is very questionable in this game. In the opening he
took too little time and ended up in a bad position. Here he also should
have taken more time. This drop is a change of plan. Suzuki wanted to play
69.+Bx8a, but thought that 70.+R7i 71.R9h 72.N3c! was too strong. The knight
on 3c looks strange, but it takes away the vital square 4e for the black
horse. If black then plays 73.+B5d, white can make the king safe with K2a
and then attack strongly with G*4h. If Suzuki would have thought about this
position a little longer, he would have found 73.B*5g! in response to N3c.
After 74.+Rx8i P6e and Bx9c+ followed by retreating the horse in black's
own camp black would have had the better position.

70.G*6g            0/283        3/396
71.+B9ax8a         1/284        0/396
72.G6gx7g          0/284        0/396
73.N8ix7g          0/284        0/396
74.+R7ex7g         0/284        0/396
75.R8h-9h          1/285        0/396
76.P*8h            0/285        10/406
77.P6f-6e          4/289        0/406
78.P8h-8i+         0/289        5/411
79.P6ex6d          1/290        0/411
80.P*6b            0/290        1/412
81.+B8a-5d         3/293        0/412
82.S*4d            0/293        7/419
83.P4g-4f          9/302        0/419
84.+P8ix9i         0/302        6/425
85.R9hx9i          0/302        0/425
86.S2b-3c          0/302        3/428
87.R9i-6i          9/311        0/428
88.N*2d            0/311        3/431
89.G*6h!           24/335       0/431
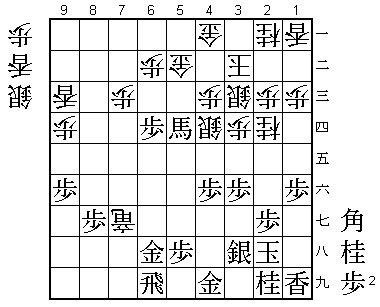
In this match, Suzuki seems to play his best shogi when he is in trouble. This
unnatural move is the only way to keep the game going.

90.+R7g-6f?        0/335        11/442

With less than an hour left, Fujii again rushes his attack. 90.+R6f is a
dangerous move. If 90.+R7d instead, white would have had a comfortable
position.

91.B*5g            7/342        0/442
92.+R6f-5f         0/342        3/445
93.+B5d-7b         0/342        0/445
94.L*4g            0/342        8/453
95.G4i-3i          20/362       0/453
96.P3d-3e          0/362        1/454
97.B5gx9c+         1/363        0/454
98.N2dx3f          0/363        1/455
99.K2h-1h?         3/366        0/455

Suzuki takes only three minutes to throw away his last chance. If he would
have played 99.+Bx3f Px3f +B5g here, he would still have had chances to win
this game. After both +Rx5g Gx5g or +R9f +B4g the position is still unclear.

100.S*4h           0/366        3/458
101.G3i-2h         1/367        0/458
102.N3fx2h+        0/367        3/461
103.K1hx2h         0/367        0/461
104.+R5fx4f        0/367        0/461
105.P*4i           1/368        0/461
106.P3e-3f!        0/368        3/464

Suzuki had overlooked this move. He thought that 105.P*4i was killing white's
attack. Suzuki had only looked at 106.Sx4i= Rx4i Lx4i+ after which P4g!
would have been alright for black, since both bishops work well in defence.

107.P4ix4h         2/370        0/464
108.L4gx4h+        0/370        0/464
109.+B9cx4h        0/370        0/464
110.+R4fx4h        0/370        0/464
111.+B7bx3f        0/370        0/464
112.S4d-4e         0/370        5/469
113.S*3g           3/373        0/469
114.+R4hx3h        0/373        2/471
115.K2hx3h         2/375        0/471
116.S4ex3f         0/375        1/472
117.S3gx3f         0/375        0/472
118.B*7d           0/375        0/472
119.P*4g           1/376        0/472
120.P*3g           0/376        1/473
121.K3h-2h         0/376        0/473
122.B*1d           0/376        0/473
123.N*2e           4/380        0/473
124.B1dx2e         0/380        0/473
125.S3fx2e         0/380        0/473
126.B7dx4g+        0/380        0/473
127.L*3f           0/380        0/473
128.P3g-3h+        0/380        3/476
129.K2h-1h         0/380        0/476
130.+B4gx3f        0/380        0/476
131.S2ex3f         0/380        0/476
132.L*1g           0/380        0/476
133.K1hx1g         0/380        0/476
134.S*2h           0/380        0/476
135.K1g-1h         0/380        0/476
136.N*2f           0/380        0/476
Resigns            0/380        0/476
Time:              06:20:00     07:56:00
Mate after 137.Px2f Sx1i+ etc. A tough game to lose for the challenger, since
he had enough chances to win. His quick style of playing turned against him
in this game. Title match games with long time limits are decided by deep and
accurate calculation. With 3-0 down, Suzuki needs a miracle to get back
in this match.