11th Ryu-O Match Game 3
Black: Tanigawa, Ryu-O
White: Fujii, Challenger
11th Ryu-O-sen, Game 3, November 5th and 6th 1998
1.P7g-7f           0/0          0/0
2.P3c-3d           0/0          7/7
3.P2g-2f           7/7          0/7
4.P4c-4d           0/7          1/8
5.S3i-4h           1/8          0/8
6.S3a-3b           0/8          6/14
7.P5g-5f           5/13         0/14
8.R8b-4b           0/13         2/16
9.K5i-6h           1/14         0/16
10.S7a-7b          0/14         4/20
11.K6h-7h          3/17         0/20
12.P9c-9d          0/17         1/21
13.G4i-5h          16/33        0/21
14.S3b-4c          0/33         16/37
15.S4h-5g          12/45        0/37
16.B2b-3c          0/45         11/48
17.P2f-2e          10/55        0/48
18.P9d-9e          0/55         5/53
19.P3g-3f?!        54/109       0/53
20.K5a-6b          0/109        4/57
21.L9i-9h          60/169       0/57
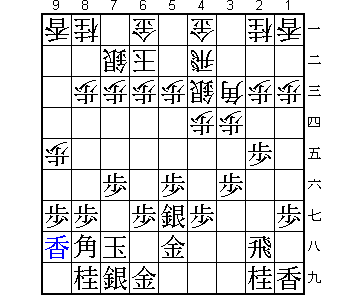
After losing the first two games of this match quite convincingly, all
commentators were very eager to know what opening he would choose in this
very important game. 21.L9h is the result of this opening preparation. It
is partly a waiting move, but also a move that prepares the anaguma castle.
It is an interesting idea to play the lance up this early, but in combination
with P3f it is not so good.
22.K6b-7a 0/169 42/99
23.B8h-7g 2/171 0/99
24.K7a-8b 0/171 2/101
25.K7h-8h 1/172 0/101
26.R4b-3b 0/172 4/105
27.K8h-9i 59/231 0/105
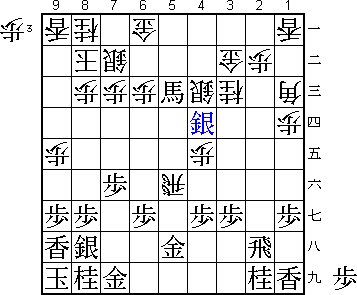
28.P3d-3e! 0/231 12/117
Fujii has spotted that P3f is a weakness in the black position and allows black
to complete his anaguma to give white the time to prepare the attack on the
third file. White is already a little better here.
29.P3fx3e 47/278 0/117
30.P4d-4e 0/278 2/119
31.S5g-6f 0/278 0/119
32.B3c-4d 0/278 2/121
33.P2e-2d! 0/278 0/121
This is actually a known position. In the second game of the 1996 Shinjin-O
match, Fujii had the same position against Maruyama. In that game Maruyama
played S8h. 33.P2d is stronger and might have been the move that Tanigawa
prepared for this game.
34.R3bx3e 0/278 63/184
Fujii had studied this position before and the result of his homework was that
34.Bx3e was very good for white. However, over the board he found the following
variation: 34.Bx3e Px2c+ Bx7i+ +Px3b +Bx6i +Px4a S*7h (the supposedly winning
move) G*8h G*7i G5i and strangely enough, black can defend his position.
35.P*3g 1/279 0/184
36.P2cx2d 0/279 2/186
37.R2hx2d 1/280 0/186
38.P*2b 0/280 0/186
39.S7i-8h 29/309 0/186
40.R3e-3d 0/309 32/218
41.R2d-2h 8/317 0/218
42.G4a-3b 0/317 7/225
43.G6i-7i 2/319 0/225
44.P1c-1d 0/319 17/242
45.B7g-8f 35/354 0/242
46.N2a-3c 0/354 73/315
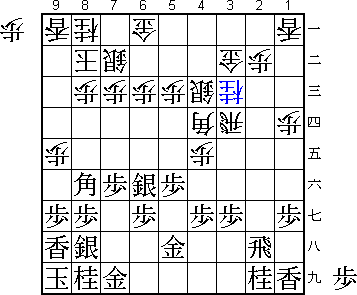
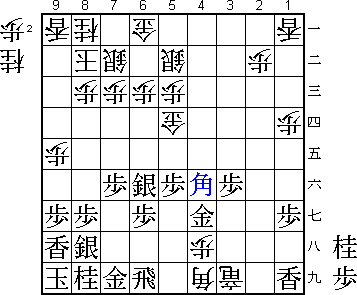
47.G5h-5g!         37/391       0/315

This was a big surprise for the commentators, but it is the only move that
keeps Tanigawa's position together. After 47.S5e B3e P3f B1c Bx5c+ Rx3f
P*3g Rx5f S4d (diagram), white wins after Bx7i+ Sx7i Rx5c since both Sx5c+
B*4d and Sx5c= B*3e lose material.
The move 47.G5g shows that Tanigawa has lost the opening
battle again, but white has to be very careful.

48.S4c-5b          0/391        23/338
49.B8f-6h          8/399        0/338
50.B4d-3e          0/399        17/355
51.P4g-4f          13/412       0/355
52.B3e-1c          0/412        40/395
53.G5g-4g          11/423       0/395
54.R3d-2d          0/423        10/405
55.P*2f            3/426        0/405
56.P*3h            0/426        0/405
57.P3g-3f          10/436       0/405
58.P3h-3i+         0/436        13/418
59.N2i-3g          2/438        0/418
60.+P3i-3h         0/438        0/418
61.R2hx3h          0/438        0/418
62.R2dx2f          0/438        0/418
63.P*2h            0/438        0/418
64.P4ex4f          0/438        0/418
65.B6hx4f          0/438        0/418
66.B1cx4f          0/438        2/420
67.G4gx4f          0/438        0/420
68.B*4i            0/438        0/420
69.R3h-6h          2/440        0/420
70.P*4h            0/440        4/424
71.N3g-4e          11/451       0/424
72.R2fx2h+ 0/451 0/424
73.N4ex3c+ 0/451 0/424
74.G3bx3c 0/451 0/424
75.B*5e 0/451 0/424
76.G3c-4c 0/451 1/425
77.G4f-4g 0/451 0/425
78.+R2h-3i 0/451 2/427
79.R6h-6i 0/451 0/427
80.G4c-5d 0/451 2/429
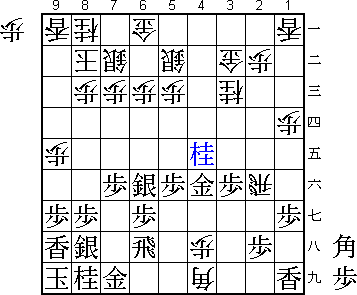
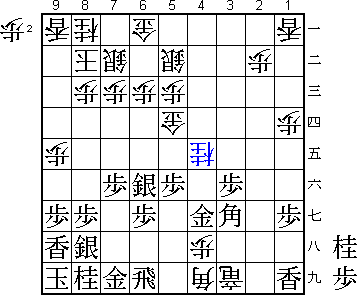
81.B5e-3g?? 6/457 0/429
The previous moves are all more or less forced. Black's position is still
difficult, but far from hopeless. However, 81.B3g is a blunder that makes
black's position collapse in a few moves.
If black plays 81.B4f instead (diagram), the situation is still very
complicated after 82.G4e B3g or B5g, since the knight drop on 4e is no
longer possible. If white turns to defense with 82.G6d, then P*4c Sx4c
S5g followed by P6g-6f-6e is very strong. Finally, 82.+R3h G3g +R2h P*4c
Sx4c G4g +R2e Gx4h B2g+ R2i is also far from clear.

82.N*4e!           0/457        2/431
This is one of those moves that seem to be hard to find for a professional.
All commentators agreed with Tanigawa that this move was not looking good,
a so-called "vulgar move". However, Fujii has calculated that this move
leaves black without defense.

83.B3g-2f          9/466        0/431
84.+R3i-2h         0/466        2/433
85.G4gx4h          1/467        0/433
86.B4i-2g+         0/467        0/433
Resigns            0/467        0/433
Time:              07:47:00     07:13:00
Black loses material without any compensation and Tanigawa therefore resigned.
Not a good game to lose, and Tanigawa is now very close to losing his second
major title in a year.