10th Ryu-O Match Game 4
Black: Tanigawa, Ryu-O
White: Sanada, Challenger
10th Ryu-O sen, Game 4, November 18th and 19th 1997
1.P7g-7f 0/0 0/0
2.P8c-8d 0/0 3/3
3.S7i-6h 1/1 0/3
4.P3c-3d 0/1 1/4
5.P6g-6f 0/1 0/4
6.S7a-6b 0/1 6/10
7.P5g-5f 1/2 0/10
8.P5c-5d 0/2 4/14
9.S3i-4h 0/2 0/14
10.S3a-4b 0/2 1/15
11.G4i-5h 1/3 0/15
12.G4a-3b 0/3 1/16
13.G6i-7h 0/3 0/16
14.K5a-4a 0/3 4/20
15.K5i-6i 3/6 0/20
16.P7c-7d 0/6 6/26
17.G5h-6g 13/19 0/26
18.G6a-5b 0/19 3/29
19.S6h-7g 5/24 0/29
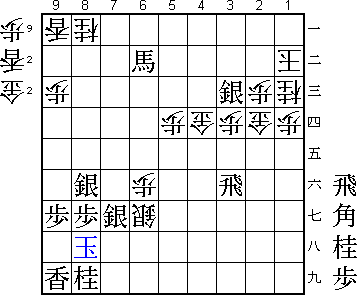
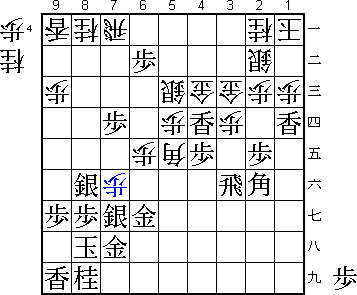
Like in game three, again the Yagura opening is played. Here we see the move
order that is most common in professional games these days.
20.S4b-3c 0/24 14/43
21.B8h-7i 4/28 0/43
22.B2b-3a 0/28 1/44
23.P3g-3f 2/30 0/44
24.P4c-4d 0/30 1/45
25.S4h-3g 12/42 0/45
26.B3a-6d 0/42 30/75
27.B7i-6h 13/55 0/75
28.G5b-4c 0/55 6/81
29.K6i-7i 3/58 0/81
30.K4a-3a 0/58 2/83
31.K7i-8h 4/62 0/83
32.K3a-2b 0/62 14/97
33.S3g-4f 21/83 0/97
34.S6b-5c 0/83 15/112
35.N2i-3g 3/86 0/112
36.P8d-8e 0/86 39/151
37.P2g-2f 55/141 0/151
38.S3c-2d 0/141 7/158
39.P1g-1f 1/142 0/158
40.P1c-1d 0/142 0/158
41.R2h-3h 44/186 0/158
42.S5c-4b 0/186 36/194
43.P2f-2e 57/243 0/194
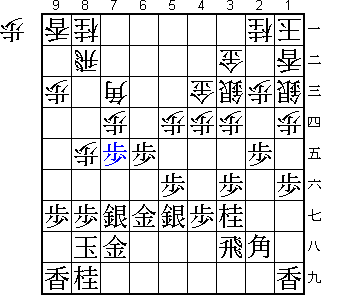
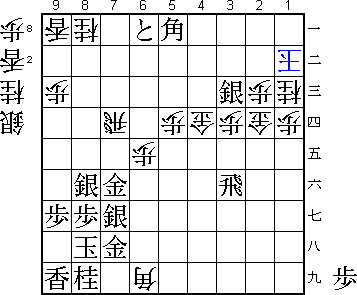
Played after long thought and a surprise. The pawn on 2e is blocking the knight
square and is therefore in the way of black's natural attacking move N2e to
open the rook file. It could be that Tanigawa is trying to take advantage of
the end of the first day. Sanada has a tough decision to make here: weaken the
edge with S2d-3c or displace the silver with S2d-1c.
44.S2d-1c 0/243 31/225
The sealed move and the end of the first day.
45.B6h-5g 23/266 0/225
46.S4b-3c 0/266 26/251
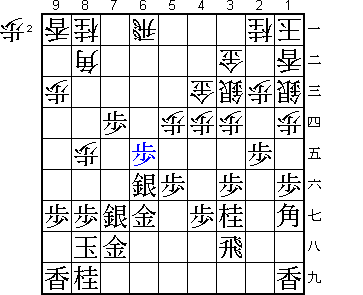
47.B5g-3i 7/273 0/251
Interesting bishop manouvre. Black is aiming at the rook on 8b, now both
white silvers have moved to the king side.
48.L1a-1b 0/273 48/299
White has to wait for what is coming. He decides to use the time to further
strengthen his king by making an Anaguma. This has the further advantage that
the silver on 1c can eventually go to 2b.
49.S4f-5g 10/283 0/299
50.K2b-1a 0/283 9/308
51.P6f-6e 7/290 0/308
52.B6d-4b 0/290 9/317
53.B3i-2h 2/292 0/317
54.P6c-6d 0/292 2/319
55.P6ex6d 46/338 0/319
56.B4bx6d 0/338 2/321
57.P*6e 2/340 0/321
58.B6d-7c 0/340 1/322
59.P7f-7e 9/349 0/322
60.R8b-6b? 0/349 44/366
60.Px7e looks very dangerous, but was actually the correct move. After 61.P1e
Px1e Lx1e P*1d P*7d B5a N4e white seems in serious trouble but after R9b Nx3c+
Bx3c P7c+ Nx7c Bx7c+ Bx1e the situation is very unclear. White has lost a
silver for a lance and black has promoted the bishop, but the pawn on 7e is
a stronghold for a white attack and the threat B5i+ is difficult to defend
against. Both players had read this variation to the end and both players did
not like it. It seems Tanigawa had the most reason not to like the position,
so Sanada should have played this variation.
61.P7ex7d 0/349 0/366
62.B7c-8b 0/349 0/366
63.B2h-1g 35/384 0/366
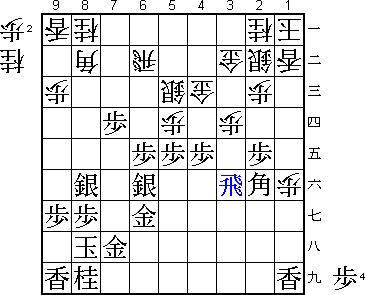
64.S1c-2b? 0/384 18/384

After this move white gets in big trouble. 64.Rx6e was the correct move. Then
65.S5g-6f R6a S7e!? S1c-2b P*6d G5c N4e seems good for black, but after Gx6d
Nx3c+ Gx3c Sx6d Bx6d it is actually white who has the easier position. Tanigawa
would have played 65.S5g-6f R6a P*6e instead (with the plan S7e P6d which is
slower but safer), and then we reach a position similar to the game position
after 64.S1c-2b.
White has won a pawn, but seems to have lost a move. However,
the rook position is very different. On 6a the rook is not on the bishop's
diagonal. In the game, Sanada will actually spend a move to put this rook on 6a
to get this piece out of harm's way. So, white is clearly better off here.

65.S5g-6f          6/390        0/384
66.P1d-1e?!        0/390        7/391

Played in style. Sanada likes to defend by attacking the opponent's pieces that
are attacking his position. Playing your own Shogi in any circumstance is
admirable, but against Tanigawa this might not be the right choice. White opens
up his position and the best attacker in the game takes advantage.

67.P4g-4f          1/391        0/391
68.P1ex1f          0/391        1/392
69.B1g-2f          0/391        0/392
70.P3d-3e          0/391        9/401
71.P4f-4e          2/393        0/401
72.P8e-8f          0/393        10/411
73.S7gx8f          18/411       0/411
74.P3ex3f          0/411        5/416
75.P4ex4d          4/415        0/416
76.S3cx4d          0/415        0/416
77.P*4e            0/415        0/416
78.S4d-5c          0/415        0/416
79.P5f-5e!         0/415        0/416

Sacrifices the knight to strengthen his attack by the idle rook. Both bishop
and rook are now very strong.

80.P3fx3g+         0/415        4/420
81.R3hx3g          0/415        0/420
82.P*3e            0/415        11/431
83.R3gx3e          4/419        0/431
84.P*3d            0/419        1/432
85.R3e-3f          0/419        0/432
86.R6b-6a          0/419        1/433

It is painful to have to play a defense only move in a position like this, but
there is no other defense against Px5d (Gx5d P*5e). If Sanada would have played
the variation above, this rook would already have been on 6a.

87.P*1d            5/424        0/433
88.P*6d            0/424        6/439
89.S6f-7g          7/431        0/439
90.P6dx6e          0/431        1/440
91.P*6b            9/440        0/440
92.R6a-7a          0/440        3/443
93.P*3c            3/443        0/443
94.G3bx3c          0/443        6/449
95.L1ix1f          0/443        0/449
96.B8bx5e          0/443        2/451
97.P1d-1c+         0/443        0/451
98.L1bx1c          0/443        2/453
99.P*1d            0/443        0/453
100.L1cx1d         0/443        0/453
101.L1fx1d         0/443        0/453
102.P*1c           0/443        0/453
103.L*4d           0/443        0/453
104.P*7f?	   0/443        0/453
The losing move. A tesuji to mess up the Yagura castle, but this extra pawn
gives Tanigawa just the extra threats to win straight in the attack. After the
simple Px1d, things would have not been that easy for Tanigawa.

105.G6gx7f         2/445        0/453
106.S5cx4d         0/445        0/453
107.P4ex4d         0/445        0/453
108.B5ex4d         0/445        0/453
109.P2e-2d         2/447        0/453
110.P1cx1d         0/447        3/456
111.P*1c           1/448        0/456
112.N2ax1c         0/448        0/456
113.P6b-6a+        0/448        0/456
114.R7ax7d         0/448        7/463
115.B2fx4d         3/451        0/463
116.G4cx4d         0/451        0/463
117.B*5a           0/451        0/463
118.G3cx2d         0/451        3/466
119.S*3c           1/452        0/466
120.B*6i           0/452        6/472

A desperate attack which has no chance of succeeding.

121.S3cx2b+       3/455        0/472
122.K1ax2b         0/455        0/472
123.S*3c           0/455        0/472
124.K2b-1b         0/455        0/472
125.B5a-4b+!       6/461        0/472

Of course Tanigawa does not hesitate. 125.R3i? would have been very bad after
Bx7h+ Kx7h N*6f Gx6f Px6f and now S*6g is a mating threat.

126.R7d-7b         0/461        3/475
127.+P6a-6b        1/462        0/475
128.R7bx6b         0/462        2/477
129.+B4b-5c        0/462        0/477
130.B6ix7h+        0/462        2/479
131.K8hx7h         0/462        0/479
132.N*6f           0/462        0/479
133.G7fx6f         1/463        0/479
134.P6ex6f         0/463        0/479
135.+B5cx6b        0/463        0/479
136.S*6g           0/463        0/479
137.K7h-8h         0/463        0/479
Resigns            0/463        0/479
Time:              07:43:00     07:59:00