10th Ryu-O Match Game 2
Black: Tanigawa, Ryu-O
White: Sanada, Challenger
10th Ryu-O sen, Game 2, October 28th and 29th 1997
1.P7g-7f           0/0          0/0
2.P8c-8d           0/0          2/2
3.G6i-7h           2/2          0/2
4.G4a-3b           0/2          2/4
5.S7i-6h           7/9          0/4
6.P3c-3d           0/9          2/6
7.B8h-7g           0/9          0/6

In the first game of this match, it was kind of surprising to see Tanigawa
choose a Furibisha strategy. Since this is not his natural strategy, he was
expected to use it only if he would get a comfortable lead in the match. This
game's opening is no surprise, though. Tanigawa is a specialist in the
Kakugawari (Bishop Exchange) opening.

8.P8d-8e           0/9          3/9
9.S3i-3h           1/10         0/9
10.S7a-7b          0/10         1/10
11.P2g-2f          7/17         0/10
12.B2bx7g+         0/17         2/12
13.S6hx7g          0/17         0/12
14.S3a-4b          0/17         0/12
15.P1g-1f          9/26         0/12
16.P1c-1d          0/26         2/14
17.P9g-9f          10/36        0/14
18.P9c-9d          0/36         4/18
19.P4g-4f          11/47        0/18
20.P6c-6d          0/47         7/25
21.S3h-4g          9/56         0/25
22.S7b-6c          0/56         0/25
23.K5i-6h          4/60         0/25
24.G6a-5b          0/60         7/32
25.S4g-5f          12/72        0/32
26.S4b-3c          0/72         3/35
27.G4i-5h          4/76         0/35
28.K5a-4b          0/76         1/36
29.K6h-7i          4/80         0/36
30.S6c-5d          0/80         3/39
31.P6g-6f          16/96        0/39
32.P7c-7d          0/96         14/53
33.P4f-4e          30/126       0/53

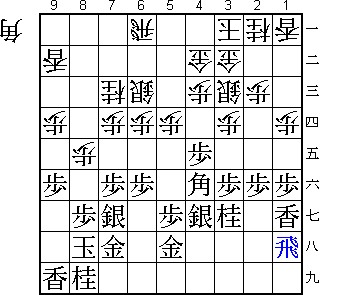
Aggresive, Tanigawa-like opening play. Since white has not played the 4d pawn,
black takes control of the center. White's position is very strong, though and
hard to break down.

34.N8a-7c          0/126        19/72
35.P3g-3f          12/138       0/72
36.K4b-3a          0/138        10/82
37.N2i-3g          6/144        0/82
38.R8b-6b          0/144        27/109
39.B*4f            11/155       0/109

Strong square to drop the bishop. It seems Sanada had nothing special against
Tanigawa's strategy and is forced into a waiting game (sakusen-make).

40.R6b-6a          0/155        22/131
41.K7i-8h          10/165       0/131
42.L9a-9b?!        0/165        8/139

Criticized by Morishita, whi felt that immediately 42.S6c followed by P5d
would have been better.

43.R2h-4h          8/173        0/139
44.G5b-4b          0/173        32/171

All waiting moves by white. He can only be patient until black starts the
attack.

45.L1i-1g          59/232       0/171

Tanigawa decides that attacking on the edge is more promising than attacking
through the center.

46.S5d-6c          0/232        54/225

The sealed move and a subtle defense move. 46.K2b is not so good, because of
47.N2e S2d S5e which favours black.

47.S5f-4g          18/250       0/225

Another preparation move, this time to defend the head of the knight against
a later pawn drop on 3f.

48.P5c-5d          0/250        9/234
49.R4h-1h          13/263       0/234

50.S3c-2d          0/263        33/267
51.P2f-2e          9/272        0/267
52.S2d-3c          0/272        2/269
53.P1f-1e          34/306       0/269
54.P1dx1e          0/306        6/275
55.L1gx1e          0/306        0/275
56.L1ax1e          0/306        1/276
57.R1hx1e          0/306        0/276
58.P*1c            0/306        0/276
59.R1e-1i          7/313        0/276
60.R6a-8a          0/313        5/281
61.P*1b            2/315        0/281
62.S3c-2b          0/315        1/282
63.P3f-3e          14/329       0/282
64.P3dx3e          0/329        3/285
65.B4fx3e          1/330        0/285
66.G4b-5b          0/330        5/290
67.P4e-4d          5/335        0/290
68.P4cx4d          0/335        26/316
69.B3ex4d          1/336        0/316
70.L*4b            0/336        45/361

71.B4dx2b+!        7/343        0/361

Strong bishop sacrifice and the only way to continue the attack.

72.K3ax2b?         0/343        2/363

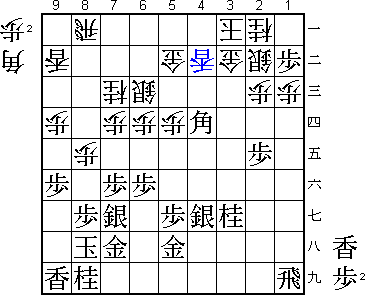
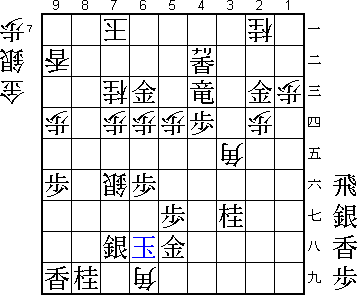
Better would have been 72.Gx2b. After 73.P1a+ Lx4g+ Gx4g P8f Sx8f B*5h the
position can go either way.

73.P1b-1a+         10/353       0/363
74.K2bx1a          0/353        0/363
75.P2e-2d?         0/353        0/363

If Tanigawa would have played 75.P*3c Gx3c P*1d Px1d Rx1d P*1c P*3d G3b S*3c
Nx3c Px3c+ Gx3c L*3f he would have won quickly. "I should have looked at that
more carefully" -Tanigawa. Now Sanada gets chances to get back in the game.

76.K1a-2b          0/353        10/373
77.P2dx2c+         2/355        0/373
78.G3bx2c          0/355        0/373
79.P*2d            2/357        0/373
80.G2cx2d          0/357        0/373
81.L*2h            0/357        0/373
82.P*2c            0/357        1/374
83.L2hx2d          9/366        0/374
84.P2cx2d          0/366        0/374
85.S*3d            0/366        0/374
86.P*3c!           0/366        13/387

Strong defense. After this, black is struggling to make his attack work.

87.G*2c            13/379       0/387
88.K2b-3a          0/379        0/387
89.S3dx3c+         0/379        0/387
90.K3a-4a          0/379        4/391
91.P*4c            4/383        0/391
92.L4bx4c          0/383        8/399
93.+S3cx4c         1/384        0/399
94.G5bx4c          0/384        0/399
95.P*4d            0/384        0/399
96.G4cx4d          0/384        4/403
97.L*4f            0/384        0/403
98.K4a-5b          0/384        4/407
99.L4fx4d          0/384        0/407
100.B*5e?          0/384        1/408

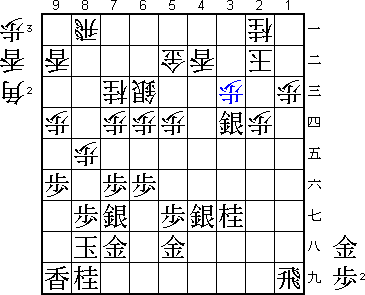
Great move, but at the wrong time. If white would have played 100.P8f first,
the outcome of the game would have been very doubtful after 101.Sx8f (Px8f
P*8e is very difficult to defend) B*5e L4b+ Kx4b N4e S*4d R3i P*3h Rx3h P*3g
(diagram).

101.L4d-4b+        17/401       0/408
102.K5b-6b         0/401        17/425

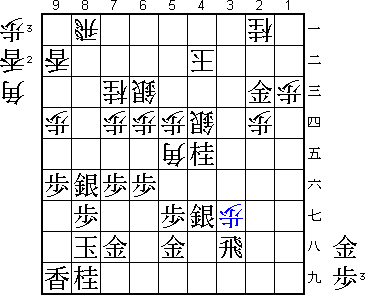
The difference with the variation above is that with the silver still
defending the pawn on 6f, so in contrast to the diagram above, black can win
the bishop by P5f, so white can not take the lance here.

103.S4g-4f!        10/411       0/425

Great silver sacrifice adding decisive strength to black's attack.

104.B5ex4f         0/411        7/432
105.R1i-4i         0/411        0/432
106.B4f-3e         0/411        7/439
107.R4i-4c+        0/411        0/439
108.P8e-8f         0/411        1/440
109.S7gx8f         3/414        0/440
110.L*8d           0/414        4/444
111.P*4d           7/421        0/444
112.L8dx8f         0/421        7/451
113.P8gx8f         0/421        0/451
114.S*6i           0/421        2/453
115.G*5c           7/428        0/453
116.K6b-7a         0/428        0/453
117.G5cx6c         0/428        0/453

It is close, but white has no mate and no defense.

118.R8ax8f         0/428        4/457
119.P*8g           4/432        0/457
120.S6ix7h+        0/432        10/467
121.K8hx7h         0/432        0/467
122.R8fx8g+        0/432        0/467
123.K7hx8g         0/432        0/467
124.B*6i           0/432        1/468
125.S*7h           4/436        0/468
126.P*8f           0/436        4/472
127.K8gx8f         0/436        0/472
128.S*8e           0/436        5/477
129.K8f-7g         0/436        0/477
130.S8ex7f         0/436        0/477
131.K7g-6h         0/436        0/477
Resigns            0/436        1/478
Time:              07:16:00     07:58:00

The king runs away to safety on the right side of the board. With a pile of
pieces in black's hand, white has no chance to defend.
